

Setting up an SMTP relay in Office 365 is essential for organizations aiming to facilitate seamless email delivery from devices like multifunction printers, scanners, or line-of-business applications. This guide provides a detailed walkthrough to help you configure SMTP relay effectively, ensuring secure and reliable email transmission.
Understanding SMTP Relay in Office 365
SMTP relay allows devices and applications within your organization to send emails through Office 365 without the need for individual mailboxes. This method is particularly useful for:
- Multifunction devices (e.g., printers, scanners) that need to send emails.
- Applications that generate automated emails (e.g., alerts, notifications).
- Systems that require sending emails to internal or external recipients.
By configuring SMTP relay, you ensure that these devices and applications can send emails efficiently, leveraging Office 365’s infrastructure.
Why Use SMTP Relay in Office 365?
Configuring SMTP relay in Office 365 offers multiple benefits:
- Improved Deliverability: Emails sent through Office 365 SMTP relay are less likely to be flagged as spam.
- Centralized Management: Consolidate email traffic through Office 365 for streamlined administration.
- Security and Compliance: Enforce encryption and authentication to meet regulatory requirements.
- Device Compatibility: Supports email delivery from multi-function printers, scanners, and business applications.
SMTP Relay Options in Office 365
Office 365 provides three main options for configuring email relays:
- SMTP Relay with Office 365:
- Suitable for devices and applications that send email to recipients both inside and outside your organization.
- Requires configuring connectors in the Exchange admin center.
- Direct Send:
- Ideal for sending emails within your organization.
- Does not require connectors but doesn’t support external recipients.
- SMTP Client Submission:
- Uses a licensed Office 365 mailbox for email relay.
- Requires authentication with a username and password.
Prerequisites for SMTP Relay
Before setting up SMTP relay, ensure you have the following:
- Office 365 Subscription: An active subscription with administrative access.
- Static Public IP Address: The device or application sending emails should have a static IP address.
- MX Record Information: Access to your domain’s MX record, which will be used as the SMTP server address.
- Firewall Configuration: Ensure that TCP port 25 is open on your network firewall to allow SMTP traffic.
- SPF Record Update: Add the device’s IP address to your domain’s SPF record to prevent email spoofing
Step-by-Step Guide to Configure SMTP Relay
1. Create a New Connector in Exchange Admin Center
- Log in to the Exchange Admin Center:
- Authenticate using your administrator credentials.
- Navigate to Mail Flow > Connectors:
- Click “+ Add a Connector” and select “From Your Organization’s Email Server to Office 365.”
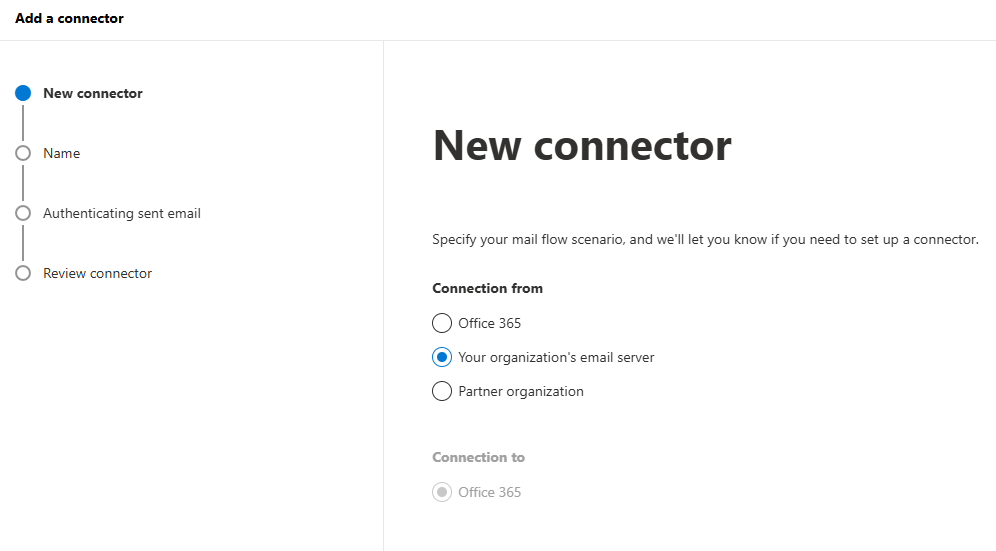
- Configure Connector Settings:
- Name the Connector: Use a descriptive name, such as “SMTP Relay for Applications.”
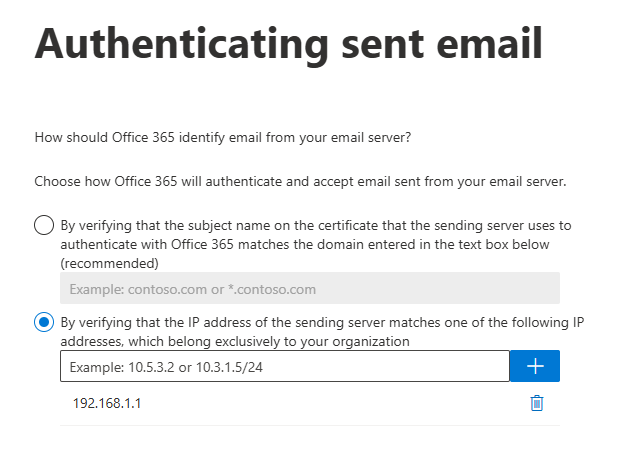
- Authenticating sent emails: Add the public IP address of your device or application or add the full domain name.
- Review Connector: Review the connector configuration and create the connector.

- Validate the Configuration:
- Test the connector by sending a test email from your device or application.
- Use logs to verify successful delivery.
2. Direct Send Configuration
- SMTP Server Address: Use
smtp.office365.com. - Port Number: Set to 25.
- No Authentication Required: Direct Send doesn’t require a username or password.
- TLS Encryption: Ensure your device supports TLS.
3. SMTP Client Submission
- SMTP Server Address: Use
smtp.office365.com. - Port Number: Set to 587.
- Enable Authentication: Use the licensed mailbox credentials.
- TLS Encryption: Ensure encryption is enabled.
Example Configuration:
SMTP Server: smtp.office365.com

Port: 587

Username: your-email@yourdomain.com

Password: ********

TLS: EnabledComparison of Methods
| Feature | SMTP Client Submission | SMTP Relay | Direct Send |
|---|---|---|---|
| Send to internal & external | ✔ | ✔ | ✘ |
| Requires mailbox | Yes | No | No |
| Requires connector | No | Yes | No |
| Authentication required | Yes | Yes | No |
| Port | 587/25 | 25 | 25 |
| Can bypass spam filters | Yes (internal) | Limited | No |
| SPF recommended | Optional | Yes | Yes |
Troubleshooting Common Issues
- Emails Not Delivered:
- Verify that the device’s IP address is correctly added to the connector and SPF record.
- Ensure that port 25 is open and not blocked by your ISP or firewall.
- Authentication Errors:
- Confirm that the device is not attempting to use SMTP authentication, as the connector relies on IP-based authentication.
- Emails Marked as Spam:
- Ensure that your SPF record is correctly configured.
Consider setting up DKIM and DMARC records for additional email authentication
Best Practices for SMTP Relay Configuration
- Restrict IP Access: Whitelist only trusted IP addresses to prevent unauthorized access.
- Monitor Logs: Regularly check email traffic logs for suspicious activities.
- Use Secure Authentication: Opt for certificate-based authentication wherever possible.
- Update SPF Records: Add the necessary entries to your domain’s SPF record to enhance email deliverability.
Conclusion
Setting up SMTP relay in Office 365 ensures that your organization’s email system remains secure, reliable, and optimized. By following the steps outlined above, you can configure SMTP relay in Microsoft 365, improve email deliverability, and prevent issues like email spoofing or unauthorized access. Whether you’re troubleshooting Microsoft 365 SMTP relay or implementing O365 SMTP relay, these best practices will help streamline your email processes and ensure smooth communication within your organization.
FAQs
- What is the SMTP server for Office 365?
The SMTP server address is smtp.office365.com. - Can I use SMTP relay for external recipients?
Yes, SMTP relay supports both internal and external recipients when configured properly. - What port should I use for SMTP relay in Office 365?
Use port 25 for SMTP relay and port 587 for SMTP Client Submission. - Do I need a licensed mailbox for SMTP relay?
No, a licensed mailbox is only required for SMTP Client Submission, not for SMTP relay or Direct Send. - How can I troubleshoot email delivery issues?
Check logs in the Exchange admin center, validate SPF records, and verify connector configurations.
Related URLs:-
- How to Add a Domain to Office 365: A Step-by-Step Guide
- A Beginner’s Guide to Exchange Online: Everything You Need to Know
- Mail Flow Rules in Exchange Online: A Comprehensive Guide
- How to Run Extended Message Trace in Microsoft 365
Enjoyed the article?
We’d love to hear your thoughts—share your comments below!
For more insights, guides, and updates from the Microsoft ecosystem, be sure to subscribe to our newsletter and follow us on LinkedIn. Stay connected and never miss out on the latest tips and news!


Excellent guide on configuring SMTP relay in Office 365! The steps are clearly written and the screenshots add a lot. One suggestion—could you include the differences between using a connector vs. direct send for common scenarios? That would help readers choose the right option. Thanks for a great walkthrough
Thanks for the kind words! I’m glad the guide was helpful. That’s a fantastic idea—I’ll add a section comparing connector-based relay and direct send to highlight when each approach works best. Appreciate you taking the time to comment!