As a Microsoft 365 Engineer, I’ve worked with many organizations handling employee offboarding. One common challenge arises when an employee leaves the company.
In many cases, organizations either delete the user account to save on licensing costs or temporarily reset the password and assign access to another employee. However, this approach is not secure, not scalable, and can lead to compliance issues.
Larger organizations usually have a dedicated IT team that follows a structured offboarding process, including archiving data and properly managing access. But smaller organizations often lack these resources and need a quick, safe, and effective way to transfer ownership of a departing employee’s mailbox and data.
In this guide, I’ll walk you through:
- What a user mailbox is
- How to convert a user mailbox to a shared mailbox
- How to safely remove the license
- How to delegate access to other users
- And how to create shared mailboxes for team collaboration
This step-by-step guide is designed to be simple, practical, and easy to follow, even if you don’t have a full IT team.
What is a Shared Mailbox in Microsoft 365?
A shared mailbox is an email inbox that multiple users can access to send and receive emails. It is commonly used for:
- Departmental communication (e.g., support@mscloudexplorers.com, hr@mscloudexplorers.com, info@mscloudexplorers,com)
- Customer service operations
- Project-based communication
- Internal team collaboration
Unlike standard user mailboxes, shared mailboxes do not require a license if:
- The mailbox size is under 50 GB
- No direct user sign-in is enabled
Shared mailboxes are managed by administrators and accessed through delegated permissions rather than direct credentials. boxes, shared mailboxes do not require a license if the size is under 50GB and no direct login is required. User can follow the step-by-step guide to access the shared mailbox on Outlook.
The Reasons for Converting a User’s Mailbox to a Shared One?
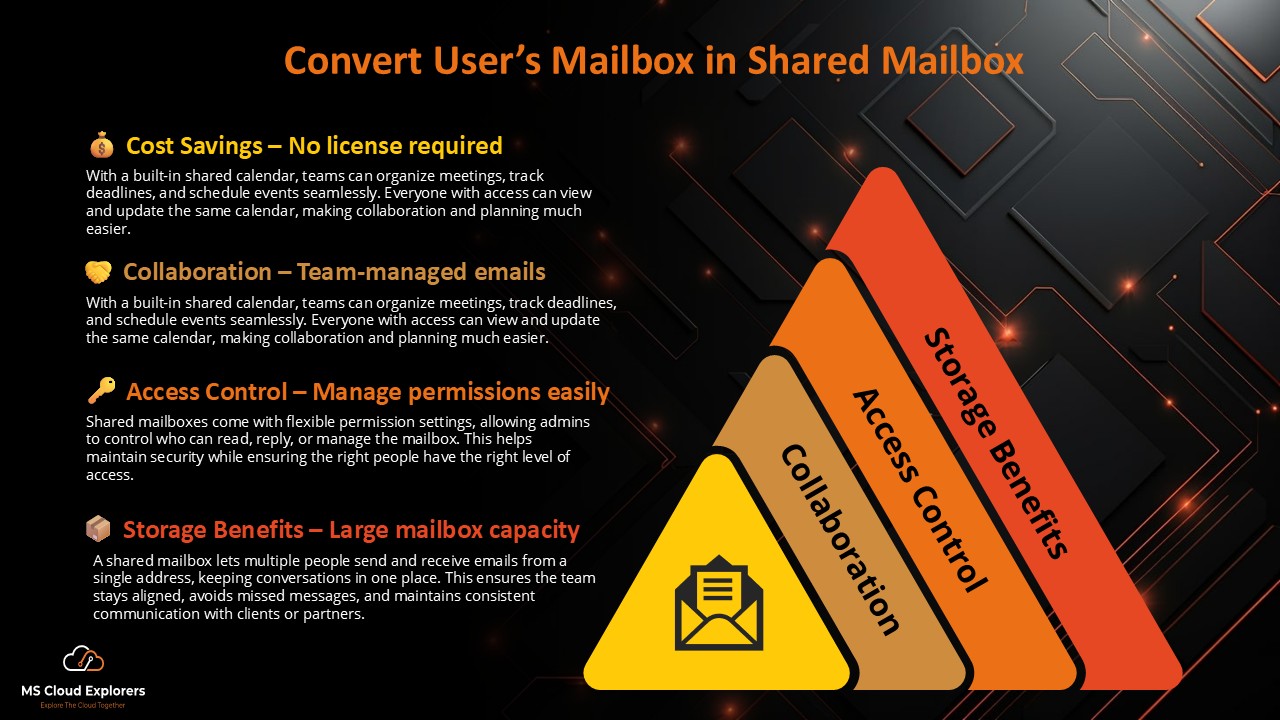
Converting a User Mailbox to a Shared Mailbox offers several organizational and operational benefits:
- Cost Savings – No license required for shared mailboxes under 50 GB
- Improved Collaboration – Multiple users can Monitor and manage emails together
- Centralized Access Control – Admins can assign granular permissions from the admin center
- Data Retention – Preserve mailbox data after employee exit (for the security purpose Blocked the account only provide delegated access to other employees if needed)
- Compliance Requirements – Maintain records without deleting mailboxes
- Operational Continuity – Business emails remain accessible after offboarding
Prerequisites for Converting a User Mailbox to a Shared Mailbox
Before converting a User Mailbox to a Shared Mailbox, ensure the following:
- You have Exchange Administrator or higher privileges
- The mailbox is not actively being used by a signed-in user
- The mailbox size is under 50 GB
- If the mailbox exceeds 50 GB, an Exchange Online Plan 2 license is required
- The user account is not required for interactive sign-in
Here are the steps on how to convert a User Mailbox to a Shared Mailbox
- Access Microsoft Exchange Online admin Center
- Log in to the Microsoft Exchange Admin Center.
- Navigate to Recipients > Mailboxes.
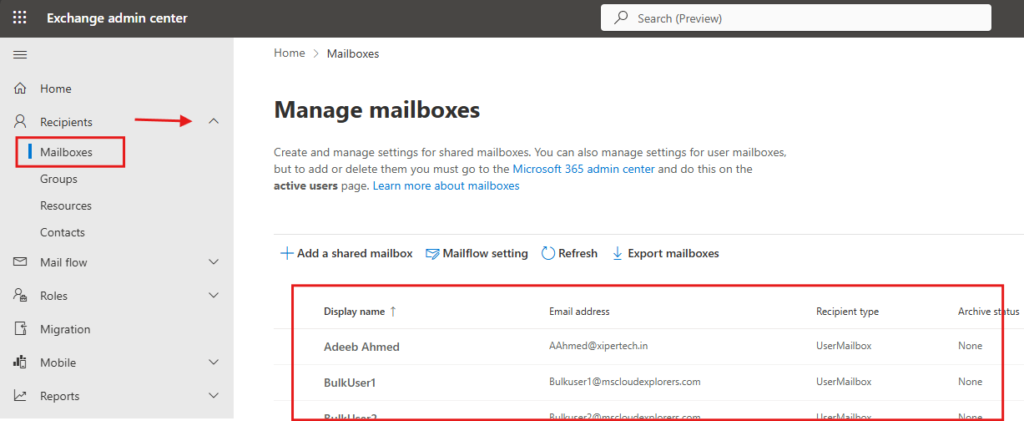
- Select the User Mailbox
- Find the user mailbox you want to convert.
- To view the user’s properties, click on their name.
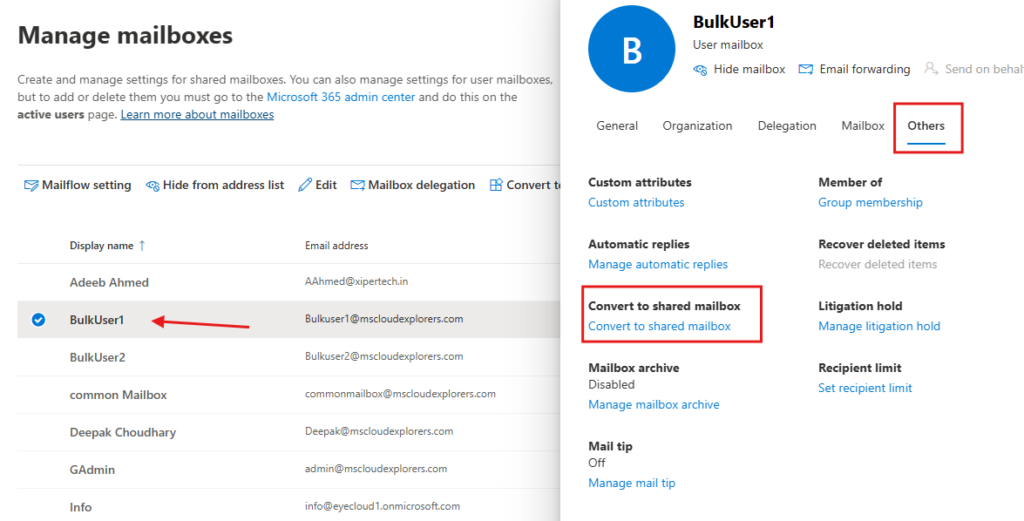
- Convert the Mailbox
- Go to the Others Settings tab.
- Under Convert to Shared mailbox, click on Convert to Shared Mailbox.
- Follow the same steps to Convert to Shared Mailbox to User Mailbox (In the future, if the employee returns)
- Confirm the action to proceed.
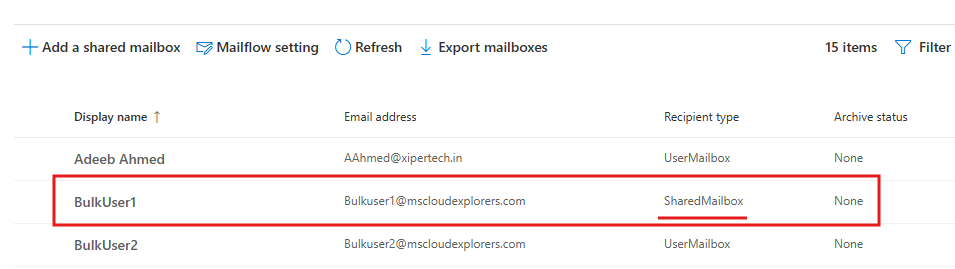
- Verify the Conversion
- Once the conversion is complete, verify the mailbox status.
- Check under Mailboxes in the Exchange Admin Center to ensure the mailbox is listed as Shared.
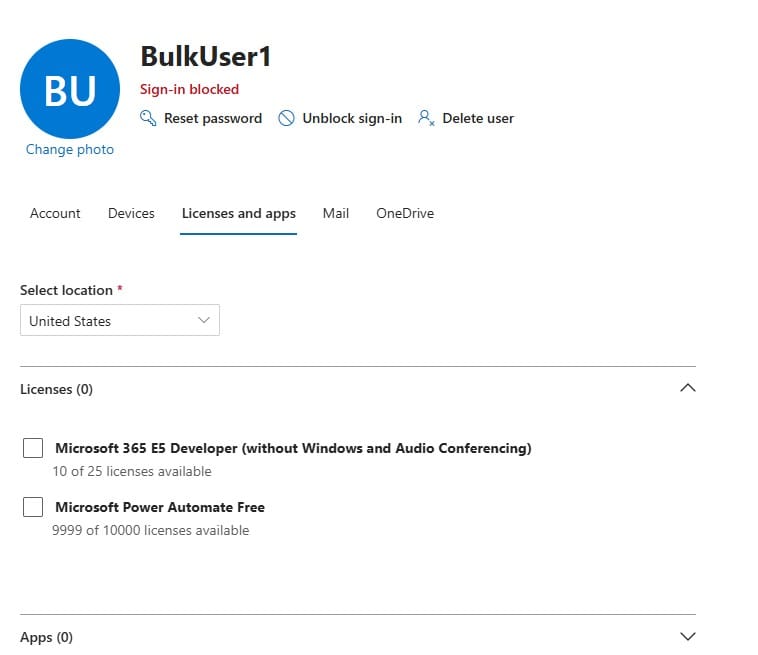
How to remove safely remove License of Shared Mailbox
- Login to Microsoft 365 admin Portal and go to Active Users.
- Select the user account and go to Licenses and apps tab.
- Uncheck all of the license and block the account
Converting a User’s Mailbox to a Shared Mailbox with PowerShell Commands
For administrators comfortable with PowerShell, the following steps can be used to convert mailboxes:
Step 1: Connect to Exchange Online PowerShell
Run the following command to connect:
Connect-ExchangeOnline -UserPrincipalName admin@yourdomain.com -ShowProgress $trueStep 2: Convert the Mailbox
Use the Set-Mailbox command to convert the mailbox:
Set-Mailbox -Identity user@yourdomain.com -Type SharedStep 3: Verify the Conversion
Check the status of the mailbox to confirm it is shared:
Get-Mailbox -Identity user@yourdomain.com | Format-Table Name, RecipientTypeDetailsConvert Back Shared mailbox to User mailbox (If needed later)
Set-Mailbox "sharedmailbox@domain.com" -Type RegularIf you don’t have the Exchange Online module installed in PowerShell, check out this guide on how to install PowerShell modules.
Additionally, if you’re looking to create a new shared mailbox in Microsoft 365, check out this step-by-step guide.
Managing Permissions for the Shared Mailbox
Once the mailbox is converted, assign permissions to users who need access by following these steps:
Managing Mailbox Permissions from Exchange Admin Portal.
Follow these steps to manage and delegate mailbox permissions using the Exchange Admin Center:
- Sign in to the Exchange Admin Center
- Navigate to:
Exchange Admin → Mailboxes - Select the mailbox you want to delegate access to
- Open the Delegation tab
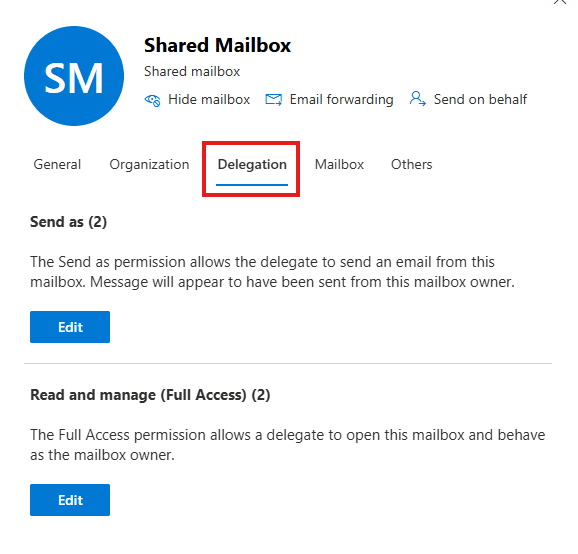
Delegate Access Based on Business Requirements
From the Delegation tab, assign permissions according to your needs:
Manage User delegation Access
- Send on Behalf – Allows users to send emails on behalf of the mailbox
- Full Access – Allows users to open and manage the mailbox
- Send As – Allows users to send emails as the mailbox
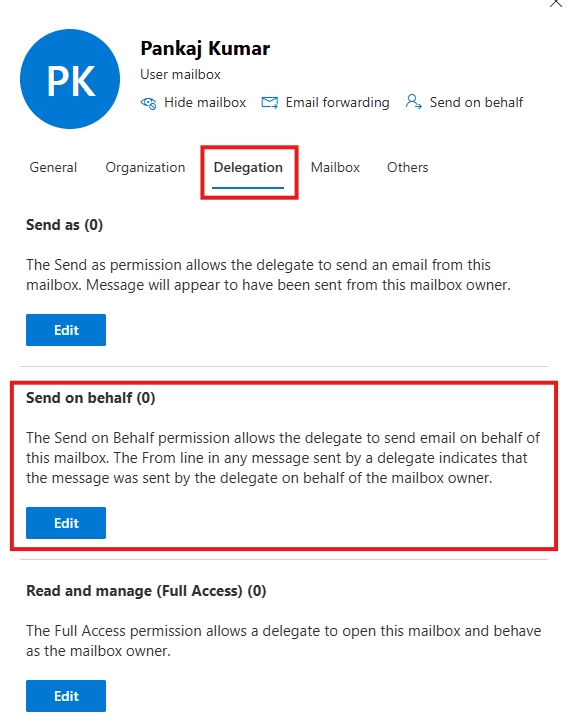
📌 Note: If you grant delegation access to a user mailbox, you will see the additional “Send on Behalf” permission option. This option is not available for all mailbox types.
Manage the Delegated Access Directly from Microsoft 365 Admin Center
You can also manage delegation access directly from Microsoft 365 Admin center.
- Go to the Microsoft 365 Admin Center > Teams & Groups > Shared Mailboxes.
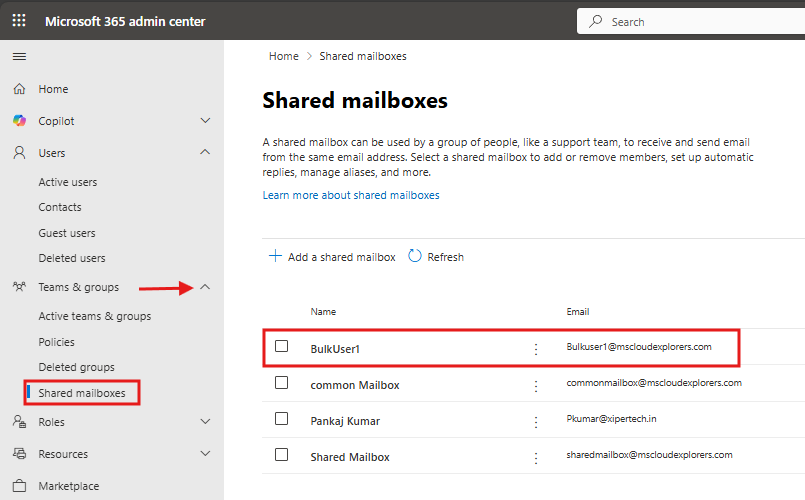
- Select the shared mailbox and click on “Edit” under “Members.”
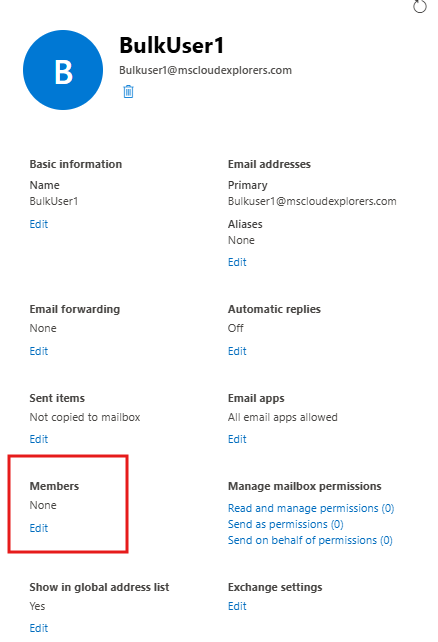
- When you add a member to the shared mailbox, they will automatically have “Read and Manage” and “Send As” permissions. You can manage this access from the “Manage mailbox permissions” settings in the user properties.
- Here’s an explanation of each permission:
- Full Access or Read and Manage: Enables users to open and manage the mailbox.
- Send As: Enables users to send emails as the shared mailbox.
- Send on Behalf: Enables users to send emails on the shared mailbox’s behalf.
Using PowerShell for Permissions
Assign permissions using the following PowerShell commands:
- Full Access:
Add-MailboxPermission -Identity sharedmailbox@yourdomain.com -User user@yourdomain.com -AccessRights FullAccessSend As:
Add-RecipientPermission -Identity sharedmailbox@yourdomain.com -Trustee user@yourdomain.com -AccessRights SendAsBenefits of Shared Mailboxes
- Centralized Communication: Teams can collaborate more efficiently by managing emails in one location.
- Enhanced Flexibility: Users can access shared mailboxes across devices and applications.
- No Additional Costs: Shared mailboxes under 50GB do not require additional licenses.
- Seamless Integration: Shared mailboxes integrate seamlessly with Outlook and Microsoft Teams.
Common Issues and Troubleshooting
Email address not available because it’s used by Other user
When you have multiple domains in your Microsoft 365 tenant and need to create a mailbox with the same name across different domains (for example, info@mscloudexplorers.com and info@msce.com), you may encounter an error stating that the email address is already in use.
This happens because Microsoft 365 uses the alias of primary domain while creating the shared mailbox. In such scenarios, you can create the mailbox using Exchange Online or PowerShell, where you have more flexibility to assign the required alias. Or Create the mailbox with a temporary or unique username. After creation, update the primary email address and alias to match the desired domain (e.g., info@msce.com).
Conclusion
Converting a user mailbox to a shared mailbox in Microsoft 365 is a practical and efficient solution for managing employee offboarding without losing access to critical business data.
Instead of deleting accounts or sharing login credentials, this approach allows you to retain emails, remove unnecessary license costs, and securely grant access to other users. Whether you choose the Microsoft 365 Admin Center or PowerShell, the process is straightforward and can be implemented with minimal effort.
For organizations without a dedicated IT team, this method provides a simple, secure, and scalable way to handle departing employees while maintaining control over mailbox data and access permissions.
By incorporating shared mailboxes into your workflow, you can improve collaboration, ensure continuity, and streamline user management across your organization.
FAQs
- What does “User Mailbox to a Shared Mailbox” mean?
It means converting a licensed Microsoft 365 user mailbox into a shared mailbox that multiple users can access without requiring a license. - Does a shared mailbox require a license?
No. A shared mailbox does not require a license if:- The mailbox size is under 50 GB
- Direct sign-in is not enabled
- Can I convert a shared mailbox back to a user mailbox?
Yes. You can convert a shared mailbox back to a user mailbox using the same process.
However, you must assign a Microsoft 365 license first before converting it back to a user mailbox. - Is email data lost during conversion?
No. All emails, folders, and existing permissions are preserved during the conversion process. - Does a shared mailbox get added to Outlook automatically?
- ✅ Outlook Classic and New Outlook (Desktop App): Yes, shared mailboxes are added automatically (auto-mapping enabled).
- ❌ Outlook Web (OWA), and Mobile Apps: No, the shared mailbox must be added manually.
Related URLs:-
- How to access shared Mailbox outlook (Step-by-Step Guide)
- Microsoft Exchange Overview Guide Everything you need know
- Step by Step Guide Managing Outlook Rules from Exchange Admin
- Step-by-Step Guide to Create Microsoft 365 Accounts and Groups
Enjoyed the article?
We’d love to hear your thoughts—share your comments below!
For more insights, guides, and updates from the Microsoft ecosystem, be sure to subscribe to our newsletter and follow us on LinkedIn. Stay connected and never miss out on the latest tips and news!

4 comments on “Convert User Mailbox to a Shared Mailbox in Microsoft 365 (Step-by-Step Guide 2026)”