

Microsoft Sensitivity Labels offer a powerful solution to classify, protect, and manage access to critical documents and emails. This guide will explore how Sensitivity Labels work in Microsoft Office, their benefits, the setup process, and best practices for implementation.
Understanding Microsoft Sensitivity Labels
What Are Sensitivity Labels?
Microsoft Sensitivity Labels are part of the Microsoft Information Protection (MIP) framework, allowing organizations to classify and protect data based on sensitivity levels. These labels ensure that sensitive information is handled properly and remains secure within Microsoft 365 applications.
Key Features and Benefits
- Data Classification: Labels help categorize documents and emails as Confidential, Public, Internal, or Restricted.
- Protection Mechanisms: Labels enforce encryption, access restrictions, and visual markings (headers, footers, watermarks).
- User Guidance: Provides in-app prompts to educate users on appropriate labeling.
- Compliance Support: Helping businesses in complying to data protection laws such as HIPAA and GDPR.
How Sensitivity Labels Work in Microsoft Office
Applying Sensitivity Labels to Documents
Users can manually or automatically apply Sensitivity Labels to files in Word, Excel, and PowerPoint, ensuring appropriate security measures are in place.
Sensitivity Labels in Microsoft Word, Excel, and PowerPoint
- Labels appear in the toolbar for easy access.
- Visual indicators like watermarks and headers notify users of document sensitivity.
- Encryption can restrict unauthorized access.
Email Protection with Sensitivity Labels in Outlook
- Labels apply encryption to emails containing sensitive information.
- Users can prevent forwarding or copying of classified emails.
- DLP (Data Loss Prevention) policies work alongside labels for enhanced security.
Setting Up Sensitivity Labels in Microsoft 365
Prerequisites for Using Sensitivity Labels
- Microsoft 365 E3 or E5 or Business Premium license with MIP capabilities.
- Admin access to the Microsoft Purview compliance center.
Default Sensitivity Labels in Microsoft 365
If you are a Microsoft 365 E3 or E5 subscriber, you should see several default labels that you can use right away. These act as a baseline protection structure that you can refine to meet your business needs:
| Label Name | Applies To | Purpose |
| Personal | Files, Emails, Meetings | For personal, non-business data |
| Public | Files, Emails, Meetings | For content safe to share publicly |
| General | Files & Emails | For internal content that isn’t sensitive |
| Confidential | Files & Emails | For business-sensitive data like contracts |
| Highly Confidential | Files & Emails | For extremely sensitive data like credentials |
These labels can be generated automatically from the Microsoft Purview portal if no custom labels exist yet, giving you a head start.
How to Create and Configure New Microsoft Sensitivity Labels
-
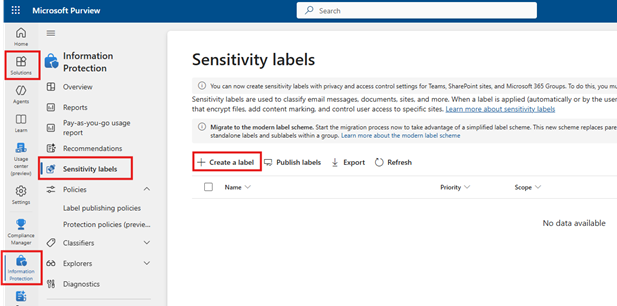
- Navigate to the Microsoft Purview compliance center.
-
- Select Information Protection > Sensitivity Labels.
-
- Click Create a Label and configure classification settings.
-
- Provide the Basic Details of the New Sensitivity Label
-
- Enter the label details as per your requirements.
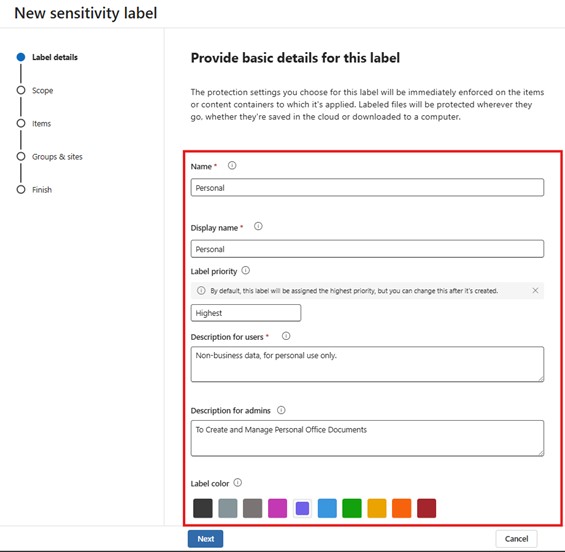
You can give the Label Details as per your requirement.
-
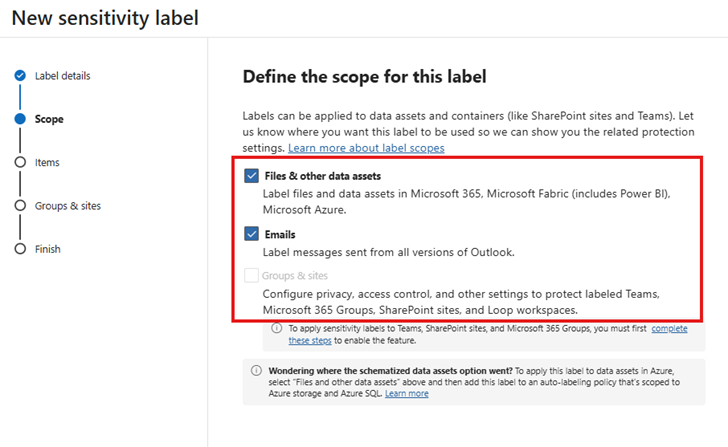
- Define the scope of the label. Follow the Additional Step to Enable the Scope for Groups and Sites.
-
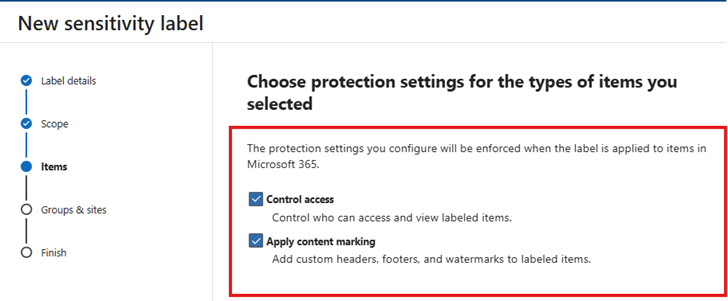
- Enable the Protection Settings options (Enable if Needed)
-
- If you selected these Above options. You also need to configure the settings for them.
-
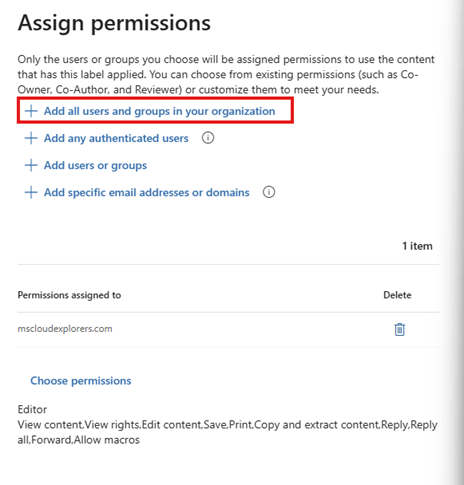
- In the Control Access section, leave the default options and click on Assign Permissions.
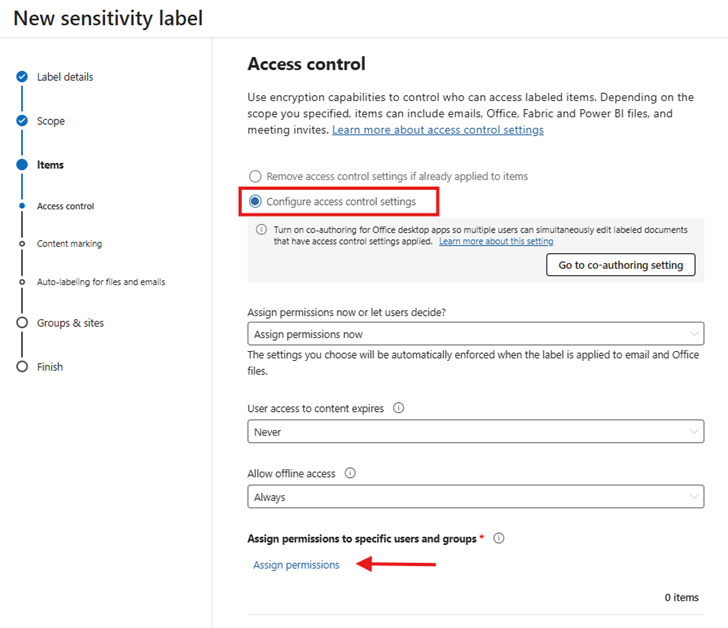
-
- You have multiple options when selecting the appropriate audience. In this example, I’ll click Add users and groups. After that, choose Select permissions to define the level of access for the selected group. You can pick from four built-in permission levels — Owner, Editor, Restricted Editor, or Viewer — or choose Custom if you need more granular control. For this demonstration, I’ve assigned all default permission levels.
-
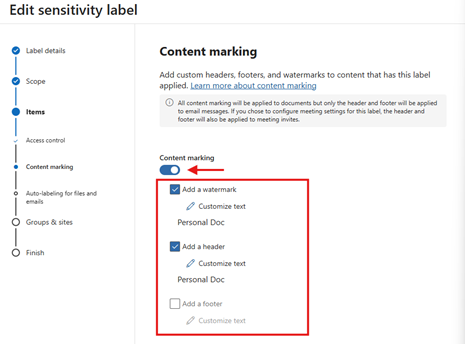
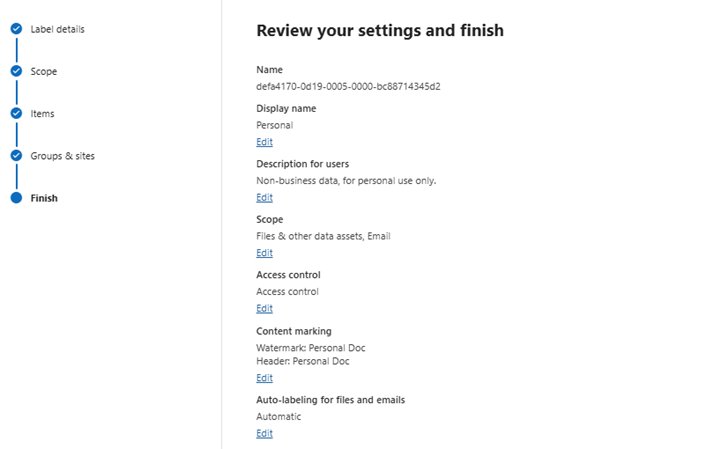
- Under Content Marking: Define the visual markings.
-
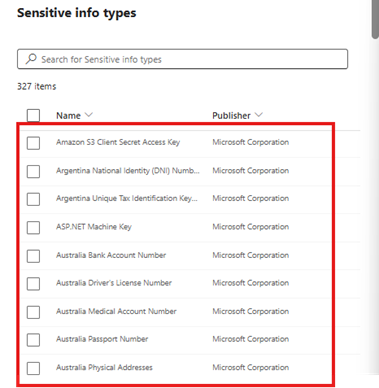
- Under Auto-Labeling: Select Add condition and add the Sensitive Information Types. Also, configure the display message when the label is applied.
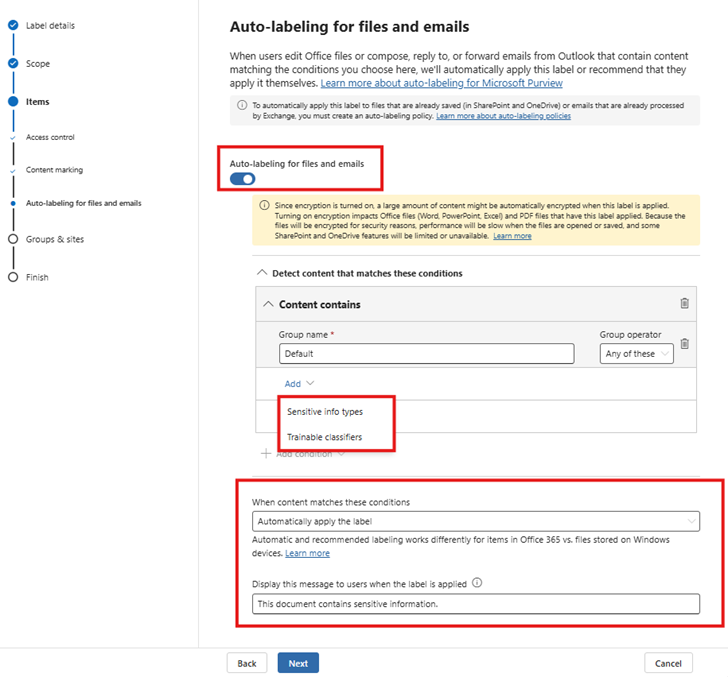
You can select multiple options under Sensitive Information Types. You can also create custom Sensitive Information Types based on your organization’s requirements.
Define the Containment Scope of the Sensitive Information:
Leave this setting untouched. Define protection settings for groups and sites.
Review the settings of the newly created label and click Create the Label.
-
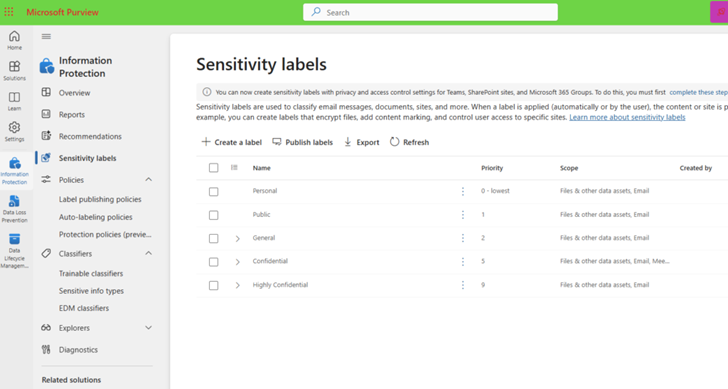
- Once the label is created, you should see it in the Sensitivity Labels section.

I have an E5 License that is the reason you can see Default Labels also. You can create new Labels or customize the Default Labels.
Assigning Microsoft Sensitivity Labels to Users
Once the labels are created, publish them so users can utilize them. To do so:
- Select the newly created label and click Publish at the top.
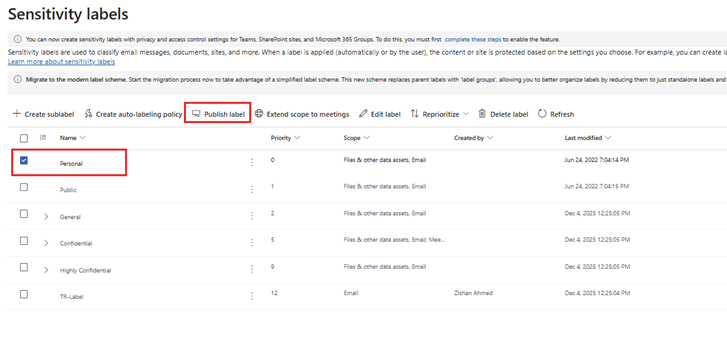
- In the Labels to Publish section, add additional labels if needed.
- Admin Units: Leave the Full Directory option selected.
- Users and Groups: Select the users you want to assign the labels to.
- In the settings, choose the options as needed

- Apply a default label to documents: This setting allows you to choose the default label you want to apply when a user opens or creates a new document. The default label will automatically apply to documents.
- Define the name and description for the policy, review it, and click Create.
Let’s see how Microsoft Sensitivity Labels works from the end users’ side
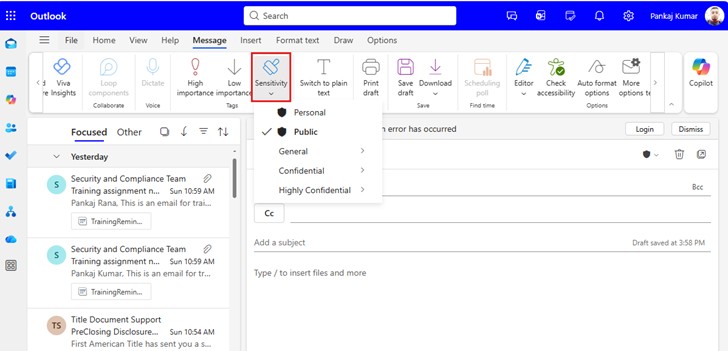
Once Sensitivity Labels are published, they should appear in the Office apps for users, including Outlook, Word, and Excel.
Outlook: Sensitivity Labels are visible in the Outlook interface, and users can easily apply the correct label to emails. Labels such as “Public” or “Confidential” will help users understand the sensitivity of the information in the email and guide them in applying the necessary protections (e.g., encryption or restricted permissions).
Word, Excel, and PowerPoint: In Office apps, Sensitivity Labels appear in the toolbar. Users can manually select the appropriate label for documents based on their content. The label may also trigger automatic actions like watermarking or restricting access to ensure data security.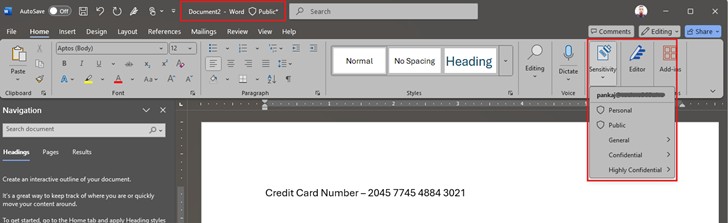
By default, a public label might be selected, but labels can be auto-applied based on content. For instance, if a document or email contains sensitive information, such as a credit card number, it will automatically be labeled as Confidential. This auto-labeling helps ensure that sensitive data is classified correctly, without requiring the user to manually apply the label every time.
Auto-Labeling for Microsoft Sensitivity Labels
Using AI-based auto-labeling, organizations can classify content based on keywords, content types, or metadata. This is Part of the Microsoft E5 plan only, and you may not be able to auto-apply if you have other subscriptions.
Labeling Policies and User Experience
- Mandatory labeling: Users must apply a label before saving a file.
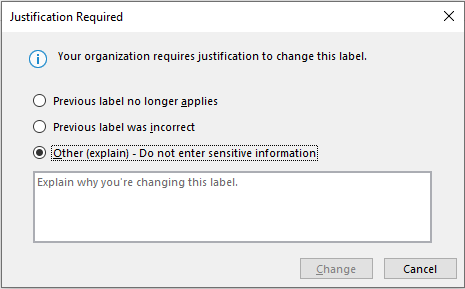
- Justifications for label changes: Users must explain why they downgrade sensitivity.
Microsoft Sensitivity Labels and Data Protection
How Sensitivity Labels Enhance Security
- Prevent unauthorized sharing of classified documents.
- Ensure compliance with industry regulations.
Encryption and Access Control Features
- Apply rights management to restrict viewing, editing, and sharing.
- Encrypt emails and files with Microsoft’s Azure Information Protection (AIP).
Integration with Microsoft Information Protection (MIP)
Sensitivity Labels integrate with DLP, AIP, and Conditional Access Policies to form a comprehensive security strategy.
Best Practices for Implementing Sensitivity Labels
- Educate Employees: Train staff on proper labeling and data handling.
- Manage Label Hierarchies: Define clear label categories and access permissions.
- Monitor Usage: Use Microsoft 365 compliance reports to track label application trends.
Common Challenges and Troubleshooting
Issues with Label Application
- Labels may not appear if policies are misconfigured.
- Users need an updated Microsoft Office version to see labels.
Troubleshooting Label Visibility in Office Apps
- Ensure Sensitivity Label policies are correctly published.
- Restart Office apps or clear cache to refresh label availability.
Resolving Access Problems with Labeled Documents
- Check if encryption settings restrict access to certain users.
- Adjust label permissions in Microsoft Purview compliance center.
Conclusion
Microsoft Sensitivity Labels provide a robust framework for data classification and protection in Microsoft Office. By implementing a well-structured labeling strategy, organizations can enhance security, ensure compliance, and improve data governance.
FAQs
- How do sensitivity labels differ from retention labels?
Sensitivity labels classify and protect data, while retention labels manage data lifecycle and deletion policies. - Can sensitivity labels be used with third-party apps?
Yes, Microsoft supports integrations through APIs and third-party security tools. - What happens if a document has multiple sensitivity labels?
A document can only have one sensitivity label at a time; the most restrictive label typically applies. - Can users override applied sensitivity labels?
Only if the admin allows it; some policies require justification for downgrading labels. - How do I remove a sensitivity label from a document?
If permitted, users can remove or change labels via Office apps or the compliance center.
Explore More from MS Cloud Explorers: –
- General Data Protection in Microsoft 365: Ensuring Data Privacy and Security
- Secure Sensitive Documents in SharePoint Online Using IRM: A Step-by-Step Guide
- How to Send Encrypted Email in Outlook: A Step-by-Step Guide for Beginners
- Microsoft Insider Risk Management: A Complete Guide to Prevent Insider Threats
- How to Setup Microsoft 365 Data Loss Prevention: A Complete step-by-step Guide
Enjoyed the article?
We’d love to hear your thoughts—share your comments below!
For more insights, guides, and updates from the Microsoft ecosystem, be sure to subscribe to our newsletter and follow us on LinkedIn. Stay connected and never miss out on the latest tips and news!


