

Managing email communication in Microsoft 365 is critical for any organization. As an administrator, you have likely heard about Message Trace or may already be using it when users report that they are not receiving expected emails.
In day-to-day operations, administrators often receive complaints such as missing customer emails, delayed messages, or emails not appearing in Outlook. In these situations, it is not always clear whether the issue is caused by Exchange Online, the user’s mailbox configuration, Outlook client connectivity, or mailbox rules.
This is where Message Trace in Exchange Online becomes essential. It allows administrators to verify whether an email was delivered, failed, quarantined, or redirected, helping to quickly identify whether the issue is on the backend or the end-user side.
In many cases, administrators discover that the email was successfully delivered to the inbox or moved to another folder because of an Outlook rule created by the user or flagged as spam. By reviewing the message trace results, you can quickly identify whether the issue is on the backend Exchange Online side or purely an end-user configuration issue.
In this blog, I explain how to run an Extended Message Trace, and how to analyze the results to troubleshoot email delivery issues in Microsoft 365 effectively.
What Is an Extended Message Trace in Exchange Online?
An Extended Message Trace provides detailed tracking information for email messages processed by Exchange Online. It allows administrators to see:
- Whether an email was delivered, failed, quarantined, or delayed
- The routing path taken by the message
- Timestamps, error codes, and delivery locations
- Whether the message was redirected, filtered, or blocked by security policies
Extended traces are especially useful when:
- Investigating email delivery failures
- Confirming if an email actually reached a user’s mailbox
- Performing security investigations or compliance audits
Prerequisites for Running a Message Trace
Before running a message trace, ensure you have the appropriate permissions.
Required Admin Roles
You must have one of the following roles:
- Global Administrator
- Exchange Administrator
Without these roles, you will not have access to detailed message trace results in the Exchange admin center.
Step-by-Step Guide to Running an Extended Message Trace (Email Tracking)
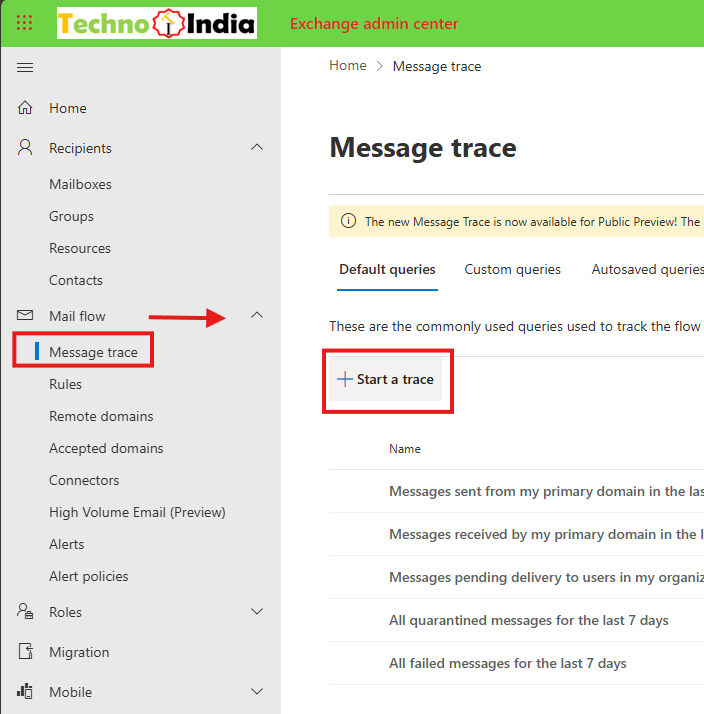
Step 1: Go to Microsoft 365 Admin Center in the Browser
- Sign in to the Microsoft 365 Admin Center.
- Navigate to Exchange:
- Select Mail flow > Message Trace.
Step 2: Configure Basic Message Trace Parameters
- Select the type of messages you want to trace:
- Emails sent or received within a specific date range.
- Options include Last 7 Days, Last 10 Days, Last 30 Days, or a Custom Range. You can check emails last 90 Days.
- You can only view the last 10 days of data directly in the portal. If more than 10 days, you need to download the result in CSV.
- Enter the sender’s or recipient’s email address to filter results. If you want to check all of the emails from the sender in the organization, leave the recipients field blank, or you can add multiple recipients.
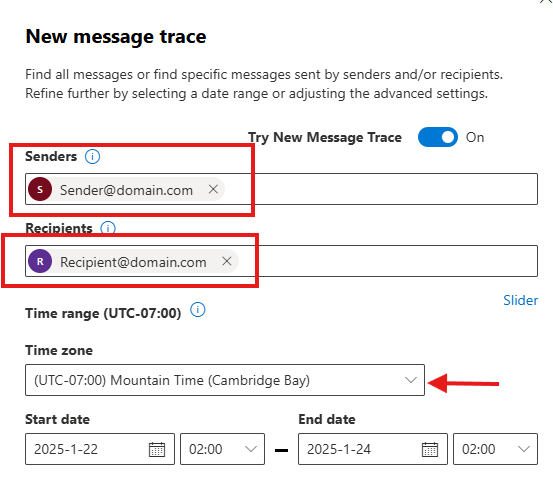
If you don’t know the sender’s exact email address, you can use the domain name starting with an asterisk, like this: *@domain.com.
Step 3: Switch to Extended Trace for In-Depth Analysis
- For detailed logs, select the Advanced Message Trace option.
- Configure the following parameters:
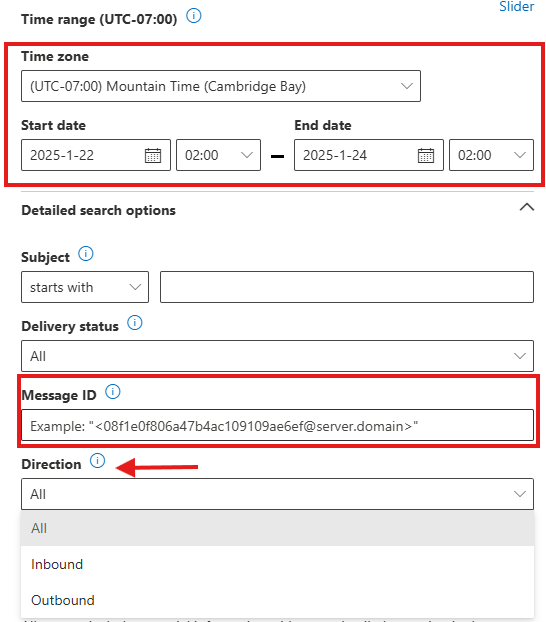
- Date Range: For extended traces, a range of up to 90 days can be selected. Slider is also available for choose the days.
- Message ID: Use a unique identifier for precise email tracking.
- Direction: Choose Inbound, Outbound, or Internal.
Step 4: Run the Trace
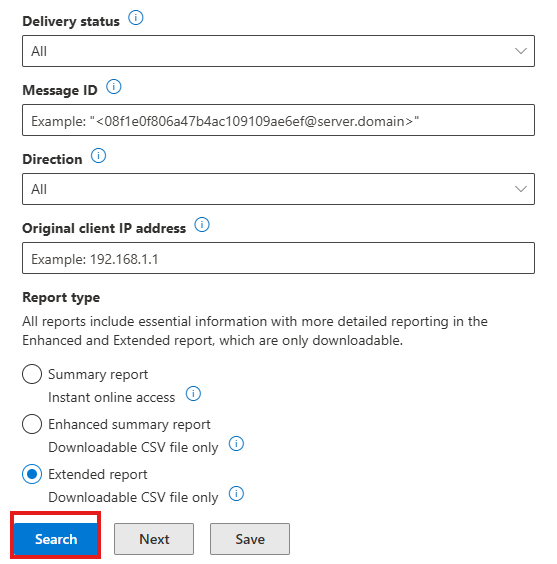
- Click on Search to execute the trace.
- The results will show delivery status, timestamps, and routing details.
Step 5: Download and Analyze Results
-
Open the email that you want to analyze.
Under the Status section, you can identify where the message was delivered.
Expand the Message Events details. Here, you can see:
-
The message received time
-
Whether any transport rule was applied during submission
-
The delivery time
You can also view additional details such as:
-
Message ID
-
Trace ID
-
Message size
-
Sender’s IP address
-

- Export trace results as a CSV file for in-depth analysis.
- Open the CSV file in Excel or another data analysis tool to review detailed logs, such as:
- Message origin and destination.
- Delivery status and error codes.
- Routing details through Microsoft 365 servers.
Please note that completing the message trace may take some time. You will be able to download it once the process is finished.
Common Real-World Scenarios for Using Extended Message Trace
Email Delivery Failures
Identify why an email failed due to:
- Spam filtering
- Transport rules
- Authentication issues
- External sender restrictions
Emails Delivered but Not Visible to Users
A very common scenario:
- Message trace shows Delivered
- User insists the email is missing
In many cases, the email was:
- Moved by an Outlook rule
- Delivered to Junk Email
- Redirected to another folder
- Deleted automatically
The trace often shows the exact delivery location, saving hours of guesswork.
Sometimes, an email shows as Delivered in Message Trace, but the end user still reports that they cannot see it in their mailbox. In such cases, ask the user to sign in to Outlook on the Web (OWA) and check again, as this helps rule out Outlook client synchronization issues.
If the email still does not appear, you can take delegated access to the user’s mailbox (with proper authorization or manager approval). This action does not notify the user, but it is recorded in audit logs for compliance purposes.
Once access is granted, open the mailbox similarly to a shared mailbox and search for the email using the subject line or sender’s address. In most cases, you will find the email in the Inbox, another folder, or even the Deleted Items folder.
Security and Compliance Investigations
Extended message traces help with:
- Investigating suspicious forwarding rules
- Identifying unauthorized email access
- Supporting audit and compliance requirements
Best Practices for Running Message Traces
- Always use filters (sender, recipient, date)
- Use Message ID when available for accuracy
- Export results for documentation and audits
- Monitor message flow regularly to detect issues early
Conclusion
Running an Extended Message Trace in Exchange Online or email trace is an essential skill for Exchange administrators. It allows you to quickly determine whether an email issue is caused by backend processing, security filtering, or end-user configuration.
By using extended message traces effectively, administrators can:
- Reduce troubleshooting time
- Resolve user complaints confidently
- Improve email reliability
- Maintain compliance and security standards
Understanding how to interpret message trace results is just as important as running the trace itself—and it can save both administrators and users a significant amount of time.
FAQs
What is the purpose of an Extended Message Trace?
It provides detailed email delivery logs, including routing, timestamps, error codes, and final delivery location.
How far back can I trace emails?
Extended Message Trace allows tracing emails up to 90 days. Basic traces are more limited.
Who can run an Extended Message Trace?
Users with Global Administrator or Exchange Administrator roles.
What information is included in the results?
Sender, recipient, delivery status, timestamps, error codes, and routing details.
How do I download the trace results?
Once completed, results can be exported as a CSV file from the Exchange admin center.
What should I do if an email is not delivered?
Run an Extended Message Trace and review error codes and delivery status to identify the root cause.
Can I trace only internal emails?
Yes, by setting the Direction filter to Internal.
Related URL:-
- How to Send Encrypted Email in Outlook: A Step-by-Step Guide
- How to Access and Manage a Shared Mailbox in Microsoft 365
- Step-by-step guide to manage and enable the Email Online Archive
- How Mail Flow Rules work and how you can manage them efficiently: Admin Guide
Enjoyed the article?
We’d love to hear your thoughts—share your comments below!
For more insights, guides, and updates from the Microsoft ecosystem, be sure to subscribe to our newsletter and follow us on LinkedIn. Stay connected and never miss out on the latest tips and news!


4 comments on “How to Run Extended Message Trace in Microsoft 365”