

Managing Outlook rules is a critical task for IT administrators, especially when troubleshooting email delivery issues, investigating compromised accounts, or controlling mailbox behavior in Microsoft 365. In many real-world scenarios—such as mail trace investigations where emails are delivered to folders other than the Inbox—administrators must analyze inbox rules to identify misconfigurations or malicious redirections.
Since Outlook rules cannot be managed through the Exchange Admin Center GUI, administrators must use PowerShell to view, create, modify, disable, delete, export, and troubleshoot inbox rules. This guide provides a complete, practical walkthrough for managing Outlook rules using Exchange Online PowerShell, ensuring full visibility and control over user mailboxes.
Understanding Server-Side and Client-Side Rules
Outlook rules can be classified into two types, and knowing the difference is crucial for effective management:
- Server-Side Rules: Executed directly on the Exchange Server, these rules work even when the Outlook client is offline. Examples include moving emails to folders, deleting specific messages, or prioritizing emails. PowerShell is ideal for managing these rules.
- Client-Side Rules: These operate only when Outlook is online and active. They are specific to the user’s Outlook client and cannot be managed via PowerShell. Examples include moving emails to PST files or playing notification sounds.
To identify a rule type, open the “Manage Rules & Alerts” window in Outlook. Client-side rules are marked with “(client only),” while server-side rules are not.
Prerequisites for Managing Outlook Rules
Before you start, ensure the following:
- PowerShell: Installed and updated on your system.
- ExchangeOnlineManagement Module: Required for managing rules in Exchange Online.
- Admin Permissions: Ensure you have the necessary rights to manage rules for user mailboxes.
Install the ExchangeOnlineManagement module with:
Install-Module -Name ExchangeOnlineManagementConnecting PowerShell to Exchange Online
Connect to Exchange Online with your credentials:
Connect-ExchangeOnline -UserPrincipalName admin@yourdomain.comFollow the prompts for secure authentication. Once connected, you can manage Outlook rules effectively.
Viewing Existing Outlook Rules
To list all rules for a specific mailbox, use the following command:
Get-InboxRule -Mailbox "user@yourdomain.com"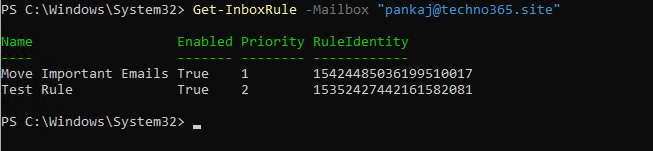
This will display details like rule names, conditions, and actions, helping you understand the current setup.
Creating, Modifying, and Deleting Rules, Creating Rules To create a new rule, use the New-InboxRule command. For example, to move emails from a specific sender to a folder:
New-InboxRule -Name "Move Important Emails" -Mailbox "user@yourdomain.com" -From "example@domain.com" -MoveToFolder "user@yourdomain.com:\Inbox\Important"
Modifying Rules Find the rule to update:
Get-InboxRule -Mailbox "user@yourdomain.com" | Where-Object {$_.Name -eq "Move Important Emails"}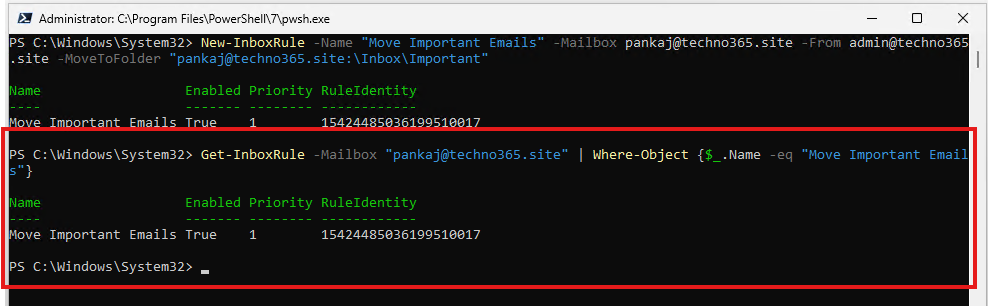
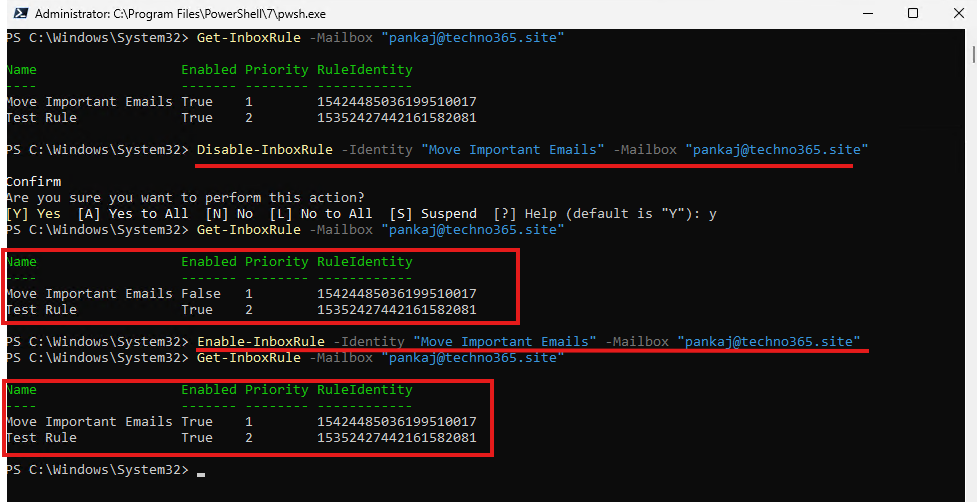
Then modify it as needed:
Disable-InboxRule -Identity "Move Important Emails" -Mailbox "user@yourdomain.com"

Enable-InboxRule -Identity "Move Important Emails" -Mailbox "user@yourdomain.com"
Deleting Rules To delete a specific rule:
Remove-InboxRule -Identity "Move Important Emails" -Mailbox "user@yourdomain.com"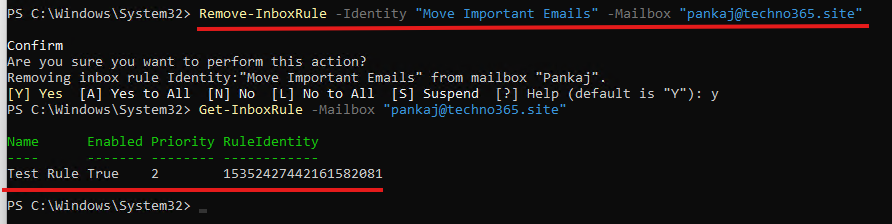
Exporting and Importing Rules Export rules to back them up or migrate them:
Get-InboxRule -Mailbox "user@yourdomain.com" | Export-CliXml -Path "C:\RulesBackup.xml"Import rules using:
$rules = Import-CliXml -Path "C:\RulesBackup.xml"
$rules | Where-Object { $_.Actions -ne $null } | ForEach-Object { New-InboxRule @$_ }
Troubleshooting Common Issues
- Connection Errors: Ensure valid credentials and verify that the ExchangeOnlineManagement module is installed.
- Permission Problems: Confirm admin or delegate rights for the mailbox.
- Rule Delays: Avoid conflicts between server-side and client-side rules.
Managing Outlook Rules Directly from the Mailbox
If you are new to PowerShell, experiencing errors while connecting to the Exchange Admin Center, or if you are a non-admin user, you can still manage Outlook rules directly from the Outlook application or Outlook Web App (OWA).
For administrators who are authorized, delegated access to the affected mailbox can be granted to perform rule management.
Steps to Manage Rules via OWA:
-
Grant delegated access to the user’s mailbox (admin or authorized user).
-
Open the mailbox in Outlook Web App (OWA) in a separate browser window.
-
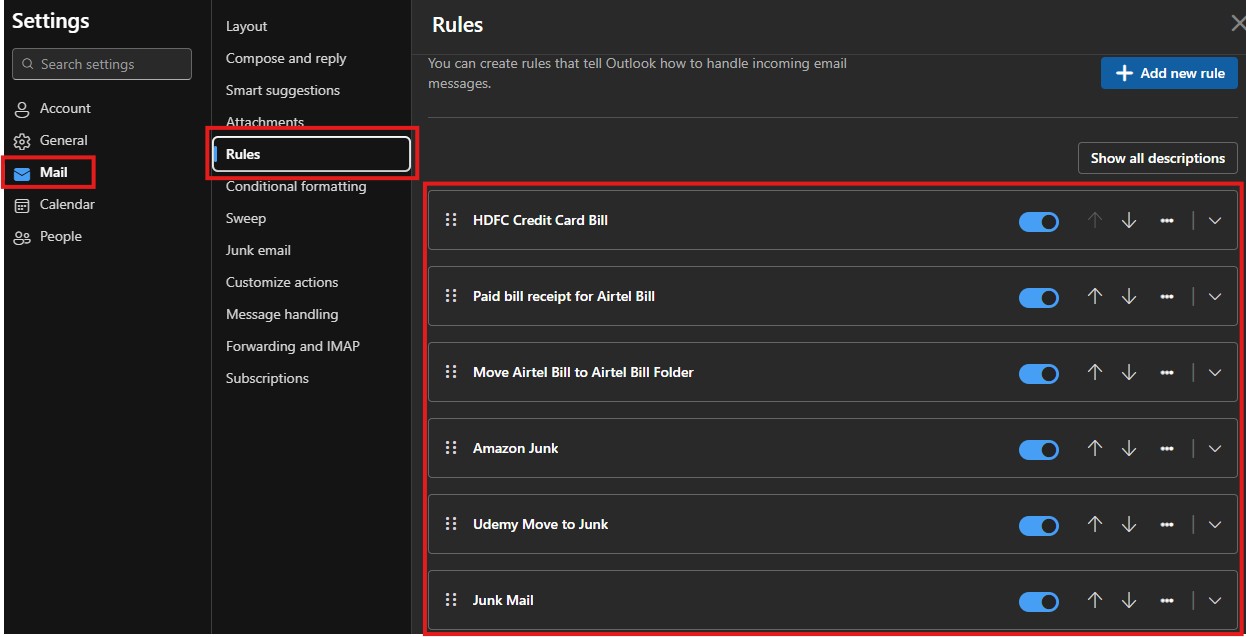
Go to Settings → Mail → Rules.
-
You will be able to view, edit, disable, delete, and manage all existing rules created in the mailbox.
This method is useful when PowerShell access is unavailable or when quick manual verification of inbox rules is required during troubleshooting or security investigations.
Best Practices for Outlook Rule Management
- Use descriptive rule names to stay organized.
- Limit the number of rules to avoid exceeding the quota.
- Test each rule after creation to ensure it functions as intended.
- Regularly back up rules to prevent data loss.
Conclusion
Managing Outlook rules from Exchange Admin using PowerShell provides IT admins with unparalleled control and efficiency. By understanding the differences between rule types and utilizing PowerShell commands, you can streamline email management and reduce user dependency on manual tasks. Embrace these practices to optimize your workflow and ensure seamless mailbox organization.
FAQs
- What are the common PowerShell commands for managing Outlook rules?
Get-InboxRule, New-InboxRule, Set-InboxRule, and Remove-InboxRule. - Can I manage rules for shared mailboxes?
Yes, ensure you have delegate or admin access to the mailbox. - How do I troubleshoot authentication issues in PowerShell?
Use multi-factor authentication or check for expired credentials. - Is it possible to disable rules temporarily?
Yes, use the Set-InboxRule command with the -Enabled $false parameter. - How secure is managing Outlook rules via PowerShell?
With proper permissions and secure connections, it’s highly secure. Follow best practices for credentials and authentication.


This post was incredibly helpful! I always get overwhelmed when managing Outlook mailbox rules at scale, but the step-by-step guide using Exchange Admin Center & PowerShell really simplified the process. I especially appreciated the example script snippets that let me list and clean up rules across all mailboxes. Great work!
Thanks so much for your feedback—we’re thrilled to hear the guide made managing mail flow rules easier for you! 😊 The PowerShell snippets are meant to help admins automate tedious tasks, and it’s fantastic that they were useful in your environment.
If you’d like more advanced examples—such as filtering rules by specific conditions or scheduling cleanup scripts—just let us know. We’re always here to help streamline your admin workflows!
Nice article! Quick question — is there a way to bulk delete inbox rules for multiple users from the Exchange Admin Center?
Great question! While the Exchange Admin Center doesn’t currently support bulk rule deletion directly, you can achieve this using PowerShell. The Get-InboxRule and Remove-InboxRule cmdlets let you manage and delete rules across mailboxes efficiently. Let us know if you’d like a sample script — we’d be happy to share it!