

Adding a shared mailbox to Outlook is not a challenging task, as long as you follow the correct steps. In most Microsoft 365 environments, a shared mailbox becomes visible automatically in Outlook apps once the required permissions are assigned. However, depending on the Outlook platform you’re using, the way a shared mailbox appears can vary.
If you’re a Microsoft 365 administrator or your organization uses a Microsoft 365 subscription, you’ve almost certainly worked with shared mailboxes. In many email platforms, teams rely on groups or distribution lists to manage common emails. Microsoft 365 goes a step further by offering shared mailboxes, which provide a more practical and centralized way to manage emails such as support@company.com, sales@company.com, or info@company.com.
A shared mailbox in Microsoft 365 works very much like a regular user mailbox—but with two key advantages: it doesn’t require a license and provides up to 50 GB of free storage. Multiple users can access the same mailbox, send emails from a common address, and manage conversations collaboratively, all from their own Outlook account.
In this guide, I won’t explain how to create a shared mailbox or assign permissions, as those topics are already covered in my other blogs. Instead, this article is written specifically for end users and support teams who want to understand how to add a shared mailbox to Outlook across different platforms.
Managing a shared mailbox in Microsoft 365 is essential for effective team collaboration and seamless email handling—without the need for multiple user accounts. Whether you’re part of a support team, sales department, or general inquiries group, knowing how to correctly add a shared mailbox to Outlook can significantly improve productivity.
This guide walks you through adding a shared mailbox to Outlook Desktop, Outlook on the Web (OWA), the New Outlook app, and Outlook mobile apps, ensuring a smooth and hassle-free experience on any device.
What is a Shared Mailbox?
A shared mailbox in Microsoft 365 allows multiple users to send, receive, and manage emails using a common email address (e.g., support@company.com). It enhances team collaboration and ensures no emails go unanswered.
Unlike regular mailboxes, shared mailboxes do not require a separate license, but users must have appropriate permissions to access them.
Explore the step-by-step guide on creating a New Shared Mailbox in the Microsoft 365 Admin Center. Additionally, check out the detailed instructions on converting an Active User’s Mailbox into a shared mailbox.
Prerequisites for Adding a Shared Mailbox to Outlook 365
Before accessing a shared mailbox, ensure:
✔ You have been granted access by the Microsoft 365 admin.
✔ The mailbox is set up correctly in Exchange Admin Center (EAC).
✔ You are using Outlook 2016 or later for desktop access.
✔ Your Microsoft 365 account is active.
If you’re an admin, use the Microsoft 365 Admin Center to assign permissions:
- Full Access – Allows users to Access and control the shared mailbox..
- Send As – Users can send emails as the shared mailbox.
- Send on Behalf – Emails sent display “on behalf of” the shared mailbox.
I have briefly explained how you can create or manage shared mailbox permissions. Please check out the blog: Convert User mailbox to shared mailbox
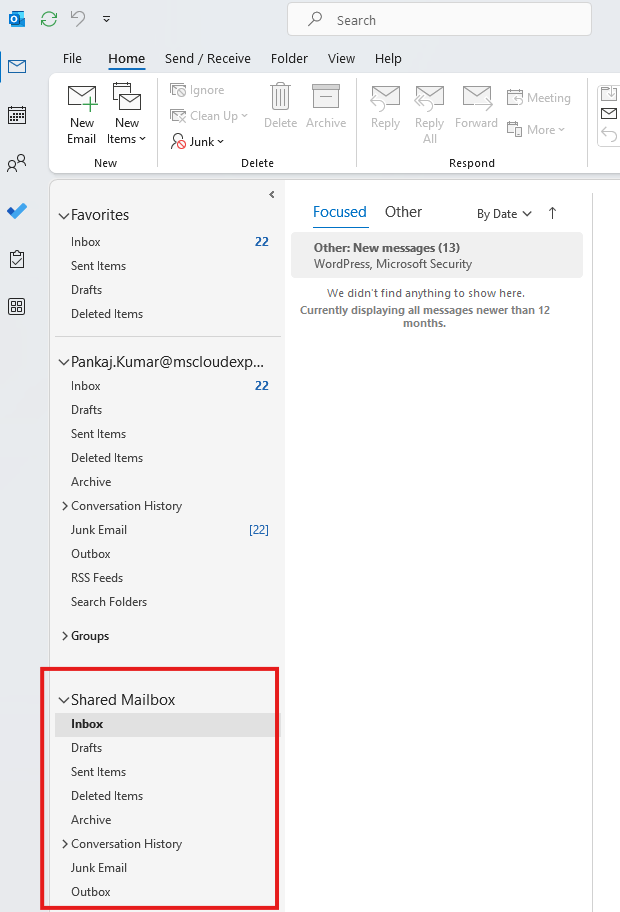
How to Access or Adding a Shared Mailbox to Outlook (Desktop App)
Method 1: Auto-Mapping (Recommended for Most Users)
- Open Outlook and sign in with your Microsoft 365 account.
- If auto-mapping is enabled, the shared mailbox should appear automatically in the left pane.
- Click on the shared mailbox name to view emails.
Method 2: Manually Add the Shared Mailbox
- In the Outlook File Tab > Under the Account Information Account Settings > Account Settings.
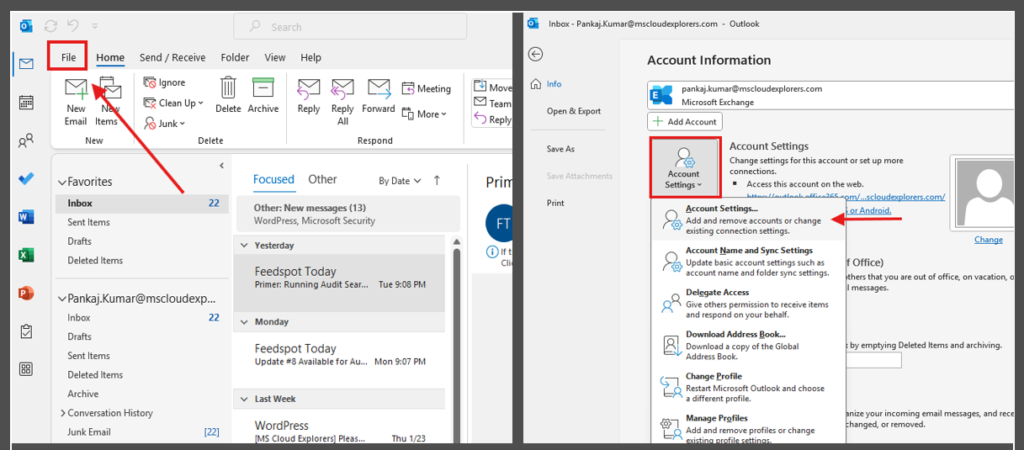
- Select your Microsoft 365 account and click Change.

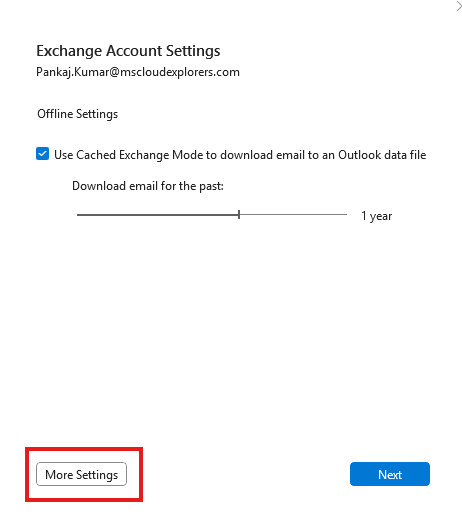
- Click More Settings.
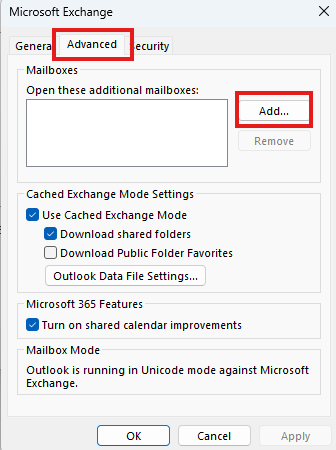
- Advanced > Add.
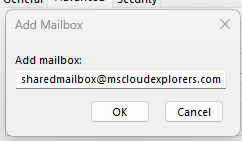
- Enter the email address of the shared mailbox and click OK.
- Restart Outlook to see the mailbox in your folder list.
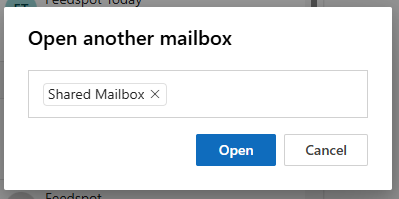
Steps for Adding a Shared Mailbox to Outlook on the Web (OWA)
- Sign in to Outlook on the Web.
- Click your profile picture in the top-right corner.
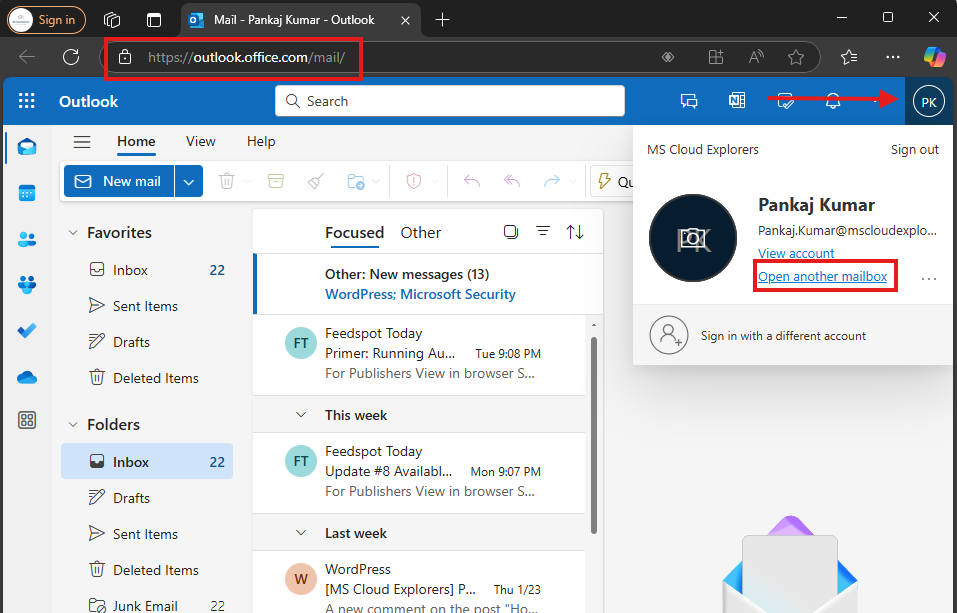
- Select Open another mailbox.
- Enter the shared mailbox email address and click Open.
✅ Tip: Bookmark the shared mailbox link for quick access!
Steps for Adding a Shard Mailbox to Outlook New App
- Open the new Outlook App.
- You Should see all the Shared Mailboxes Automatically under the Shared With me folder.
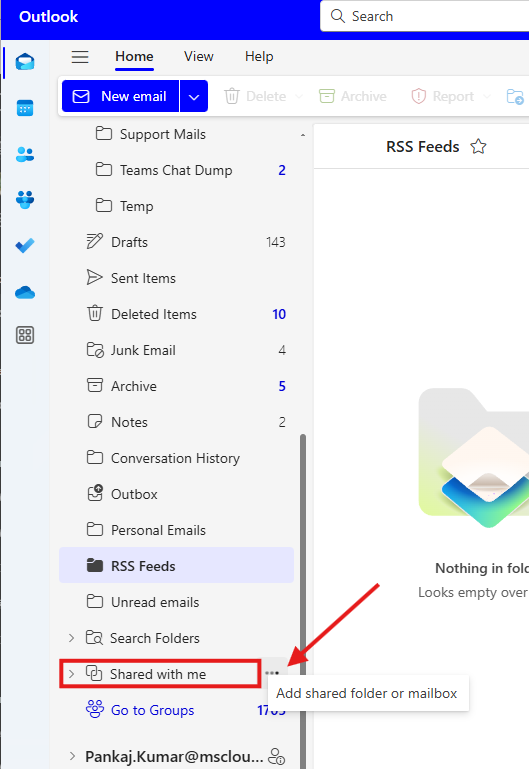
- Try to Add Manually (If the mailbox not added already).
- Click on 3 dots in the left of Shared with me Folder or Right click on it.
- Enter the Shared mailbox Name and click add.
- Restart your outlook app and you can access the Newly added mailbox.
Steps for Adding a Shared Mailbox to Outlook Mobile phone App
On iOS and Android
- Open the Outlook app.
- Tap Add Account > Add a Shared Mailbox.
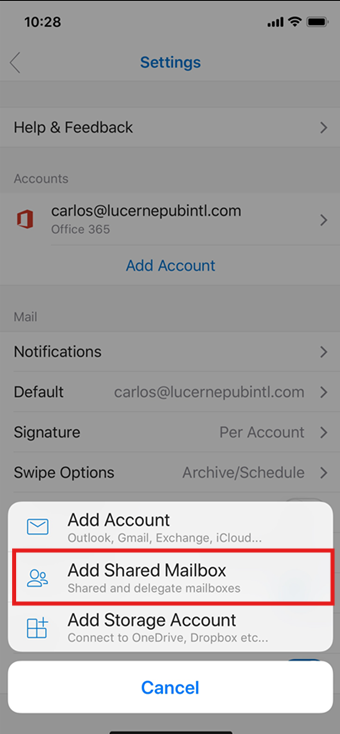
- Enter the shared mailbox email and tap Next.

- Sign in with your Microsoft 365 credentials.
How to Send Emails from a Shared Mailbox
- Open Outlook and click New Email.
- Click From and select the shared mailbox.
- Compose your email and click Send.
✅ Ensure “Send As” or “Send on Behalf” permission is enabled.
Troubleshooting Shared Mailbox Issues
1. Shared Mailbox Not Appearing in Outlook
- Restart Outlook and check Account Settings.
- Ensure permissions are correctly assigned.
2. Permission Issues
- Ask the admin to verify your Full Access rights in Microsoft 365 Admin Center.
3. Email Synchronization Delays
- Refresh your mailbox or restart the Outlook app.
Best Practices for Managing a Shared Mailbox
✔ Set up auto-replies for quick responses.
✔ Use mailbox rules to sort emails efficiently.
✔ Email Forwarding to receive the emails into your mailbox.
Conclusion
Learning how to adding a shared mailbox to Outlook correctly saves time and prevents common access issues. Whether you’re using Outlook Desktop, Outlook Web, the New Outlook app, or Outlook on mobile, the key is ensuring the right permissions are in place.
Once configured properly, shared mailboxes become one of the most effective collaboration tools in Microsoft 365.
If you encounter issues, check permissions and settings, or consult your IT admin for assistance.
FAQs
- How do I request access to a shared mailbox?
Contact your IT administrator or Microsoft 365 admin to assign access. - Can I access a shared mailbox without an Office 365 license?
Yes, shared mailboxes do not require individual licenses, but users must have an active Microsoft 365 account. - Why can’t I see my shared mailbox in Outlook?
Ensure that auto-mapping is enabled or manually add the mailbox. - How do I remove a shared mailbox from Outlook?
Go to Account Settings > Remove Shared Mailbox and restart Outlook. - Can I use a shared mailbox for external email forwarding?
No, shared mailboxes cannot forward emails externally by default. Admins can enable this via Exchange Admin Center.
Related URLs:-
- Exchange Online Overview guide to manage mailboxes effectively
- Ultimate Guide to Exchange Email Online Archive for Efficient Email Management
- How to Transition a Microsoft 365 User Mailbox to a Shared Mailbox
- Step by Step Guide Managing Outlook Rules from Exchange Admin
- Ultimate Guide to Creating and Implementing Professional Email Signature in Outlook 365


4 comments on “Adding a Shared Mailbox to Outlook: Complete Guide for Desktop, Web & Mobile (Microsoft 365)”