

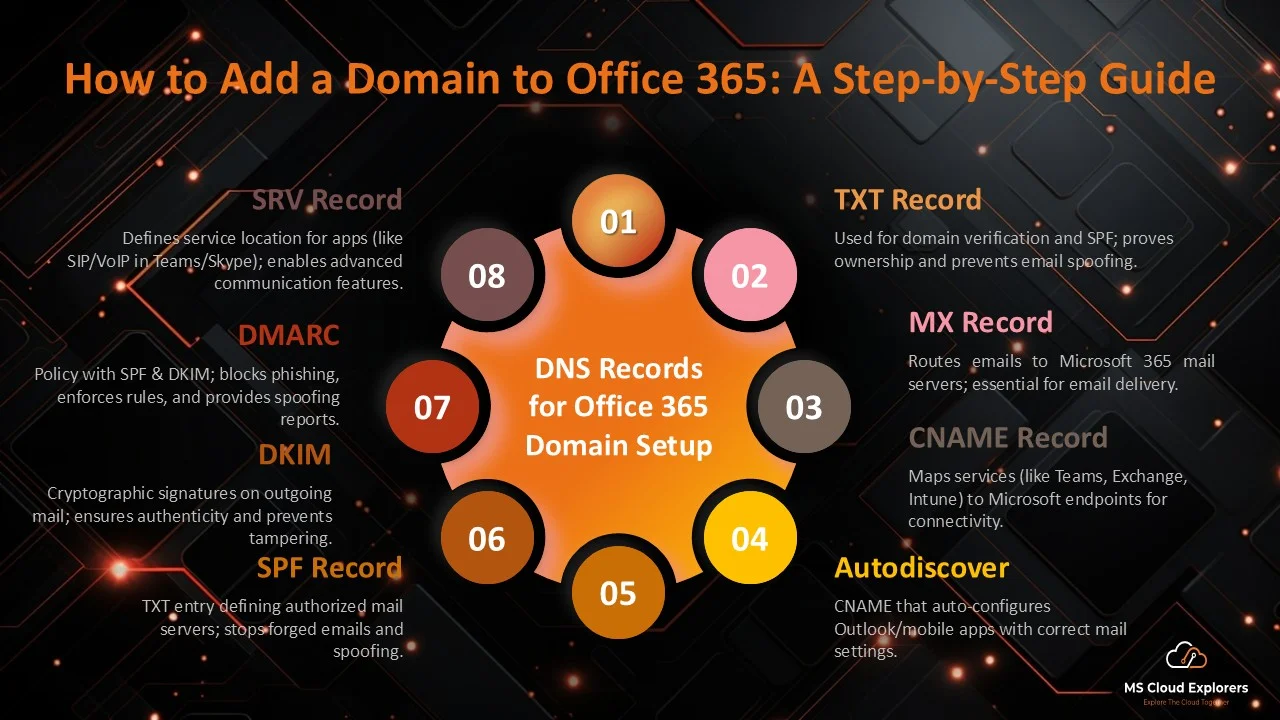
Adding a custom domain to Microsoft 365 allows your organization to use professional email addresses such as user@yourcompany.com instead of the default user@tenant.onmicrosoft.com address. This is one of the first steps most businesses complete after creating a Microsoft 365 tenant because it improves branding, email trust, and user identity across Microsoft 365 services.
In this guide, I have explained how to add a domain to Microsoft 365, verify domain ownership, configure DNS records such as TXT, MX, CNAME, SPF, DKIM, and DMARC, and avoid common issues that can affect mail flow. This guide also applies if you are still searching for Office 365 domain setup because the process is now managed through the Microsoft 365 admin center.
|
Quick summary Open the Microsoft 365 admin center, go to Settings > Domains, select Add domain, enter your domain name, verify ownership using a TXT record or Domain Connect, add the required DNS records, and then assign users to the new domain. |
What Is a Custom Domain in Microsoft 365?
A custom domain in Microsoft 365 is a domain name that your organization owns, such as yourcompany.com, and connects to your Microsoft 365 tenant. After the domain is added and verified, users can sign in and send email using addresses such as pankaj@mscloudexplorers.com instead of pankaj@mscloudexplorers.onmicrosoft.com.
The default onmicrosoft.com domain is fallback domain and created automatically when you create a Microsoft 365 tenant. It works for initial setup, but most organizations add their own domain before creating users or moving email services to Microsoft 365.
Why Add a Custom Domain to Microsoft 365?
- Professional email identity: A custom domain makes email addresses look more professional and easier for customers to trust.
- Consistent branding: The same business domain can be used across Exchange Online, Teams, SharePoint, OneDrive, and user sign-in identities.
- Better email reputation: Using a verified business domain with SPF, DKIM, and DMARC helps improve email authentication and reduces spoofing risk.
- Support for multiple brands or departments: You can add more than one domain to the same Microsoft 365 tenant when your organization uses multiple brands, business units, or acquired company names.
Before You Add a Domain to Microsoft 365
Before starting the setup, make sure you have the correct permissions and access. This avoids delays while verifying the domain or adding DNS records.
|
Requirement |
Why It Is Needed |
Example / Notes |
|
Domain ownership |
You must own the domain you want to add. |
Example: yourcompany.com |
|
DNS hosting access |
You need to add TXT, MX, CNAME, and other DNS records. |
DNS provider can be GoDaddy, Cloudflare, Hostinger, Namecheap, etc. |
|
Microsoft 365 admin role |
You need permission to manage tenant-level domains. |
Use a Global Administrator or Domain Name Administrator account. |
|
Mailbox migration plan |
Changing the MX record moves new mail flow to Microsoft 365. |
Do not change MX records until users/mailboxes are ready. |
Important mail-flow warning
If your email is currently hosted with another provider, do not change the MX record until your Microsoft 365 mailboxes and users are ready. Updating the MX record sends new email for the domain to Microsoft 365, so changing it too early can interrupt mail delivery.
Domain Connect vs Manual DNS Setup
When you add a domain, Microsoft 365 may offer two setup methods depending on your domain registrar. Some registrars support Domain Connect, which allows Microsoft 365 to automatically verify ownership and add DNS records. If your registrar does not support Domain Connect, you can manually add the records at your DNS provider.
|
Setup method |
Best for |
What happens |
|
Domain Connect |
Registrars that support automatic setup, such as GoDaddy, Cloudflare, IONOS, WordPress.com, Plesk, and others. |
Microsoft 365 redirects you to the registrar, verifies ownership, and can add DNS records automatically after authorization. |
|
Manual DNS setup |
Any domain/DNS provider where automatic setup is not available or when you want full control. |
You copy Microsoft 365 DNS values and manually create TXT, MX, CNAME, SPF, DKIM, DMARC, and SRV records as needed. |
Follow the Steps on How to add a domain in Microsoft 365.
Follow the steps below to add a new custom domain to your Microsoft 365 tenant. These steps are useful for both Microsoft 365 and Office 365 domain setup searches because the configuration is handled from the Microsoft 365 admin center. (I’m using here Hostinger DNS Manager but steps are similar to Other DNS Manager Also.
Step 1: Log in to the Microsoft 365 Admin Portal with GA Admin
- Navigate to the Microsoft 365 Admin Center.
- Log in using your global administrator credentials.
- From the left-hand navigation pane, select Settings > Domains.
Step 2: Add Your Domain
- Click the Add domain button.
- Enter your custom domain name (e.g., yourdomain.com) in the provided field.
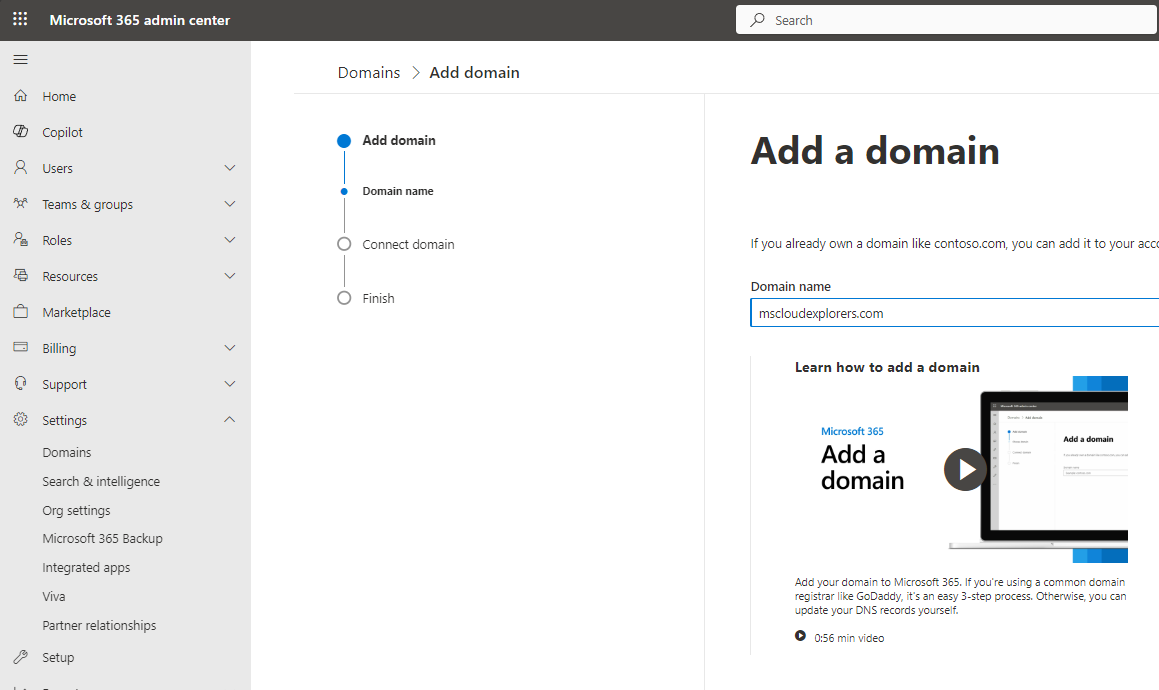
- Click Use this domain to proceed.
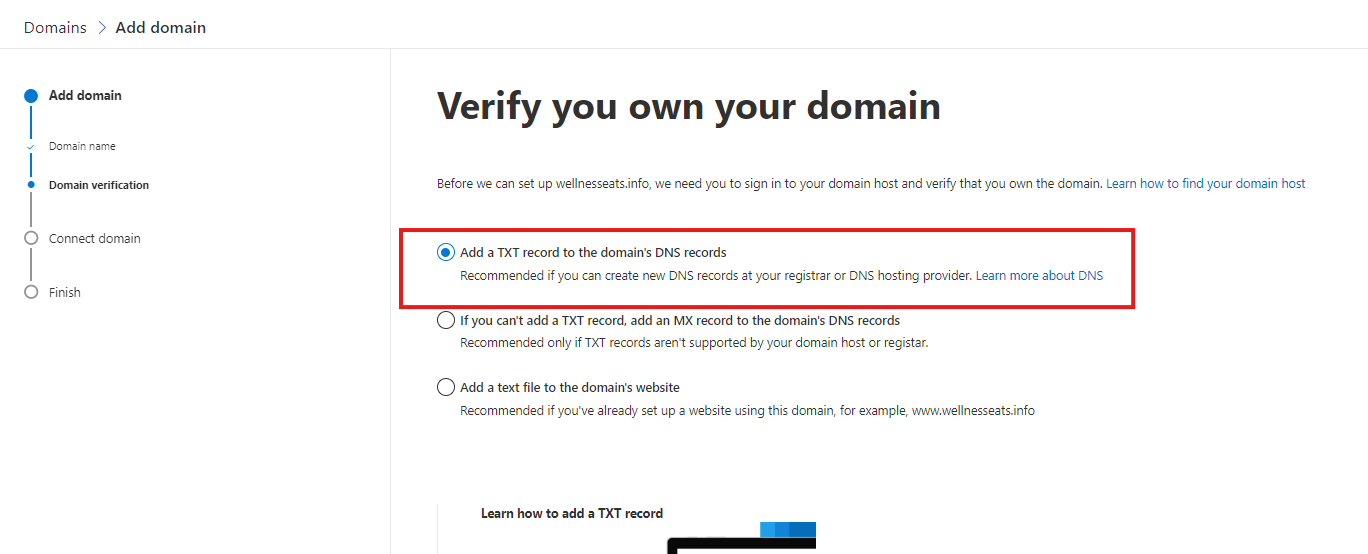
- Click on Add a TXT record to the domain’s DNS records and Continue.
Step 3: Verify Domain Ownership (Connect Hostinger domain to office 365 tenant)
If you are planning to purchase a new domain, Hostinger is one of the best and most recommended options. I personally prefer their services because of their responsive technical support, reliable hosting performance, and cost-effective plans. If you decide to choose Hostinger for your hosting needs, you can use the link below to get an additional 20% discount on your new hosting plan. Hostinger Plans on discounted Rate
Microsoft requires you to verify ownership of the domain. Choose one of the following methods:
1: TXT Record Verification
- Copy the TXT record provided by Microsoft.
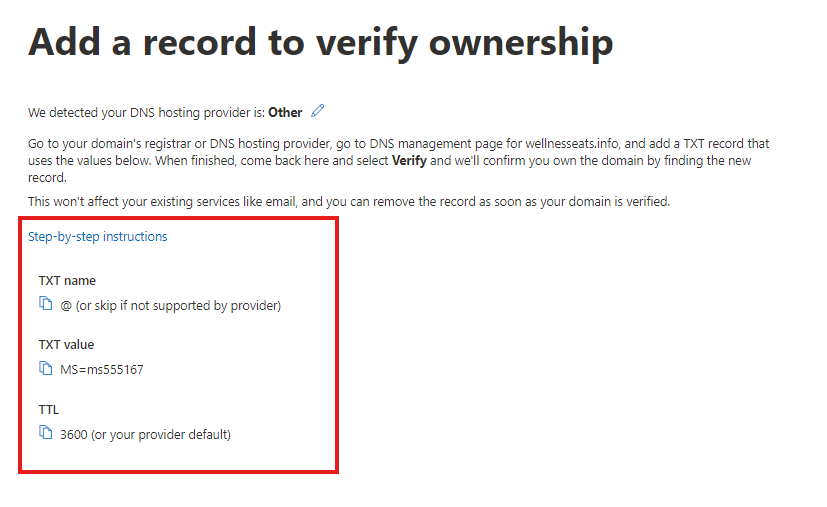
- Log in to your domain registrar’s DNS management portal (For demo Purpose I’m using Hostinger You may have different DNS provider, but steps would be same.)
- In the DNS management portal go to domain section, Select the domain and click on the Manage DNS records.
- In the left side Click on the DNS/Nameservers.
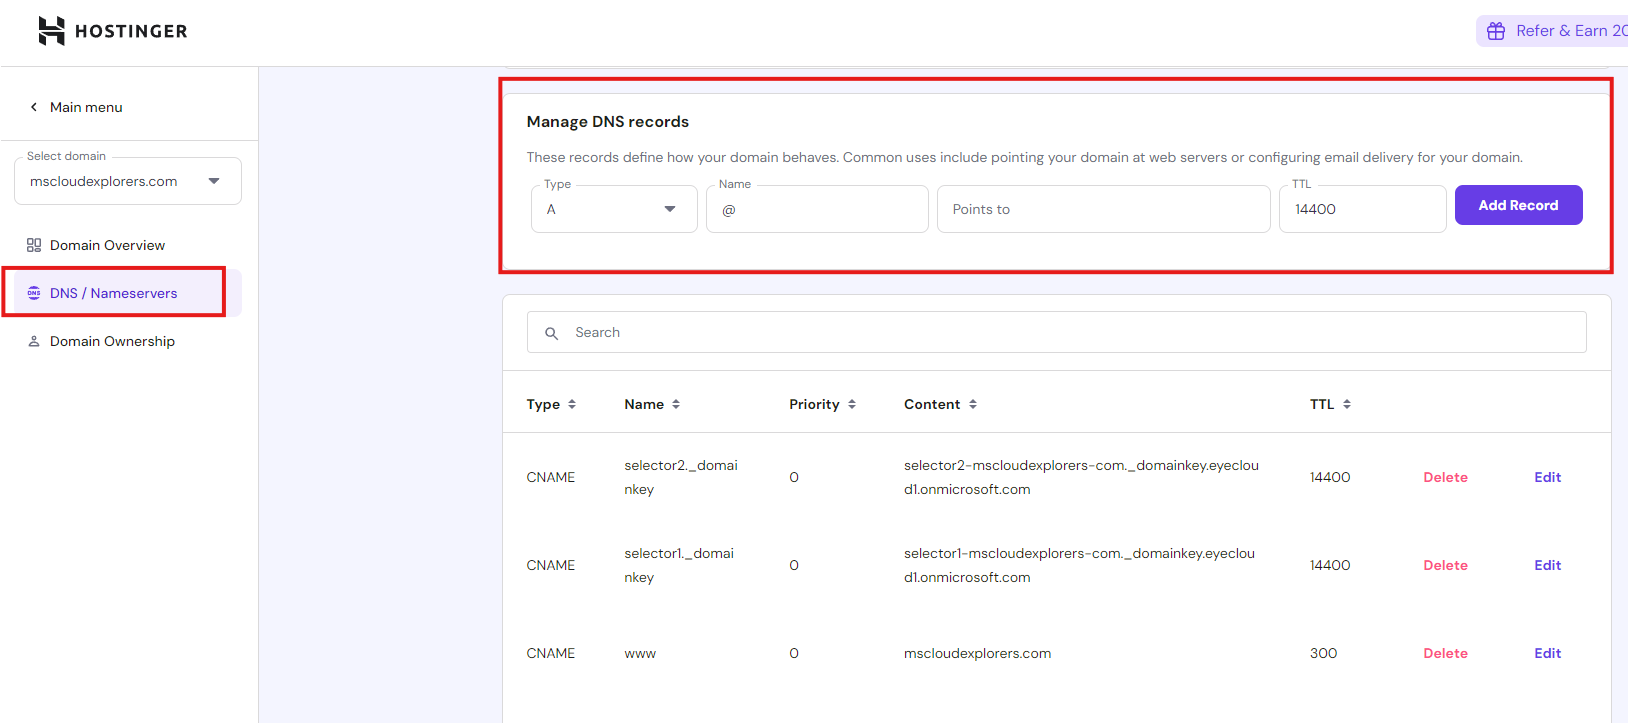
- Add a new TXT record with the following details:
- Host: @
- Value: The TXT record value provided by Microsoft.
- TTL: Set to the default value or 3600 seconds.

- Save the changes and return to the Microsoft 365 Admin Center.
- Click Verify to confirm ownership. (It may take some time to propagate the changes).
- Choose the Add your own DNS records and click continue.
Step 4: Configure DNS Records
Once ownership is verified, set up DNS records for Office 365 services like email, Teams, and OneDrive. Microsoft provides the required records:
2: MX Record Verification
- Copy the MX record details provided.
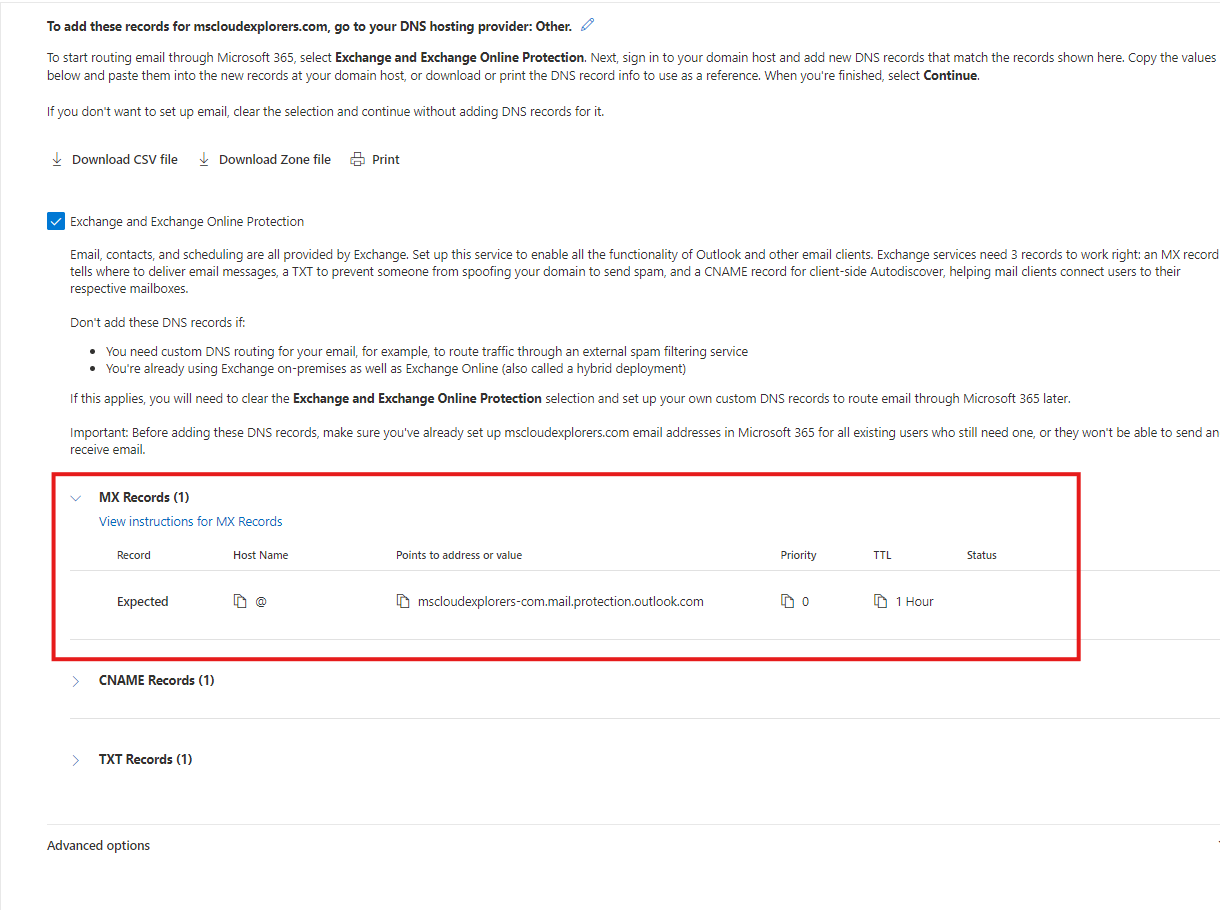
Important: Do Not Change MX Records Too Early
The MX record controls where new email for your domain is delivered. If your organization is currently using another mail provider, Hosted Exchange, Google Workspace, cPanel email, or Exchange Server on-premises, changing the MX record too early can route new emails to Microsoft 365 before users and mailboxes are ready.
Before changing the MX record, confirm the following:
- All required users are created in Microsoft 365.
- The required mailbox licenses are assigned.
- Mailboxes are ready to receive mail in Exchange Online.
- Any migration or cutover plan is approved.
- SPF, DKIM, and DMARC records are planned or configured.
|
Best practice If you are only verifying the domain before a migration, you can add the TXT verification record first and delay MX record changes until the final migration or cutover window. |
- Add an MX record in your DNS settings with these parameters:
- Priority: High (or the highest available setting).
- Value: The Microsoft-provided destination address.
- Similar method copy the CNAME records and TXT Records.
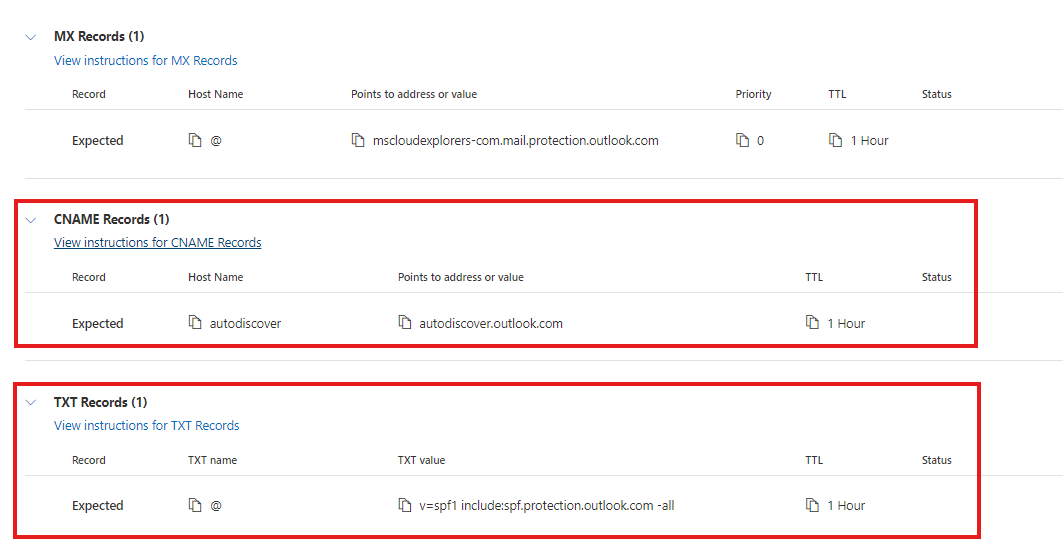
- Add these records to the DNS Management (For me its Hostinger)
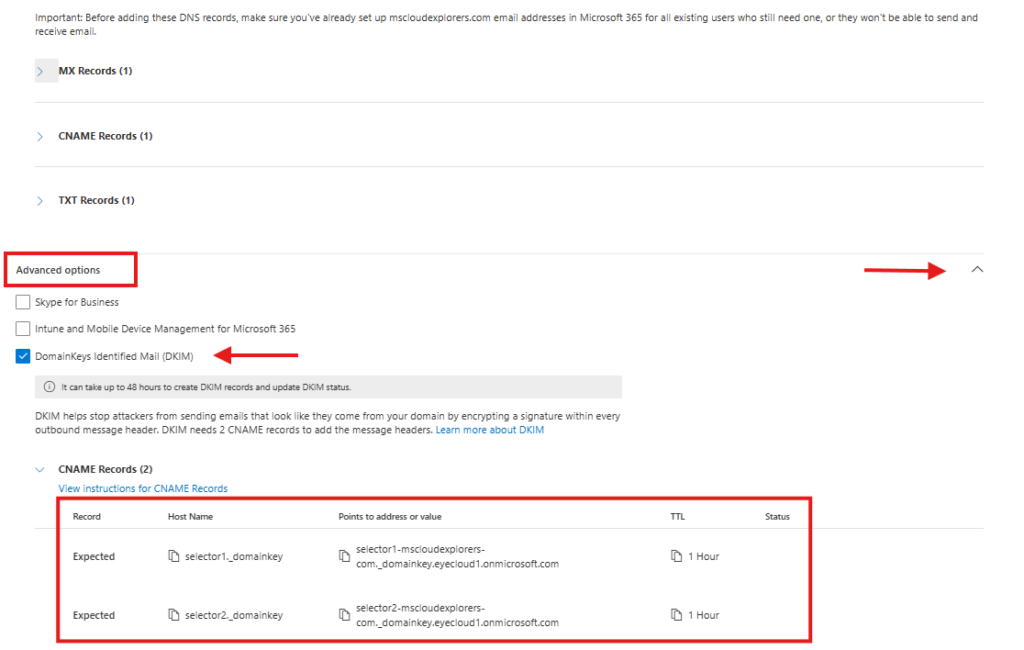
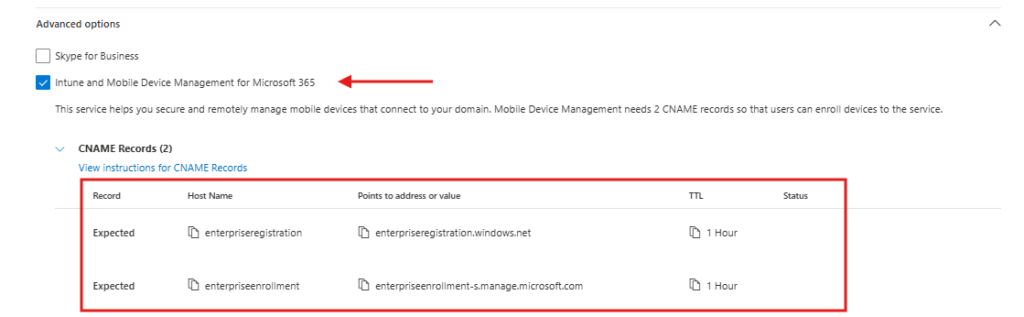
- Add the DNS Records for Intune and MDM: Under the Advanced option
- Click on the CNAME Records (2).
- Copy both of them and add into the DNS host similar to above.
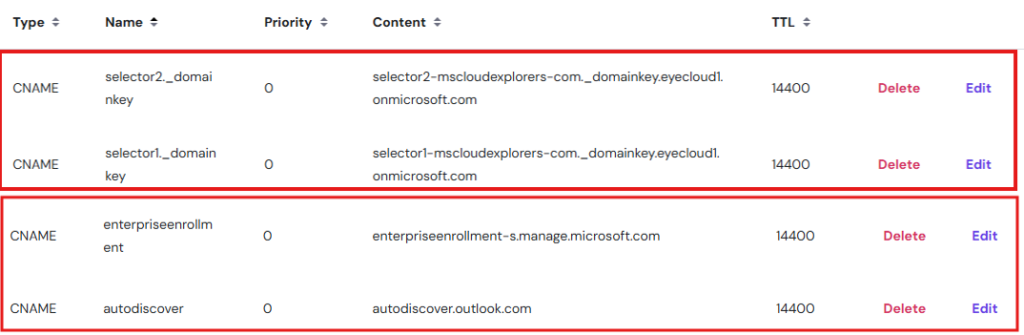
- Records for DKIM and Intune (MDM) Must be CNAME TTL Value 1hour or Default.
- Return to the Microsoft 365 Admin Center and verify the records.

3. You can also Add DKIM later from the Security Center.
- Go to Security Admin Center.
- Under Email and Collaboration Select the Policies and Rules.
- Open the Threat Policies options.
- Under the Rules select the Email authentication settings.
- Under the DKIM tab you should see all domains’ DKIM status.
Essential DNS Records
The DNS records you need depend on the Microsoft 365 services you plan to use. For email in Exchange Online, you generally need MX, Autodiscover CNAME, and SPF TXT records. DKIM and DMARC are also strongly recommended for email authentication.
|
DNS record |
Purpose |
Required? |
Notes |
|
TXT |
Verifies domain ownership and can also be used for SPF. |
Required for verification |
SPF is configured as a TXT record, not a CNAME record. |
|
MX |
Routes inbound email for your domain to Microsoft 365. |
Required for Exchange Online email |
Change this only when you are ready to move mail flow. |
|
CNAME |
Supports services such as Autodiscover, DKIM, and Intune/MDM. |
Recommended / service dependent |
Autodiscover helps Outlook automatically configure mail profiles. |
|
SPF TXT |
Helps identify authorized mail senders for your domain. |
Recommended |
Use one SPF TXT record and include Microsoft 365 in the existing SPF record if one already exists. |
|
DKIM CNAME |
Helps validate outbound email sent from your domain. |
Recommended |
Configure DKIM after the domain is added. |
|
DMARC TXT |
Tells receiving mail systems how to handle messages that fail SPF/DKIM checks. |
Recommended |
Start with monitoring before enforcing strict policies. |
|
SRV |
Supports specific Teams/Skype federation scenarios. |
Service dependent |
Only add if Microsoft 365 shows the record as required for your selected services. |
Step 6: Finalize Setup
- After entering DNS records, click Finish in the Admin Center.
- Test your domain’s functionality by sending and receiving emails.
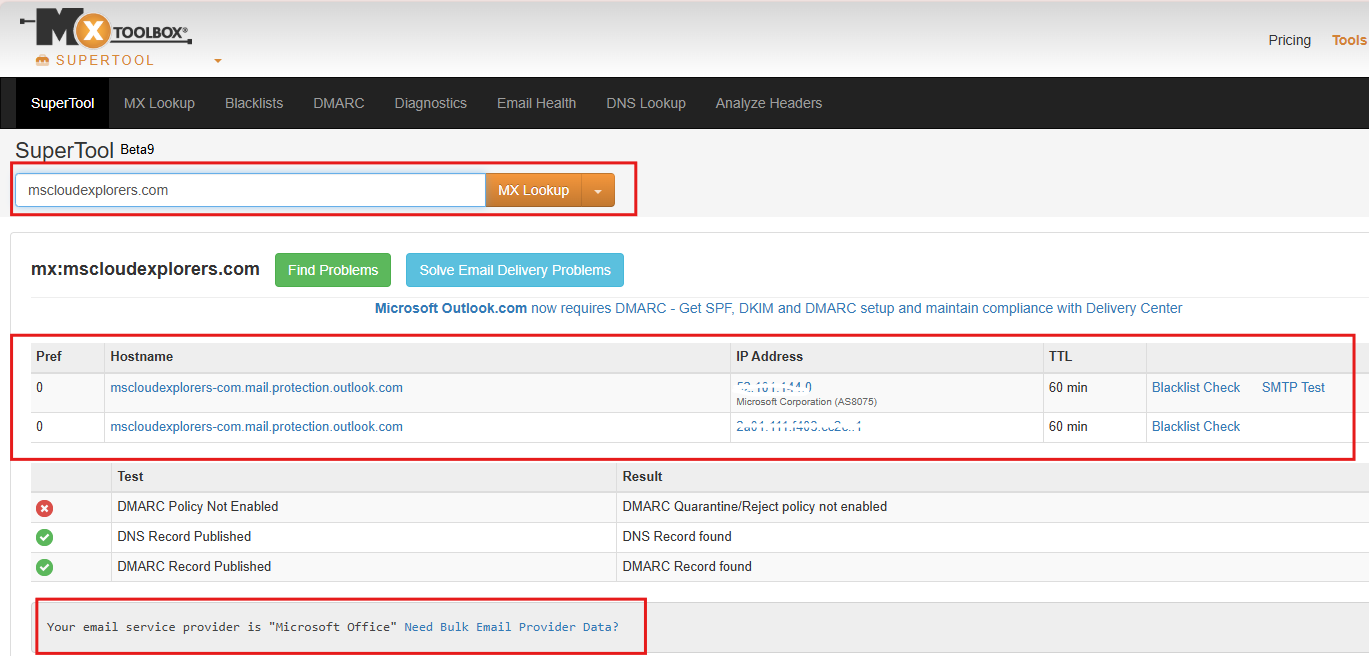
- Use the MX Tool Box diagnostic tools to troubleshoot any issues.
Step 7: Assign Users to the New Domain
Once the domain has been setup and verified you can start changing the username of the accounts.
-
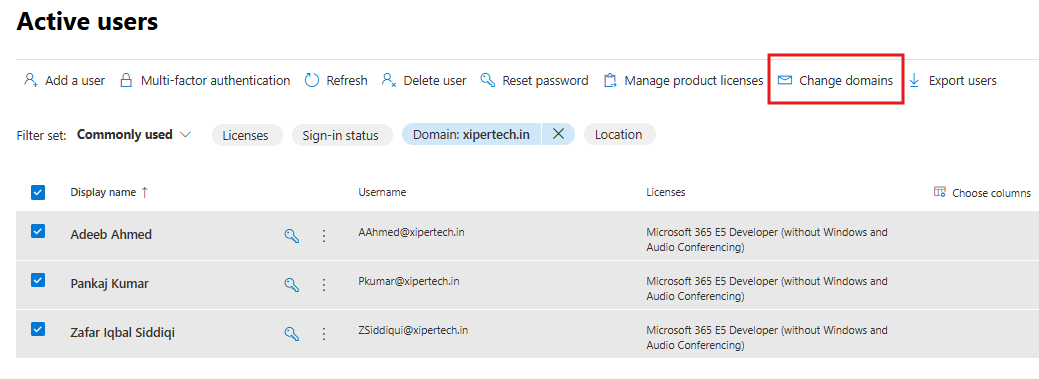
In the Admin Center, navigate to Users > Active users.
-
Select all the user accounts that you want to assign the new domain.
-
Click Change Domains.
-
Select the newly added domain Name in the dropdown list (e.g.,
mscloudexplorers.com). -
Save the changes.
How to Test the Domain After Setup
After completing the setup, test the domain before announcing the change to users.
- Confirm that the domain status is healthy in Microsoft 365 admin center > Settings > Domains.
- Send a test email from an external mailbox to a Microsoft 365 user using the new domain.
- Send a test email from Microsoft 365 to an external mailbox.
- Check Outlook Autodiscover behavior for a test user.
- Use DNS lookup tools to confirm TXT, MX, CNAME, SPF, DKIM, and DMARC records are visible publicly.
- Review message headers to confirm SPF, DKIM, and DMARC alignment after email authentication is configured.
DMARC Records in Microsoft 365
While DMARC (Domain-based Message Authentication, Reporting, and Conformance) has always been highly recommended for email security and deliverability, it will become essential for certain organizations using Microsoft 365. Starting May 2025, all organizations sending 5,000 or more emails per day to Microsoft consumer services (Outlook.com, Hotmail, Live.com) must publish valid SPF, DKIM, and at least a DMARC record with a ‘p=none’ policy. Without these records, your emails may be marked as spam or rejected, reducing deliverability and increasing risk.
Key DMARC Points:
Even if you don’t meet the high-volume threshold, setting up DMARC is strongly recommended for all domains to improve mail security and gain visibility into how your domain is used.
- DMARC helps protect your domain from phishing, spoofing, and unauthorized use.
- It works by aligning SPF and DKIM with the “From:” address in your messages and gives you control over how unauthenticated emails are handled.
- DMARC helps protect your domain from phishing, spoofing, and unauthorized use.
DMARC Record Example (customize for your needs):
Plaintext
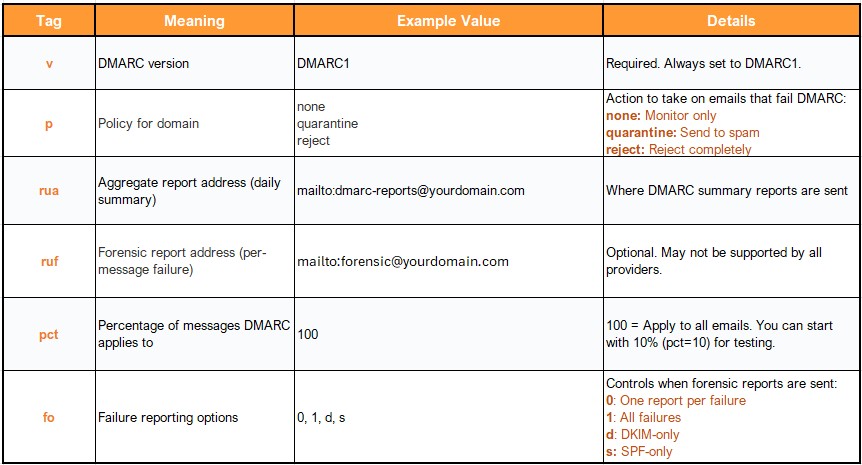
v=DMARC1; p=quarantine; rua=mailto:dmarc-reports@yourdomain.com; ruf=mailto:forensic@yourdomain.com; pct=100; fo=1;
Explanation of Each Tag
Simplified/Minimal DMARC Record Example (Monitoring Only)
Plaintext
v=DMARC1; p=none; rua=mailto:dmarc-reports@yourdomain.com
This simply monitors DMARC alignment without affecting mail flow. Good for starting out.
Important Notes:
Gradually move from none → quarantine → reject as you validate email sources.
Make sure the reporting email addresses (rua/ruf) are set up and can receive mail. You can separate Shared Mailbox for it.
If you’re using third-party services (e.g., Mailchimp, Salesforce), they must be configured to align with your domain via SPF/DKIM.
Use this to monitor DMARC results without affecting email delivery. Ideal for initial setup or testing.
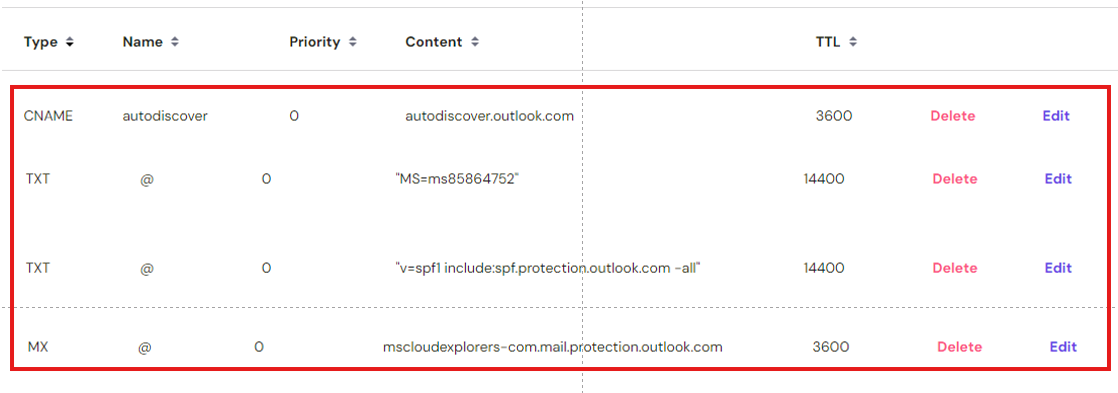
DNS Host Management
Your DNS records should look like the following:

Common Microsoft 365 Domain Setup Issues and Fixes
|
Issue |
Possible cause |
How to fix it |
|
Domain verification failed |
TXT record is missing, added to wrong DNS zone, or not propagated yet. |
Confirm the domain, record type, host/name, and TXT value. Wait for DNS propagation and verify again. |
|
Email not receiving after MX change |
MX record is incorrect or mailboxes are not ready in Microsoft 365. |
Check MX value and priority. Confirm users have Exchange Online mailboxes and licenses. |
|
Outlook profile not configuring automatically |
Autodiscover CNAME record is missing or pointing to the old provider. |
Update the Autodiscover CNAME record only when you are ready for Outlook to connect to Microsoft 365. |
|
SPF record error |
Multiple SPF TXT records exist for the same domain. |
Merge all senders into a single SPF TXT record instead of creating multiple SPF records. |
|
Domain shows incomplete setup |
Some optional or delayed DNS records are not configured. |
Review the DNS records page. If this is a migration, confirm whether records are intentionally delayed. |
|
Users still using onmicrosoft.com address |
The custom domain has not been assigned to users. |
Update user sign-in names or email addresses to use the verified custom domain. |
Frequently Asked Questions
Can I add multiple domains to Microsoft 365?
Yes. You can add multiple custom domains to a Microsoft 365 tenant and use them for different brands, departments, aliases, or user groups.
What DNS records are required for Microsoft 365 email?
For Exchange Online email, you generally need an MX record, an Autodiscover CNAME record, and an SPF TXT record. DKIM and DMARC are also recommended to improve email authentication.
Is SPF a TXT record or CNAME record?
SPF is configured as a TXT record. Do not create SPF as a CNAME record.
Should I update the MX record immediately after adding the domain?
No. If email is still hosted somewhere else, update the MX record only when users, mailboxes, and migration planning are ready.
How long does Microsoft 365 domain verification take?
Verification can complete quickly after the DNS record is visible, but DNS propagation depends on the DNS provider and may take longer.
Can I connect a Hostinger domain to Office 365 or Microsoft 365?
Yes. Add the Microsoft 365 TXT verification record and required email DNS records in the Hostinger DNS zone, then complete verification from the Microsoft 365 admin center.
Can users keep their old email address after adding a new domain?
Yes. You can keep the old email address as an alias while setting the new domain address as the primary email address, depending on your business requirement.
Conclusion
Adding a custom domain to Microsoft 365 is an important step for creating professional email addresses and connecting your business identity to Microsoft 365 services. The main steps are simple: add the domain, verify ownership, configure DNS records, and assign the domain to users. However, the most important part is planning your DNS changes carefully, especially the MX record, so email flow is not interrupted.
If you are setting up Microsoft 365 for the first time, add your custom domain before creating all users. If you are moving from another email provider, verify the domain first and update mail-flow records only when your migration plan is ready.
Explore More from MS Cloud Explorers
- A Practical Guide to Successful Microsoft 365 Adoption
- How to Configure SMTP Relay in Office 365: A Comprehensive Guide
- Microsoft Zero Trust Assessment: A Step-by-Step Guide for IT Admins
- Mail Flow Rules in Exchange Online: A Comprehensive Guide
- Microsoft Zero Trust Assessment Tool: Complete Step-by-Step Guide for IT Admins (2026)
- Microsoft 365 Data Protection: The Ultimate Guide to Secure Your Cloud Data
- Microsoft Insider Risk Management: A Complete Guide to Prevent Insider Threats
- How to Create and Assign Microsoft Phishing Simulator Training in Microsoft 365
- Microsoft 365 Applications Explained: A Complete Guide for IT Admins
- Step-by-Step Guide to Create and Manage Microsoft 365 Accounts and Groups
- How to Create a New Microsoft 365 Tenant: A Step-by-Step Guide
Enjoyed the article?
We’d love to hear your thoughts—share your comments below!
For more insights, guides, and updates from the Microsoft ecosystem, be sure to subscribe to our newsletter and follow us on LinkedIn. Stay connected and never miss out on the latest tips and news!
Hey! I’m pretty new to Office 365 admin stuff, but this guide made adding a domain way less scary than I thought 😅. The DNS steps were super clear too. Quick Q—how long does it usually take for the domain to verify? Mine’s been stuck for a bit.
Welcome to the world of 365 admin! 😊 So glad the guide helped—it can definitely feel overwhelming at first. Domain verification can take anywhere from a few minutes to an hour, depending on your DNS provider. If it’s been longer, double-check the TXT record for typos. Let me know if you’re still stuck—we’ve all been there!