

As a Microsoft 365 Engineer, I often hear terms like “please whitelist this domain” or “block this sender” from customers. Whitelist domains in Microsoft 365 is a common request, and it’s important to manage these domains efficiently to maintain email security while allowing trusted communications. In this post, we’ll dive deep into the Tenant Allow and Block List (TABL) in Microsoft Defender, explaining how you can manage your whitelist and block lists effectively, providing you with the best practices for email security.
What is the Best Way to Block or Whitelist Domains in Microsoft 365?
When it comes to whitelisting domains in Microsoft 365, two primary methods are commonly used: Exchange Online Transport Rules (ETRs) and Microsoft Defender’s Tenant Allow and Block List (TABL). Which one should you use?
- Exchange Online Transport Rules are suitable for simple domain management tasks, but they can be cumbersome to manage and are limited in scope.
- Microsoft Defender’s Tenant Allow and Block List is the recommended method. Here’s why:
-
- Centralized Management: The TABL provides a single, unified place to manage your allow/block list for both senders and domains.
- Automation and Threat Intelligence: Microsoft Defender automatically updates the list with new threat intelligence, helping to block malicious senders more effectively.
- Integration with Other Security Measures: The TABL integrates with other tools such as Threat Explorer and anti-phishing policies, providing a more comprehensive security approach.
For better results, always prefer using Microsoft Defender’s Tenant Allow and Block List to whitelist domains in Microsoft 365. It offers a more streamlined and secure way of managing email traffic.
What does the Tenant Allow and Block List in Microsoft Defender?
The Tenant Allow and Block List (TABL) is a powerful security feature in Microsoft Defender for Office 365. It enables administrators to manage email communications by permitting (whitelisting) or blocking specific senders, domains, and file types. This feature is crucial for protecting your Microsoft 365 environment from phishing, malware, and spam threats.
By using the Tenant Allow and Block List, you can ensure that only trusted senders and domains are allowed to communicate with your organization, while malicious ones are blocked. Whitelisting domains in Microsoft 365 provides a proactive approach to ensuring that legitimate communications are not disrupted.
Key Features of the Tenant Allow/Block List
- Sender Management:
- Block malicious senders by adding their domains or email addresses to the block list.
- Ensure trusted communication by allowing specific senders.
- File Type Management:
- Block specific file types or extensions commonly associated with malware.
- Automatic Blocking:
- Leverage Microsoft Defender for Office 365 to auto-block malicious senders detected in phishing or spam campaigns.
- Spoofing Protection:
- Use the TABL to mitigate spoofing attempts and protect organizational domains.
How to Blocklist and Whitelist Domains in Microsoft 365 to Defender (Tenant Allow/Block List Management)
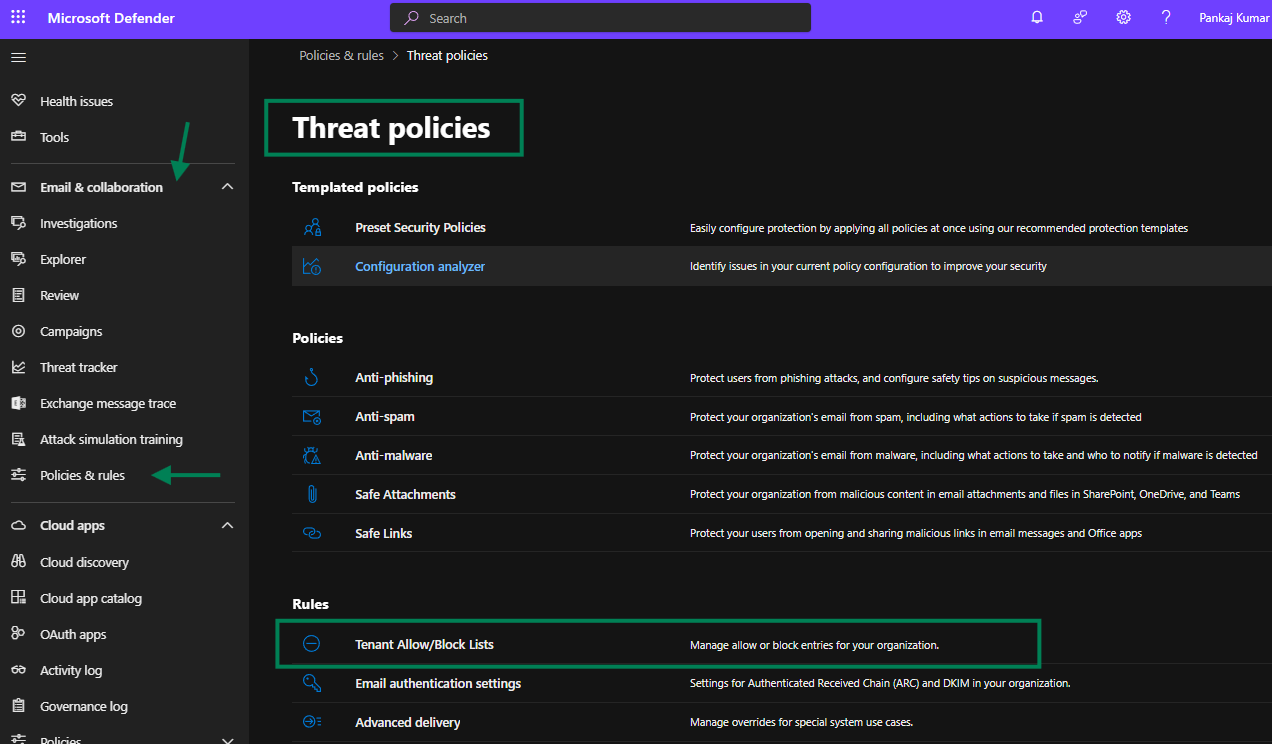
Accessing the Tenant Allow/Block List
- Log in to the Microsoft 365 Security or Defender Admin Center.
- Navigate to Email & Collaboration> Policies & Rules > Threat Policies.
- Select the Tenant Allow/Block Lists under the Rules.
Adding Entries to the Allow and Block List
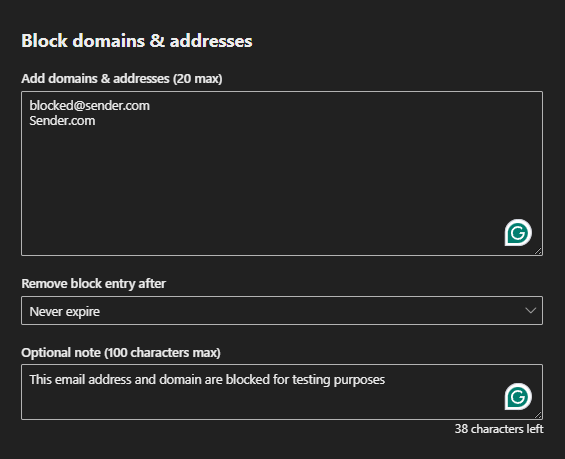
Adding a Sender to the Block List:
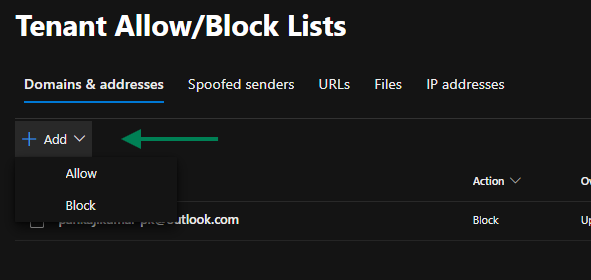
- Select + Add under the Domains & Addresses tab, Select the Block.

- Enter the email address or domain to be blocked.
- Specify a reason or notes for reference.
- Click Add to apply.
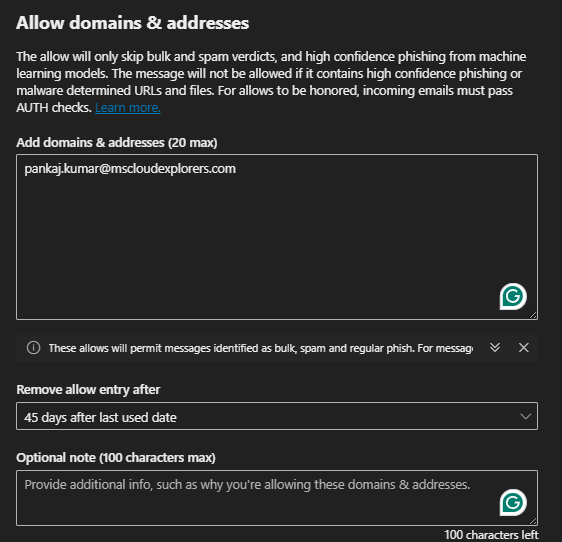
Adding a Sender to the Allow List:
- Select + Add under the Allow in the dropdown.
- Enter the trusted sender’s email address or domain.
- Provide a reason or additional details.
- Click on the Add.
Blocking File Types
- Go to the Files section in the Tenant Allow/Block List.
- Click on the Add or Block.
- Add extensions or specific file types to the list.
- Save the configuration.
Best Practice: Regularly review and update the blocked file types to align with evolving threats.
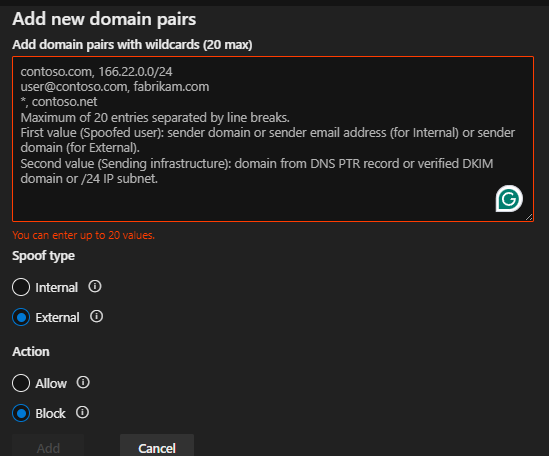
Managing Spoofed Senders
- Navigate to the Spoofed Senders tab.
- Review spoofing detection reports.
- Add trusted domains or email addresses if false positives are identified.
Integration with Threat Explorer
-
Threat Explorer is an essential tool for investigating and responding to malicious email activity. You can directly block or allow specific senders from the Threat Explorer interface, which will update the Tenant Allow/Block List accordingly.
-
By using Microsoft Defender for Office 365, organizations can efficiently manage their email security by integrating the Tenant Allow and Block List with Threat Explorer.
Best Practices for Tenant Allow and Block List Management
- Regular Audits:
- Periodically review entries in the allow and block lists to remove outdated or unnecessary records.
- Leverage Automation:
- Use automated threat intelligence feeds from Microsoft Defender to keep the list updated.
- Monitor Spoofing Activity:
- Regularly check spoofing reports and adjust the TABL to reduce false positives and negatives.
- Employee Training:
- Educate staff to recognize phishing and spam, reducing reliance on allow/block rules.
- Advanced Threat Protection:
- Combine TABL with other security measures, such as anti-phishing policies and multi-factor authentication (MFA).
Conclusion
Whitelisting domains in office 365 defender through the Tenant Allow and Block List is a crucial step in securing your organization’s email communications. By following the best practices outlined in this post and leveraging tools like Threat Explorer, you can efficiently protect your Microsoft 365 environment from malicious senders, phishing, and malware attacks.
Managing the Tenant Allow and Block List is an essential part of keeping your email system secure while ensuring that important, trusted communications are never blocked. Use the TABL in conjunction with other Microsoft Defender tools to build a robust defense system.
FAQs
1. What is the Tenant Allow/Block List in Exchange Online?
The Tenant Allow/Block List is a tool in Exchange Online used to manage email security by controlling which senders, domains, or file types are allowed or blocked. It helps prevent phishing, spam, and malware attacks.
2. How do I access the Tenant Allow/Block List?
You can access the list by logging into the Microsoft 365 Defender portal and navigating to Threat Management > Policy > Tenant Allow/Block List.
3. Can I block specific file types using the Tenant Allow/Block List?
Yes, you can block specific file types or extensions commonly associated with malware by adding them to the Blocked File Types section.
4. What happens if a legitimate email is blocked?
If a legitimate email is blocked, you should check the Blocked Senders list in the Tenant Allow/Block List and add the sender’s email or domain to the allow list if necessary.
5. How does the Tenant Allow/Block List help with spoofing protection? The Tenant Allow/Block List includes a Spoofed Senders section where you can identify and block spoofing attempts. You can also add trusted domains or senders to reduce false positives.
Explore More from MS Cloud Explorers
- Complete Breakdown of Microsoft Defender for Business and Step-by-Step Configuration Guide
- Microsoft Defender for Endpoint: Comprehensive Guide to Architecture, Features, and Plans
- The Ultimate Guide to Microsoft Secure Score: Strengthening Your Security Posture
- Microsoft Defender for Office 365 Overview and Step-by-Step Implementation
Enjoyed the article?
We’d love to hear your thoughts—share your comments below!
For more insights, guides, and updates from the Microsoft ecosystem, be sure to subscribe to our newsletter and follow us on LinkedIn. Stay connected and never miss out on the latest tips and news!


Hey, this was super helpful! I always got confused between spam filters and the allow/block list. This guide cleared it up nicely. One thing though—do I need to set this up even if I’m using a third-party email filter? Just curious. 😅
Glad it helped and totally get the confusion—those filters can get messy! 😄 If you’re using a third-party filter, it depends on how your mail flow is set up. But it’s still a good idea to keep the Tenant Allow/Block List updated just in case something slips through or bypasses the third-party filtering. Appreciate the comment!