

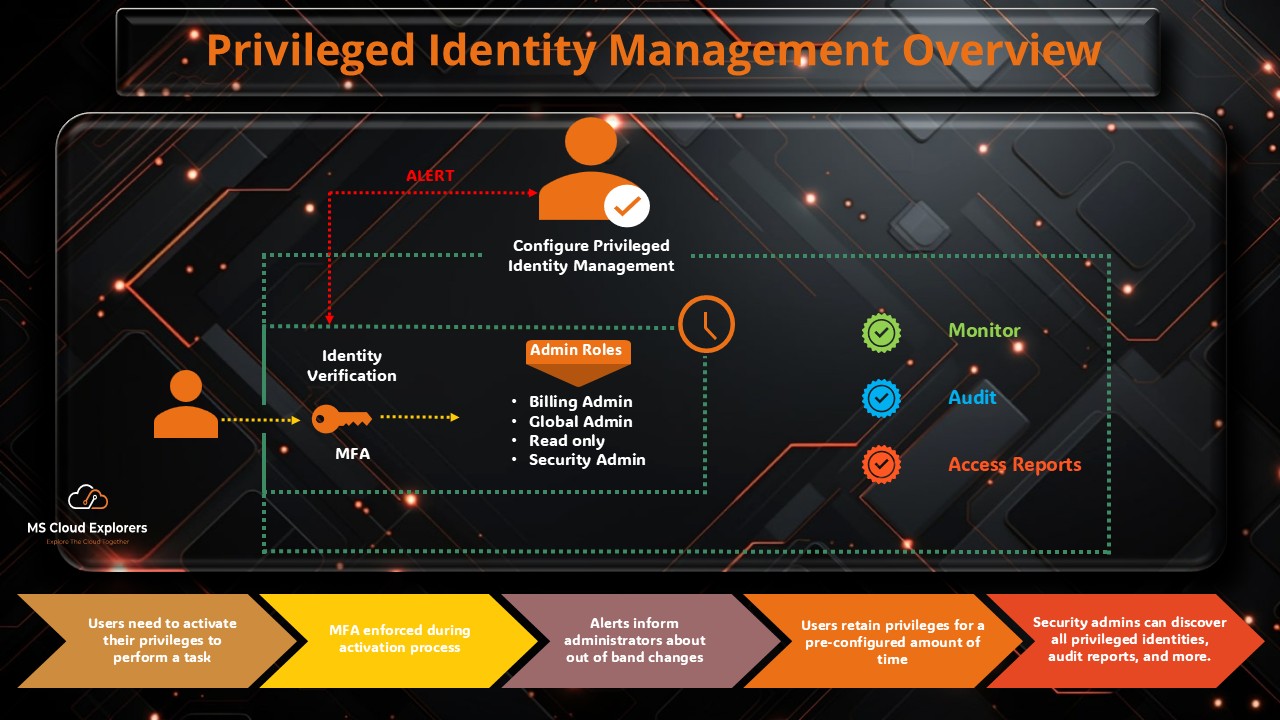
Privileged Identity Management (PIM) has never been more essential—and a recent security assessment for one of our customers made that clearer than ever. During the review, I noticed something that immediately raised a red flag: the tenant had 9 Global Administrators assigned.
Out of curiosity, I asked the IT team why so many users needed Global Admin access. Their response was honest—and familiar:
“We assigned Global Admin access because certain tasks couldn’t be completed with the existing role. Once the work was done, we simply forgot to remove it.”
This scenario is far more common than most organizations realize. While it often starts with good intentions, permanent privileged access quickly becomes a serious security risk. Microsoft recommends keeping the number of Global Administrators to a minimum—ideally fewer than five—to reduce your attack surface.
Leaving standing privileged access in place increases the blast radius of an account compromise and often creates compliance gaps.
The good news? Strong security doesn’t have to slow down productivity.
That’s exactly where Privileged Identity Management (PIM) comes in.
What Is Privileged Identity Management?
Privileged Identity Management (PIM) is a feature of Microsoft Entra ID designed to help organizations enforce the principle of least privilege.
In simple terms, Privileged Identity Management ensures users receive elevated permissions only when they need them—and only for a limited time. This significantly reduces the risks associated with always-on administrative access.
How Microsoft Entra Privileged Identity Management Works
Think of Microsoft Entra PIM as a security gate between administrators and privileged roles.
Instead of permanently assigning roles such as Global Administrator, Privileged Role Administrator, or SharePoint Administrator, users receive eligible access. When administrative work needs to be performed, the user activates the role for a limited period of time.
Depending on your organization’s security requirements, the activation process can require:
- Multi-Factor Authentication (MFA)
- Business justification
- Ticket information
- Manager or security team approval
Once the approved duration expires, privileged access is automatically removed.
This Just-in-Time (JIT) model significantly reduces the attack surface compared to permanently assigned administrator accounts.
Example
Without PIM:
User = Global Administrator
24x7x365 access
With PIM:
User = Eligible Global Administrator
Activate for 2 hours
Access automatically removed
Why Privileged Identity Management Matters
In today’s digital workplace, privileged accounts are a primary target for attackers. Whether the threat is internal or external, unmanaged admin access can lead to:
- Data breaches
- Configuration drift
- Compliance violations
- Lateral movement across the tenant
Privileged Identity Management helps organizations control, monitor, and audit all privileged access in a centralized and secure way.
Eligible vs Active Assignments in Azure PIM
| Assignment Type | Description | Recommended |
|---|---|---|
| Active | Continuous administrative access | ❌ Only when necessary |
| Eligible | Access activated only when needed | ✅ Best Practice |
Active Assignment
An active assignment provides permanent access to a role. The administrator can immediately perform privileged actions without requesting activation.
Eligible Assignment
An eligible assignment requires the administrator to activate access before using the role. Additional controls such as MFA, approval workflows, and justification can also be enforced.
For most organizations, Microsoft recommends using Eligible assignments whenever possible.
Key Features of Privileged Identity Management
- Just-in-Time (JIT) Access
Activate privileged roles only when required, reducing exposure windows. - Time-Bound Role Assignments
Define start and end times for access—ideal for projects or temporary work. - Approval-Based Role Activation
Require authorization before high-privilege roles are activated. - Multi-Factor Authentication (MFA)
Enforce MFA during role activation to verify user identity. - Access Reviews
Periodically review role assignments and remove unnecessary access. - Detailed Audit Logs
Track all role activations and changes for compliance and investigation.
License Requirements for Privileged Identity Management
One of the most common questions administrators ask is whether Azure PIM requires a separate license.
Microsoft Entra Privileged Identity Management requires Microsoft Entra ID P2 licensing.
PIM is included with:
- Microsoft Entra ID P2
- Microsoft 365 E5
- Enterprise Mobility + Security E5
- Microsoft 365 E5 Security
If a user needs to activate or manage privileged roles through PIM, that user should be licensed appropriately.
Privileged Identity Management Best Practices
- Always require MFA for role activation
- Use Conditional Access policies for additional protection
- Prefer Eligible assignments over permanent roles
- Run regular access reviews
- Monitor audit logs for suspicious activity
- Align activation duration with actual task requirements
Benefits of Implementing Privileged Identity Management
- Improved Security Posture – Reduced risk of credential misuse
- Regulatory Compliance – Supports PCI-DSS, HIPAA, SOX, and more
- Operational Efficiency – Automated approvals and removals
- Consistent Governance – Centralized control of privileged access
Step-by-Step: Configure Privileged Identity Management
Step 1: Enable PIM
- Sign in to the Azure portal or the Entra ID Portal.
- Search for Privileged Identity Management
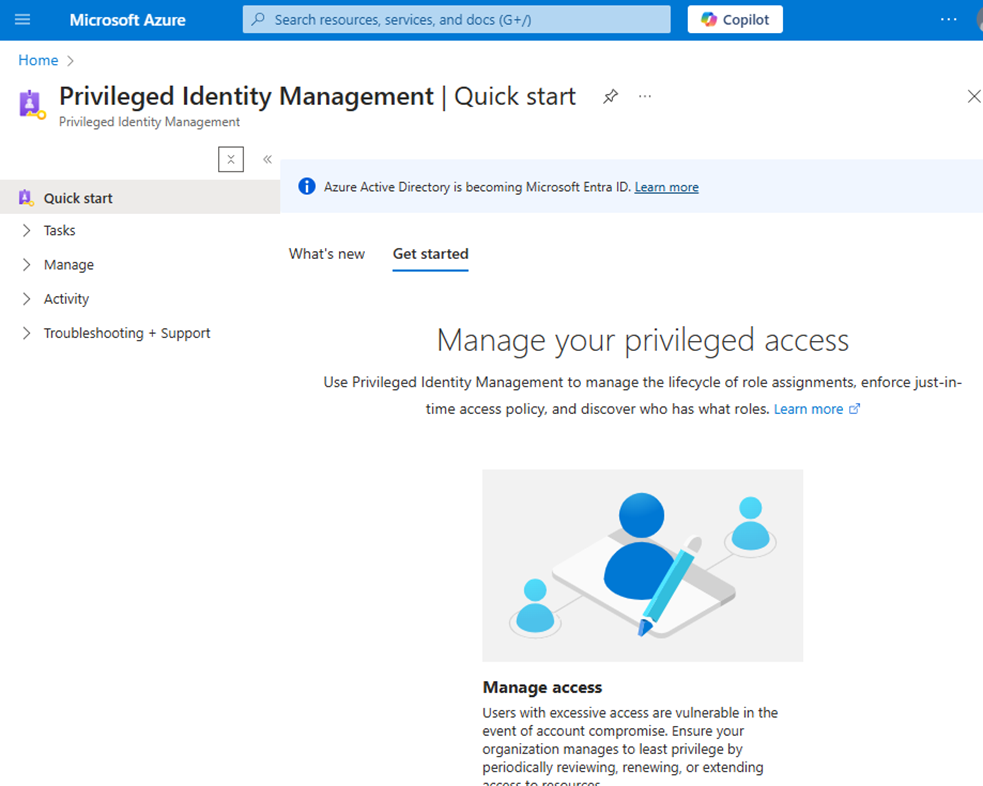
- Onboard your directory or subscription by following the prompts
Step 2: Assign Roles
- Go to PIM > Manage > Roles
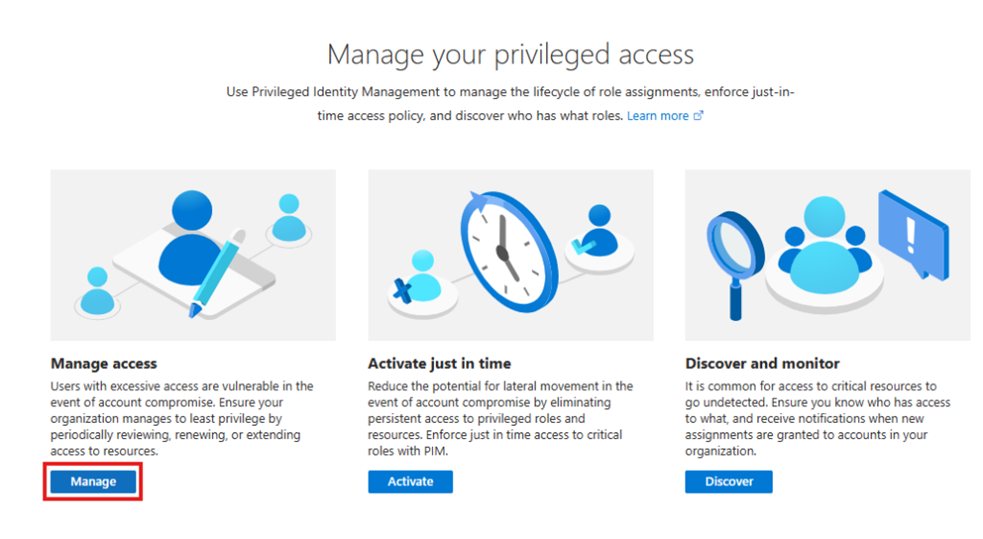
- Select the role you want to manage and click Add assignments.
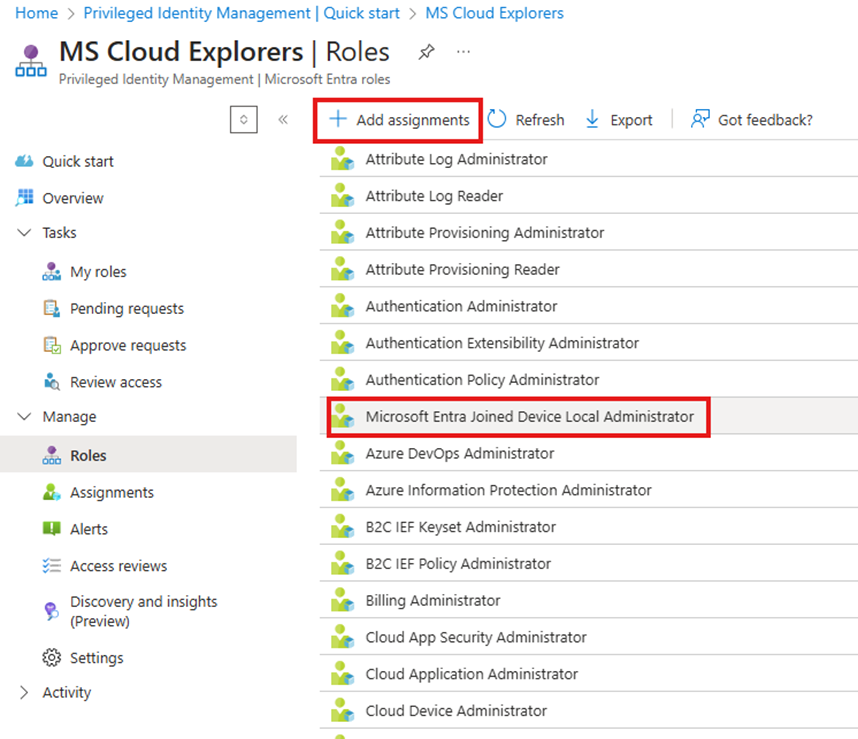
- Then Again Click on the + Add Assignments.
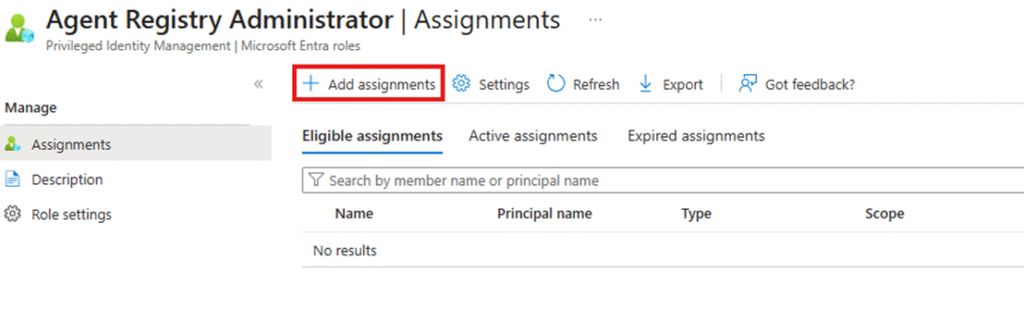
- Select the user or Group that you want to assign the Role.
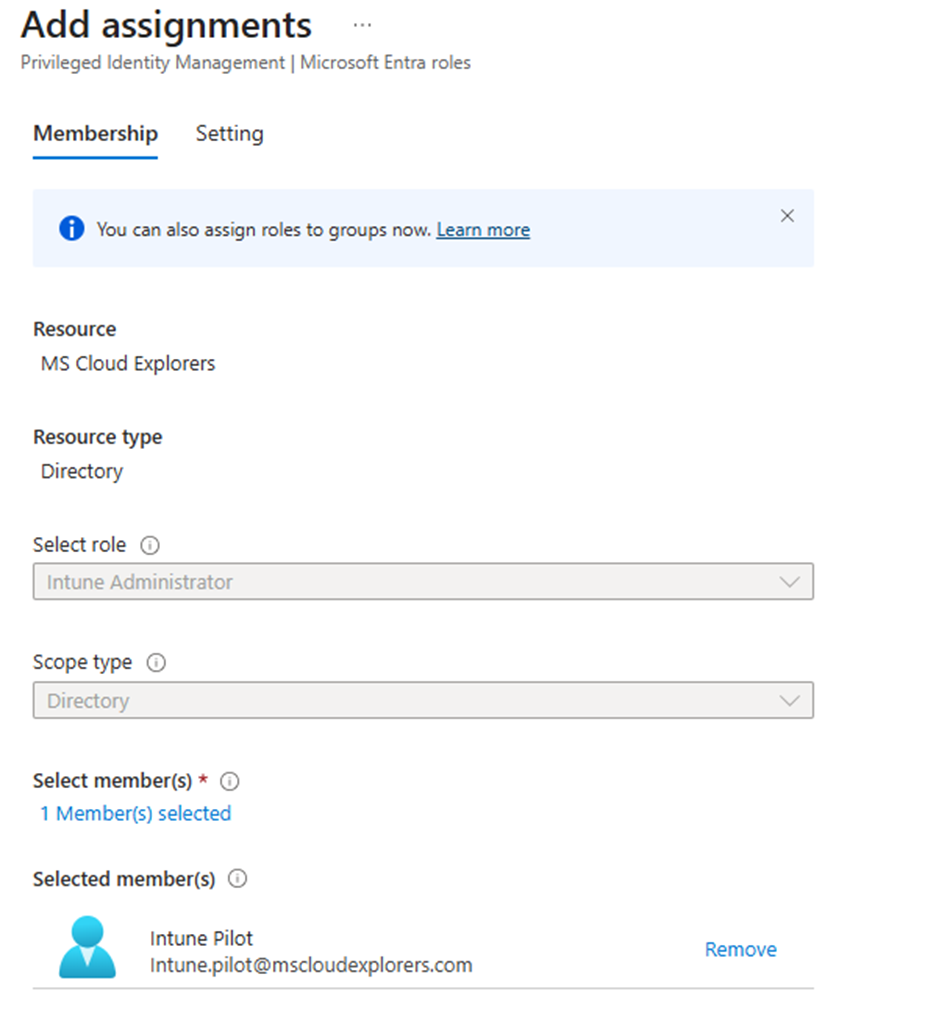
- Under the settings Choose Eligible or Active. (I have explained Briefly about Eligible Assignment below in this blog). So, I’m choosing here Active.
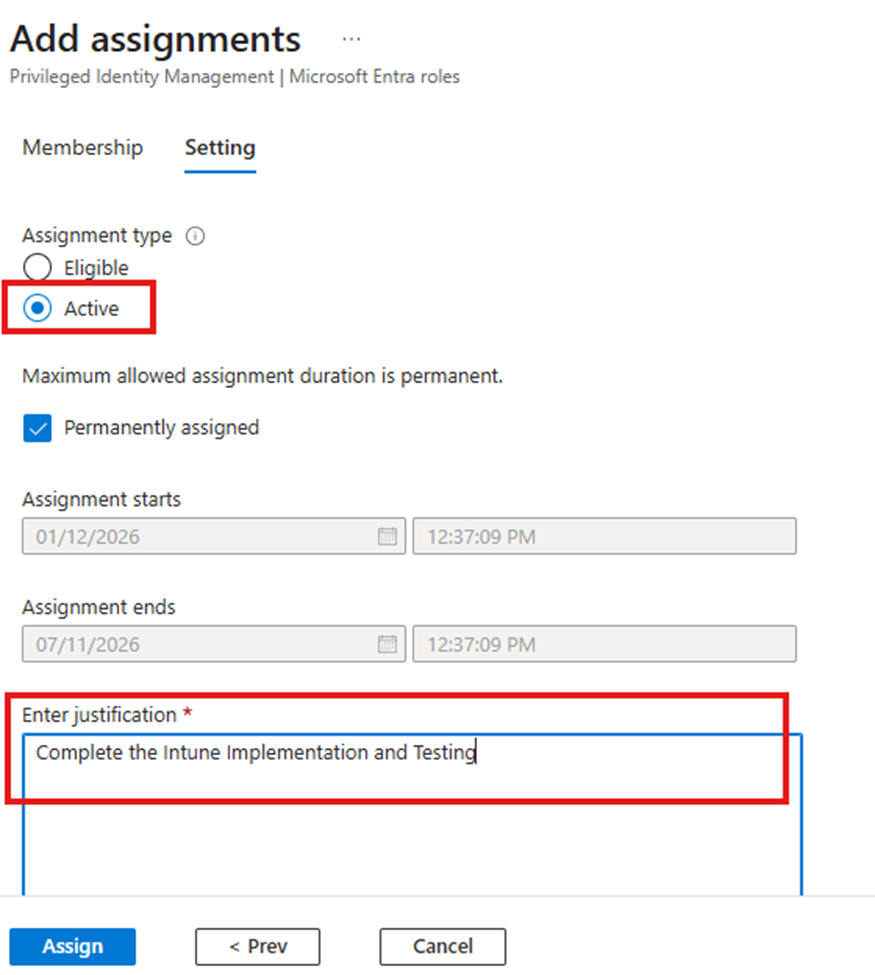
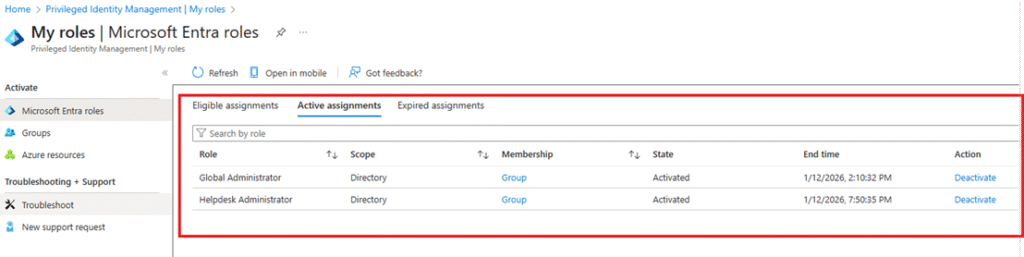
Once the Role is assigned Admin can access the respective Admin center as we as they can verify their Assignment under my Roles in Active Assignments.
Note: Active assignments grant permanent access and should be used only when absolutely necessary.
Modifying Role Settings for Eligible Assignments
You can assign roles using the steps above. During assignment, you will have access to Role Settings.
If a role is already assigned:
- Go to Manage > Assignments
- Select the role and open Settings
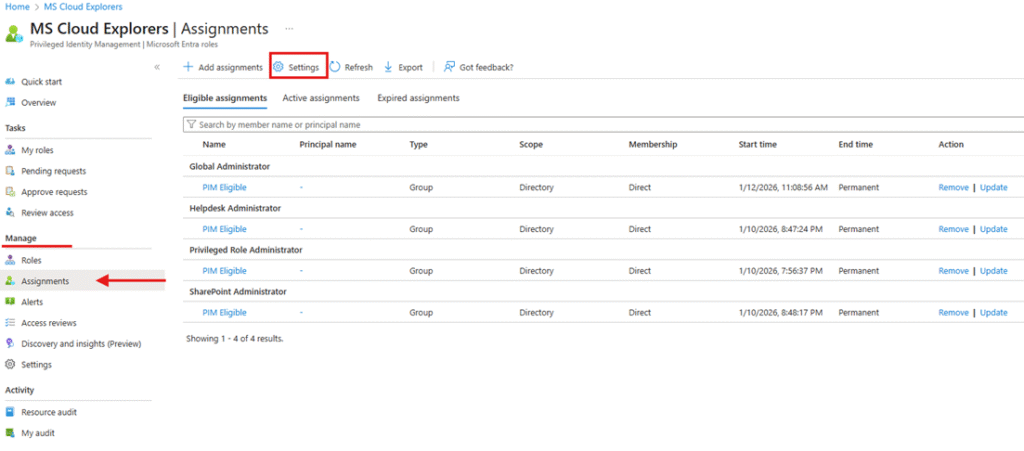
Step 3: Configure Role Settings
- Define activation requirements such as MFA, justification, and approval.
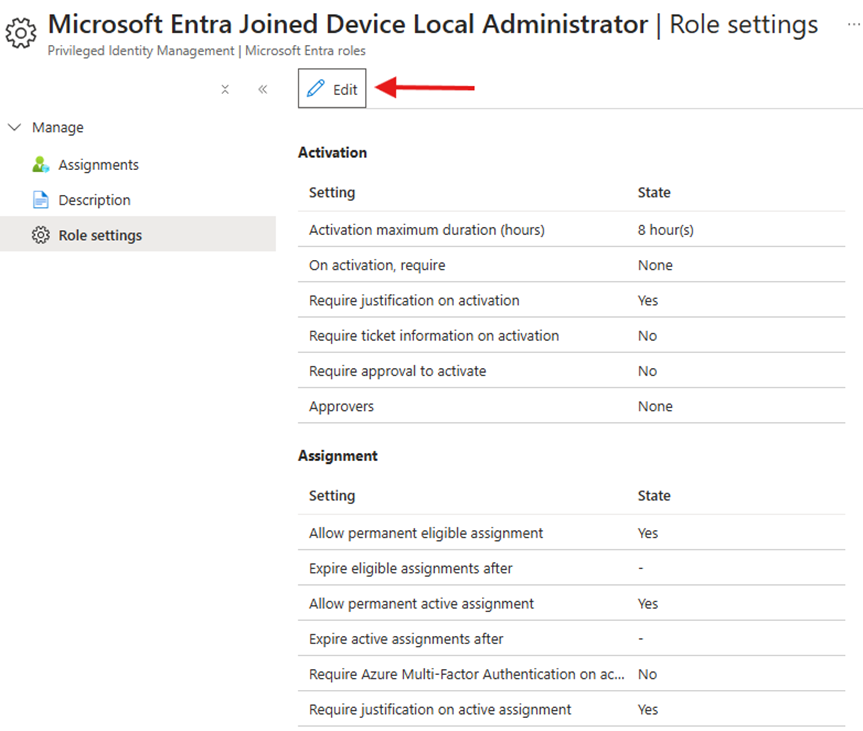
- Set the maximum activation duration to limit how long privileged access remains active.
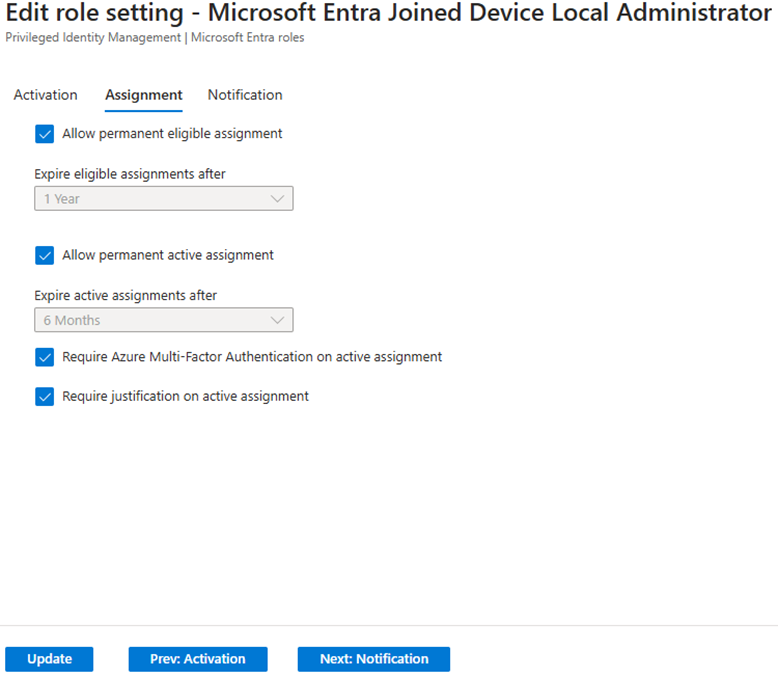
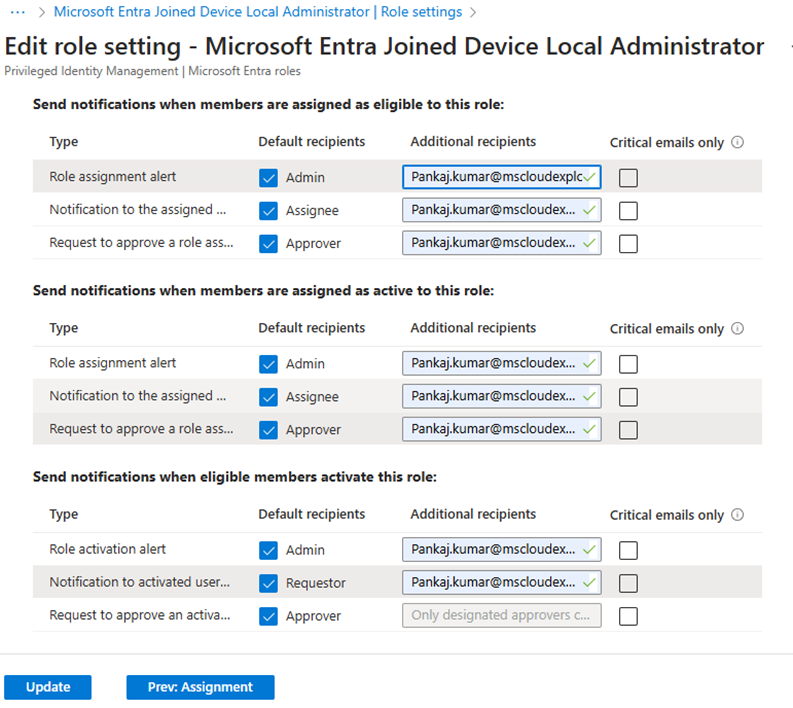
- Enable notifications to track role activations and changes.
For lower-privilege roles (Helpdesk, User Administrator, Exchange Admin):
- Set eligibility for up to 8 hours
- Require justification only
For high-privilege roles (Global Admin, SharePoint Admin):
- Require justification and approval
- Limit activation duration
- Assign approvers using a dedicated security or M365 group.
Using Entra ID security or M365 dynamic groups for admins and approvers makes PIM far easier to manage at scale.
How Eligible Assignments Work
For lower-privileged roles such as Helpdesk Administrator, User Administrator, or Exchange Administrator, you can assign users as Eligible with a maximum activation duration of up to 8 hours. These roles can typically be activated using justification only, without approval.
For high-privileged roles such as Global Administrator or SharePoint Administrator, you should configure activation to require approval. This ensures an additional security checkpoint before elevated access is granted.
In this guide, we will review the experience from:
- The requester’s perspective (admin requesting access)
- The approver’s perspective (approving or denying access)
Best Practice: Use Groups for Role Management
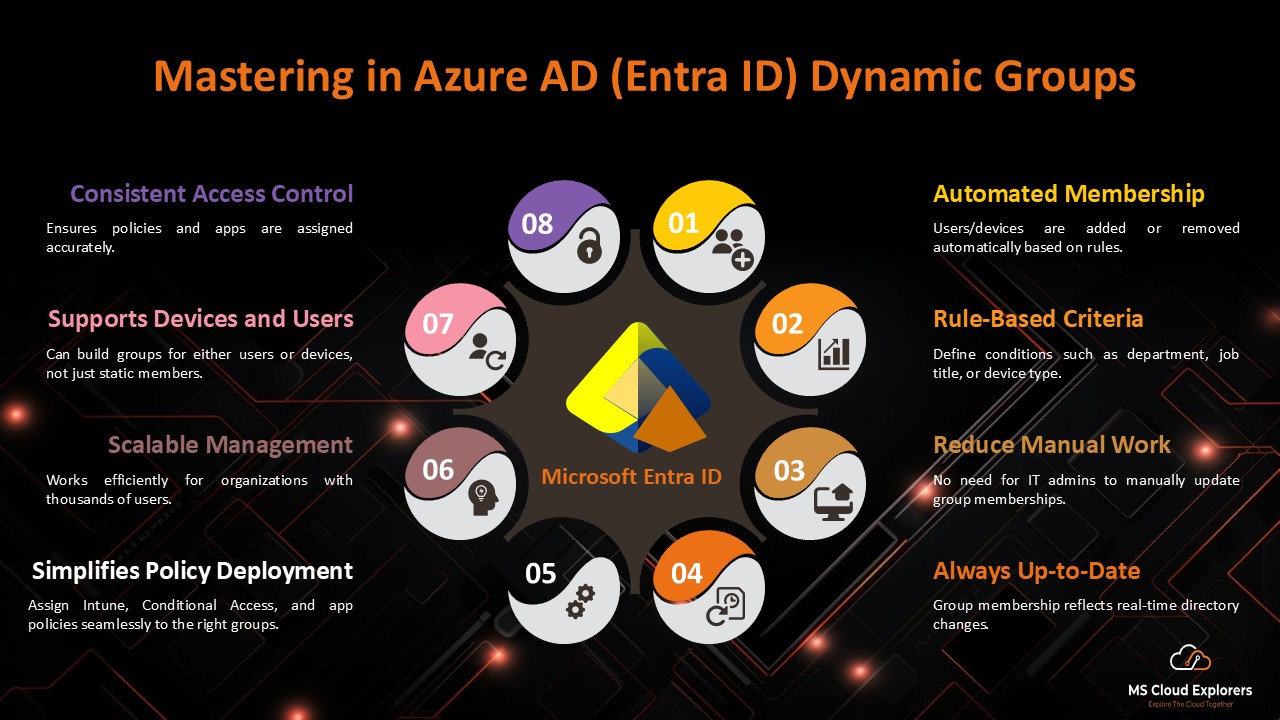
For better governance and scalability, create Entra ID Security Groups or Dynamic Groups.
In this tenant, two groups were created:
- One group for admins eligible for privileged roles
- Another group for PIM approvers and access reviewers

This approach simplifies role management and approval workflows.
Example Scenario
In this example:
- Users are eligible for Exchange Administrator, Privileged Role Administrator, and SharePoint Administrator roles with justification only.
- The Global Administrator role requires approval before activation.
Select the Global Administrator role (or any high-privilege role you want to restrict) and configure it accordingly.
Configure Activation Settings
- Under Activation settings, click the Edit (pencil) icon.
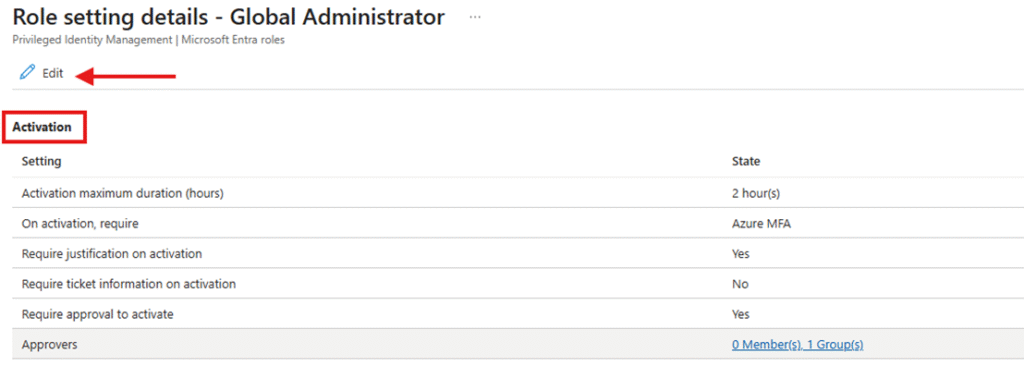
- Define how long admins can activate the Global Administrator role.
- Enable:
- Require justification on activation (for low-privilege roles)
- Require approval to activate (for high-privilege roles)
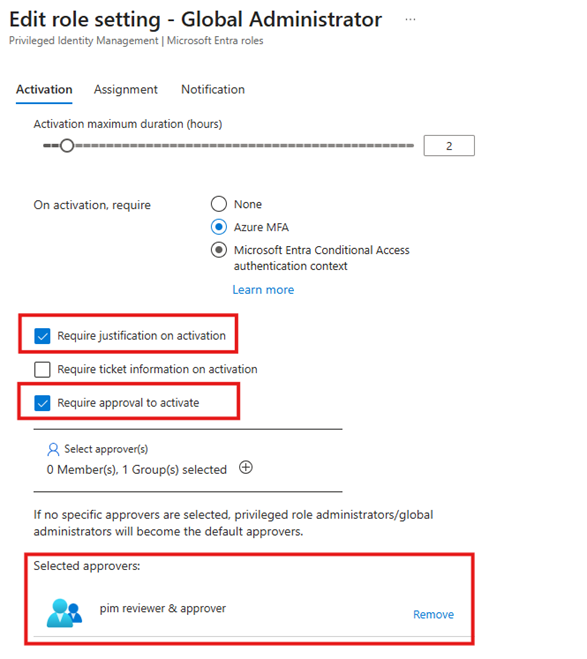
- If you use a ticketing system, enable Require ticket information on activation.
- Add the Approver Admins group and save the changes.
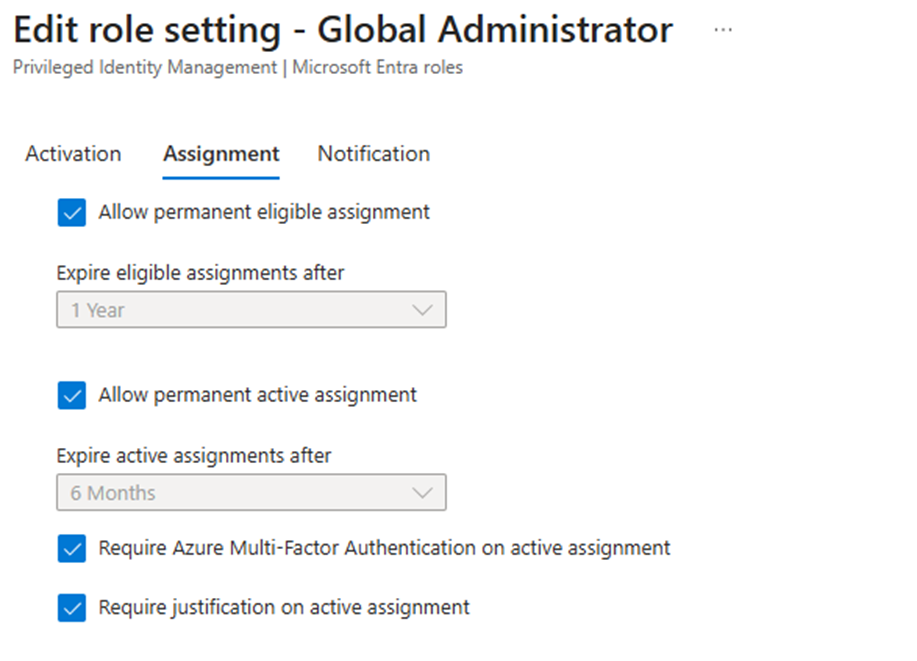
Under the Activation tab, you can also configure eligibility expiration and other related settings. Default values are sufficient for most environments, but you can adjust them to meet your requirements.
Notifications Configuration
By enabling notifications for role activations, you can track when privileged roles are activated. See the above Notifications management.
Best practice: Use Microsoft 365 groups for PIM approvers and eligible admins to simplify notification management.
How Admins Check Eligibility and Activate PIM Roles
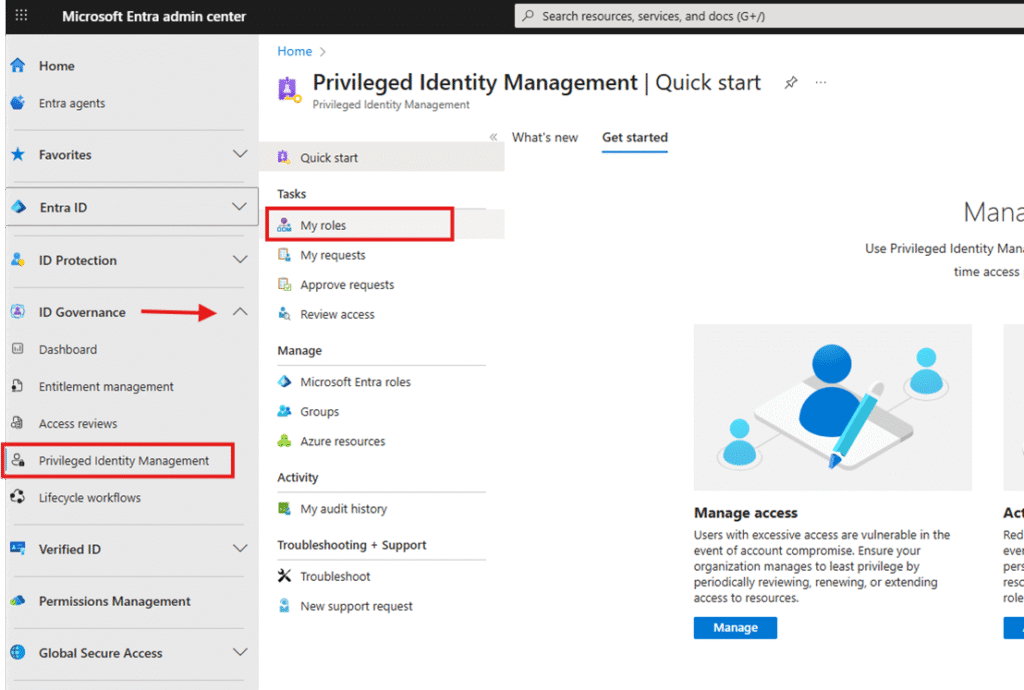
- Sign in to entra.microsoft.com.
- Navigate to Privileged Identity Management under the ID Governance menu.
- Click My roles.
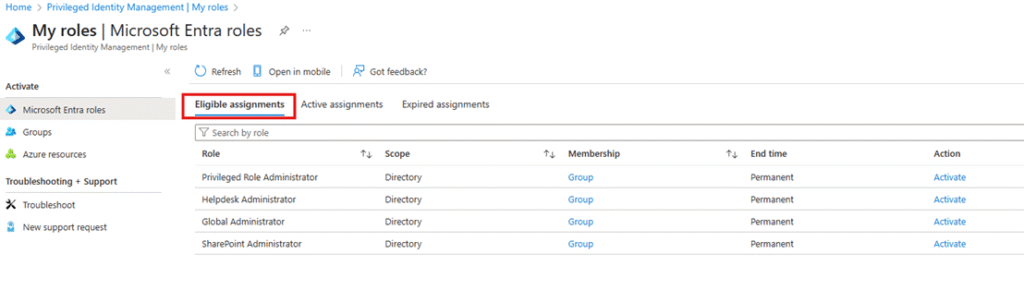
Under Eligible assignments, you will see the roles available for activation.
Activating a Role Without Approval
- Select Helpdesk Administrator.
- Click Activate on the right side.
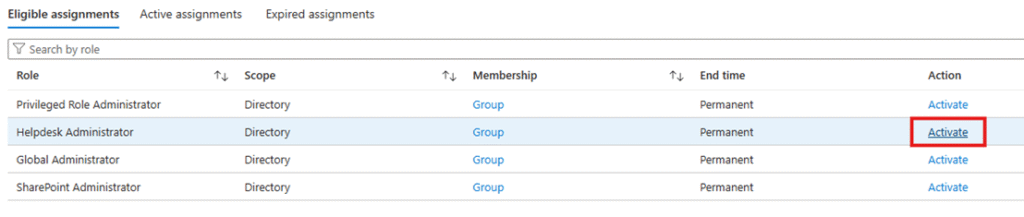
- In the activation window, provide a justification and click Activate.
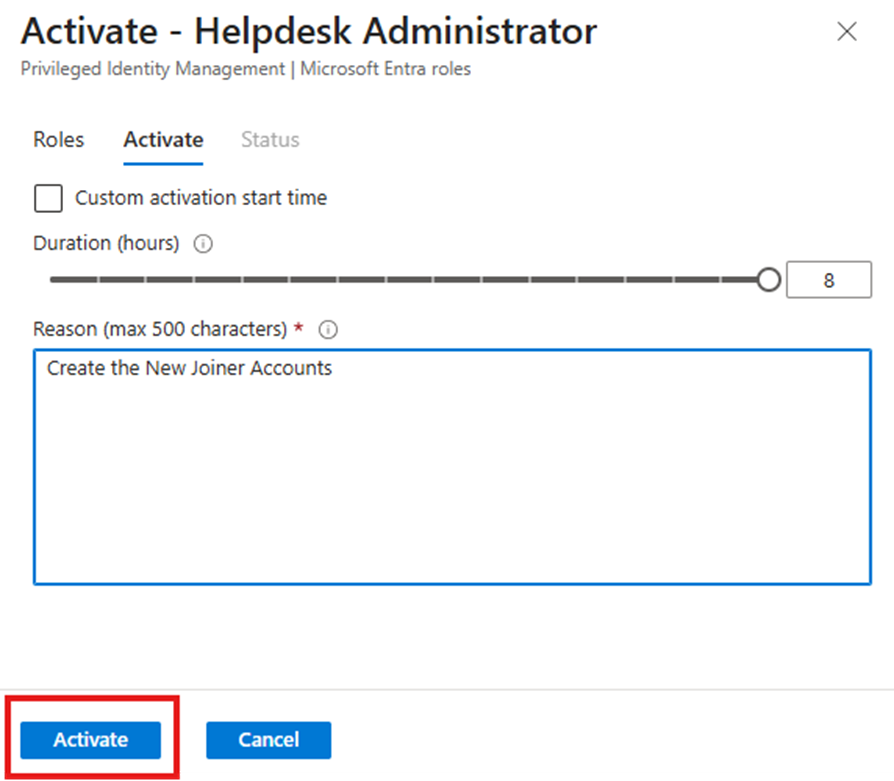
The activation process includes three automatic stages. Once completed:
- The role becomes active
- The browser refreshes automatically
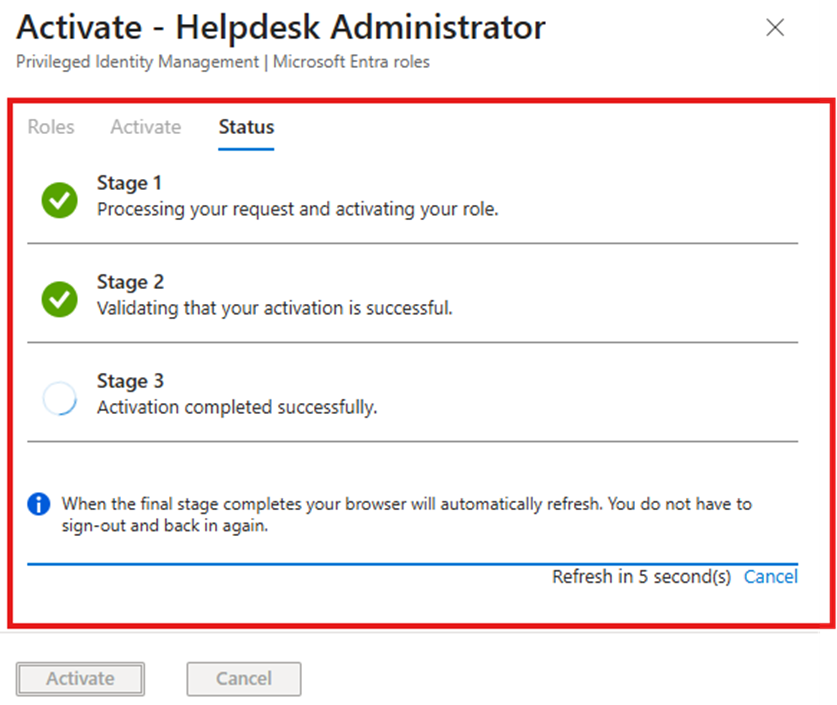
- You can verify activation under the Active assignments tab

Activating a Role That Requires Approval
- Go to the Eligible assignments tab.
- Select the Global Administrator role.
- Click Activate and provide justification.
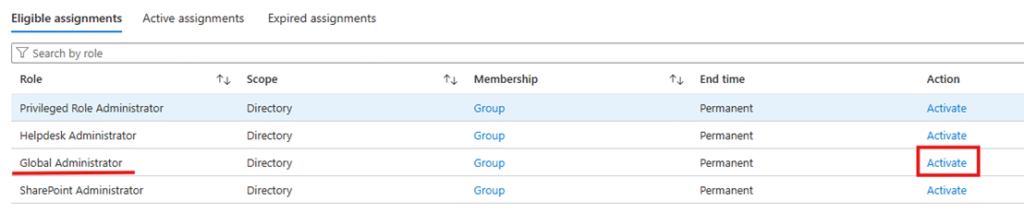
You will see similar activation stages, but instead of immediate access, a notification appears indicating the request is pending approval.
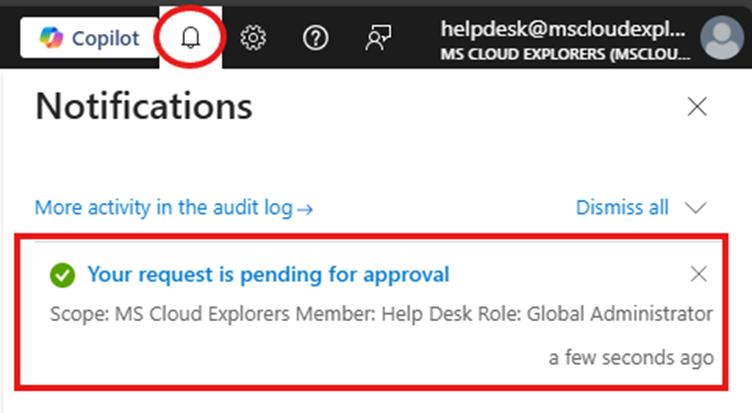
Approval Workflow (Approver Experience)
- All PIM approvers receive an email notification.
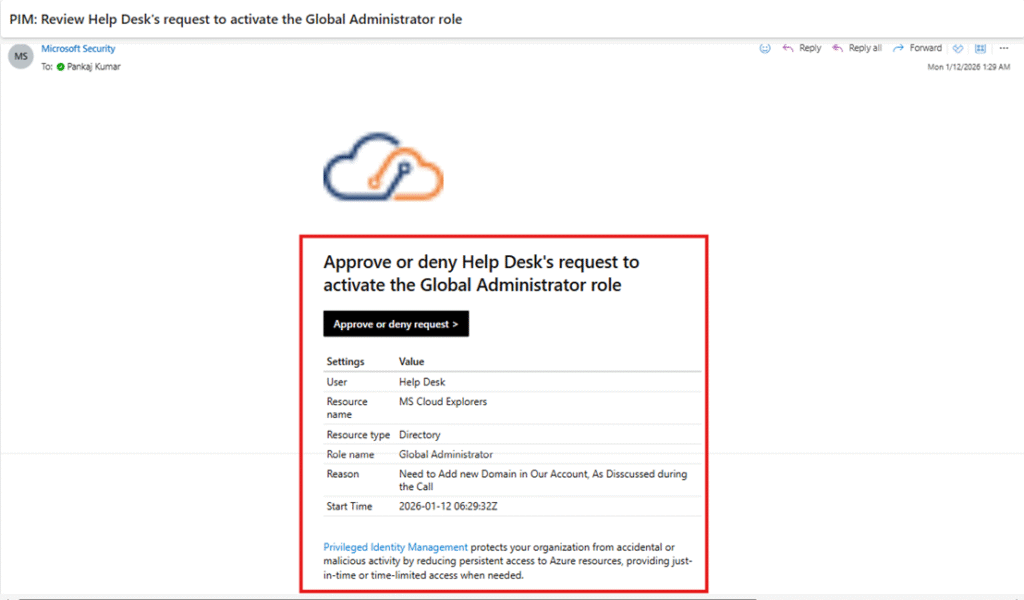
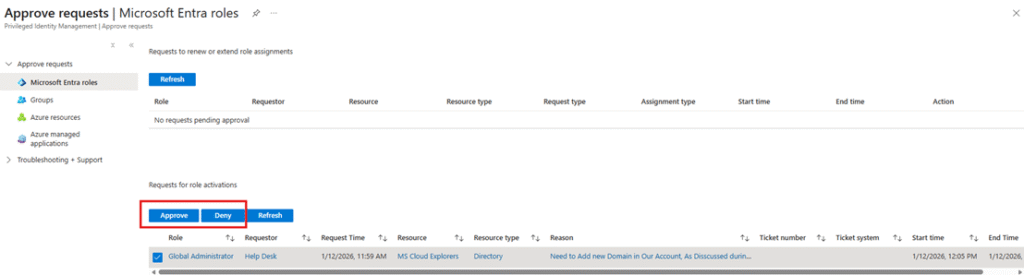
- Clicking Approve or Deny redirects them to the Entra Admin Portal – Approve Requests page.
- Approvers must provide justification and confirm the action.
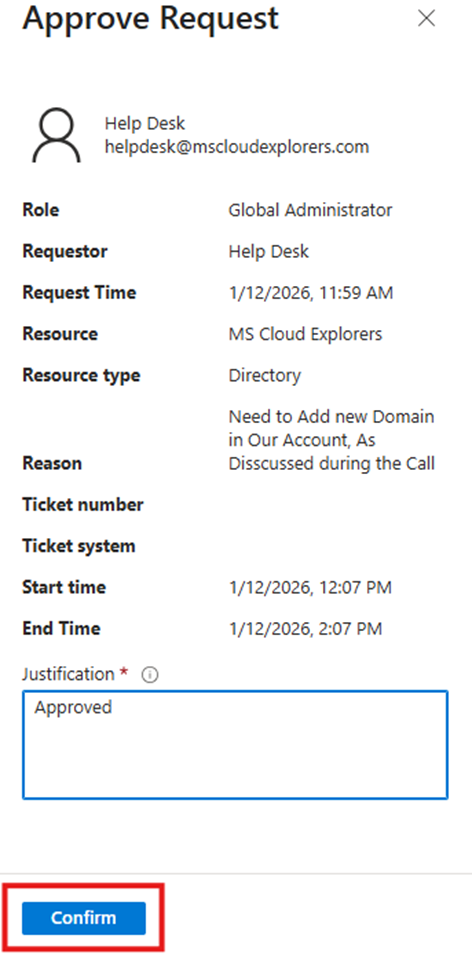
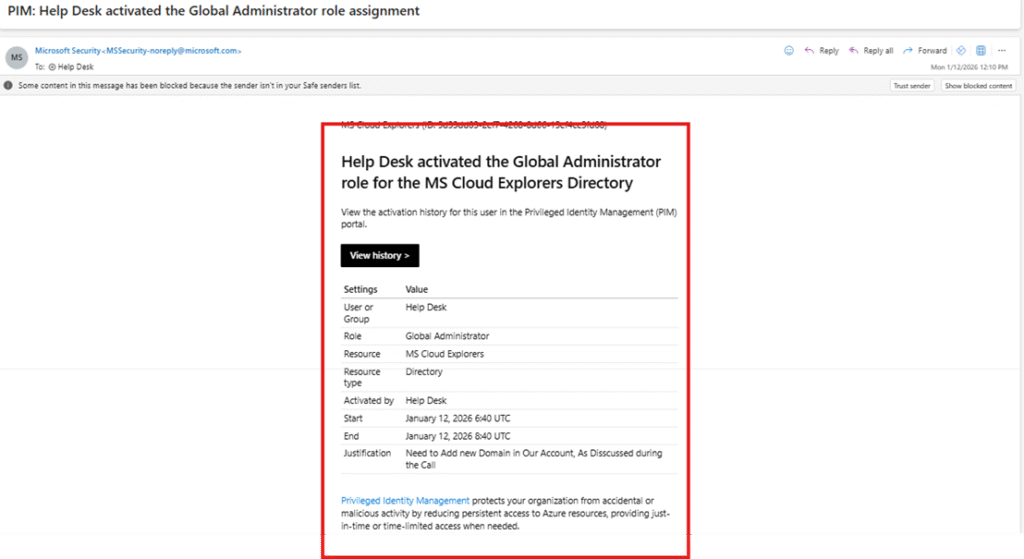
Once approved or denied:
- The requester receives an email notification
- The admin can verify role status under My roles > Active assignments
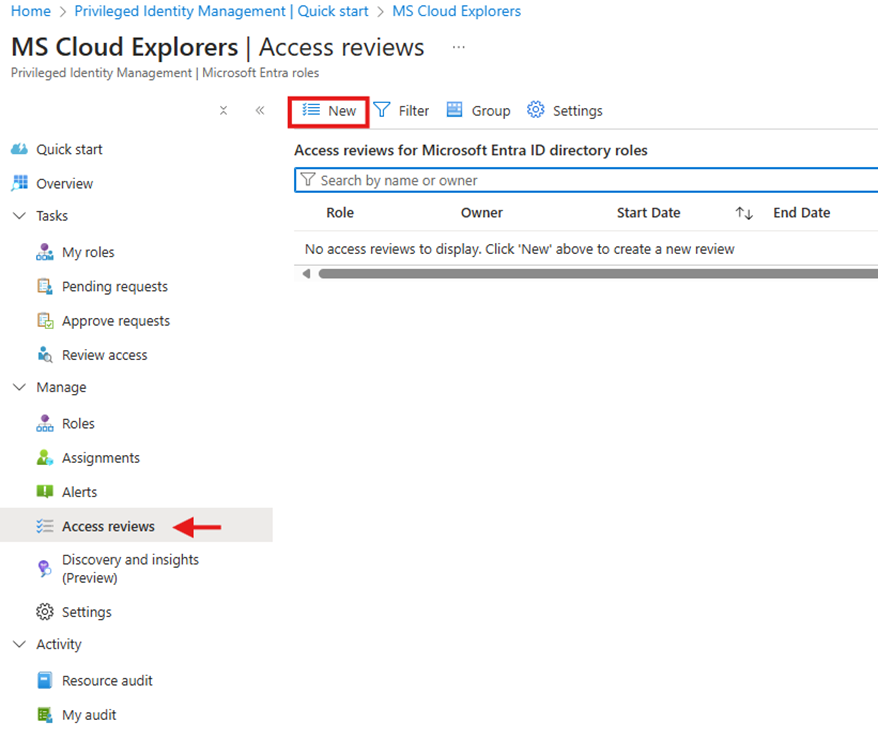
Step 5: Configure Access Reviews
- Go to PIM > Access Reviews
- Click New Access Review
- Define reviewers and review frequency
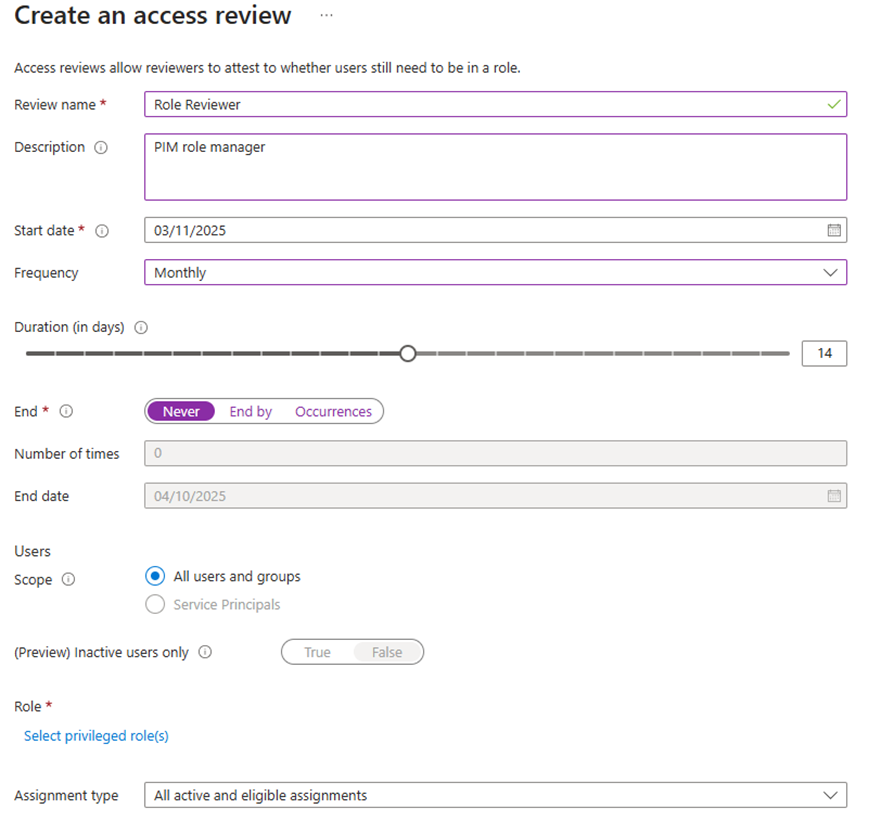
- Enable automatic removal for users who fail reviews
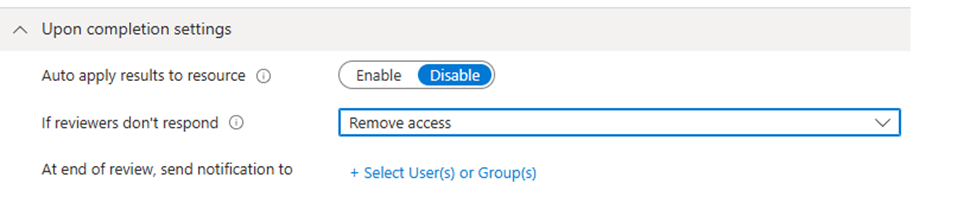
Access reviews ensure privileged access remains aligned with business needs.
Real-World Azure PIM Example
During a recent Microsoft 365 security review, I discovered nine users with permanent Global Administrator access. When I discussed the configuration with the IT team, they explained that elevated permissions were granted temporarily for troubleshooting and administrative tasks but were never removed.
After implementing Microsoft Entra Privileged Identity Management:
- All permanent Global Administrator assignments were removed.
- Users were converted to Eligible assignments.
- MFA was required during activation.
- Approval was required for Global Administrator requests.
- Access Reviews were scheduled quarterly.
The result was a significant reduction in standing privileged access while still allowing administrators to perform their daily responsibilities efficiently.
Conclusion
Whether you call it Azure PIM, Microsoft PIM, or Privileged Identity Management, the goal is the same:
protect critical resources by tightly controlling privileged access.
By implementing just-in-time access, approval workflows, and regular access reviews, organizations can dramatically reduce security risks—without slowing down IT operations.
FAQs
What is Azure PIM?
Azure Privileged Identity Management (PIM) is a Microsoft Entra ID feature that enables Just-in-Time access to privileged roles and resources.
What is Just-in-Time access in PIM?
Just-in-Time access allows administrators to activate privileged roles only when needed and only for a limited duration.
Does Azure PIM require MFA?
Yes. Organizations can require Multi-Factor Authentication during role activation.
Can Azure PIM manage Global Administrators?
Yes. Global Administrator is one of the most common roles managed using Microsoft Entra PIM.
What is the difference between eligible and active assignments?
Eligible assignments require activation before use, while active assignments provide continuous access.
Can Azure PIM approve requests automatically?
Approval workflows can be configured, but approval is generally provided by designated approvers.
Can access reviews be automated?
Yes, PIM supports scheduled and automated access reviews.
Do all users need an Entra ID P2 license?
No—only administrators who use Privileged Identity Management.
Related Links:
- Endpoint Privilege Management (EPM) for Intune Managed Devices
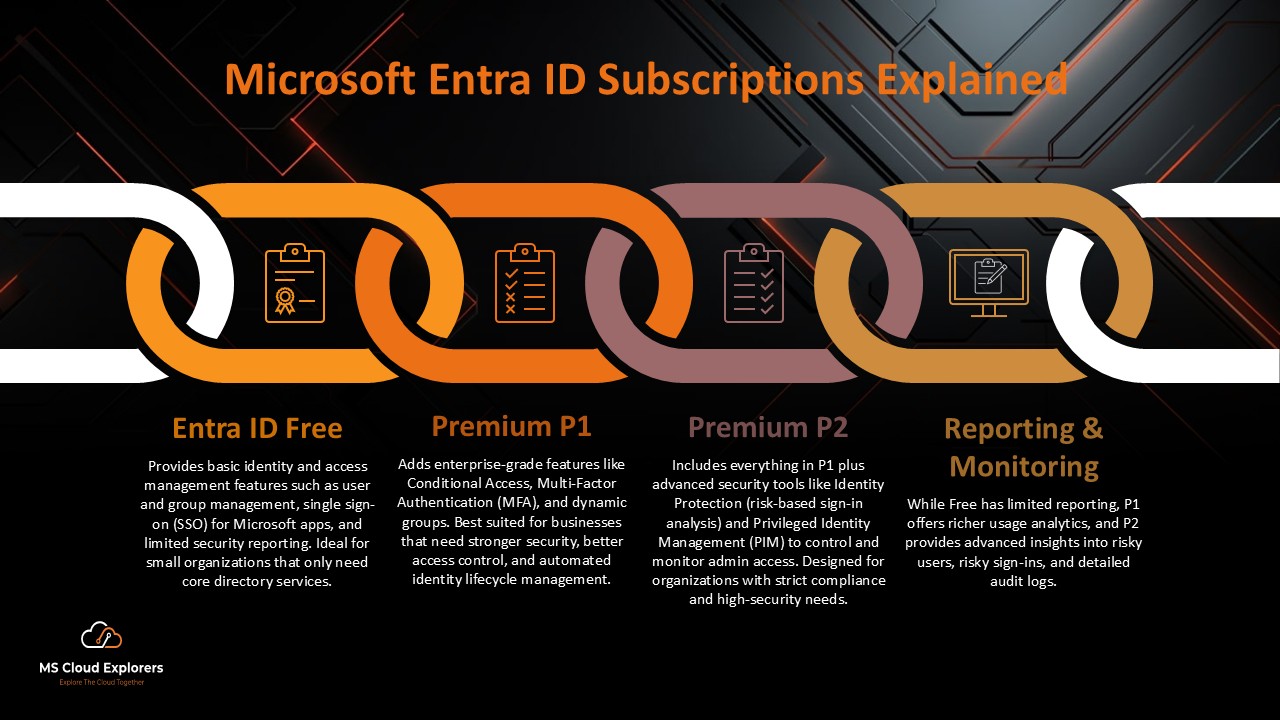
- Microsoft Entra ID Subscriptions (Free, Premium P1 and Premium P2)
- Microsoft 365 Tenant Zero Trust Security Assessment Guide
- Microsoft Entra ID Identity Protection: A Complete Guide to Securing Your Environment
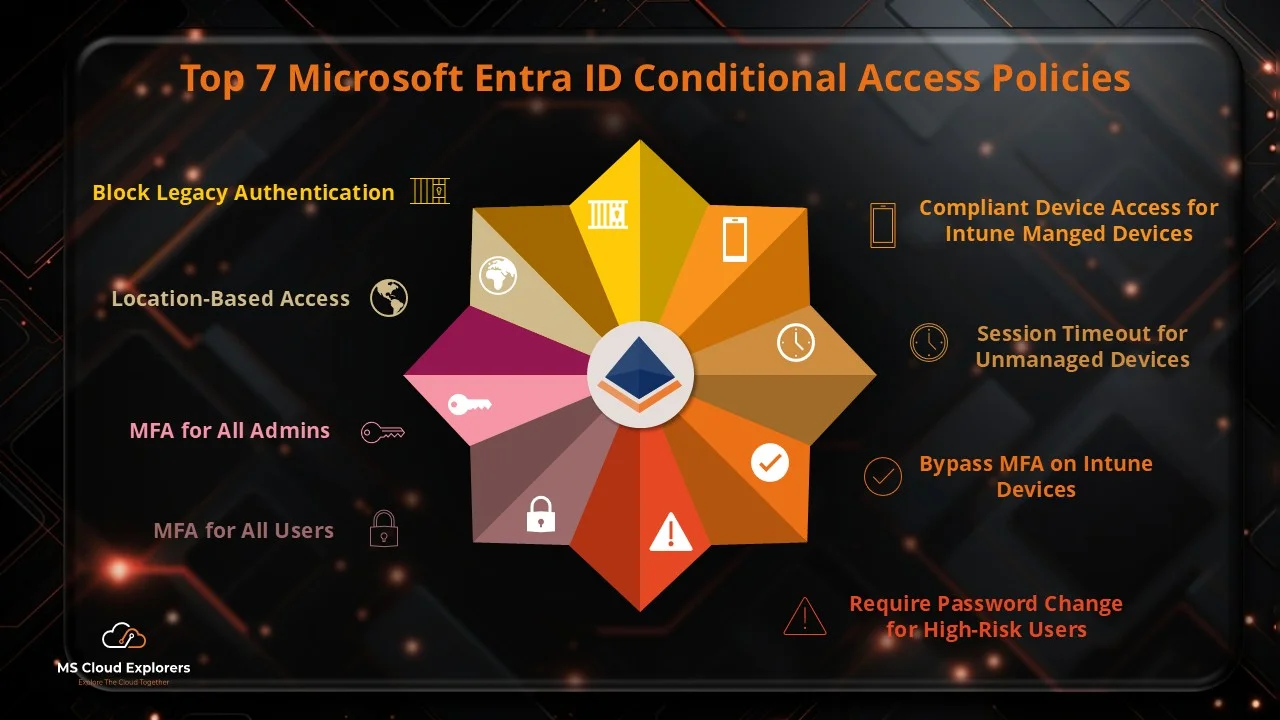
- Top 7 Conditional Access Policies Every Organization Should Implement
- A Complete Guide to Privileged Identity Management in Azure AD (PIM)
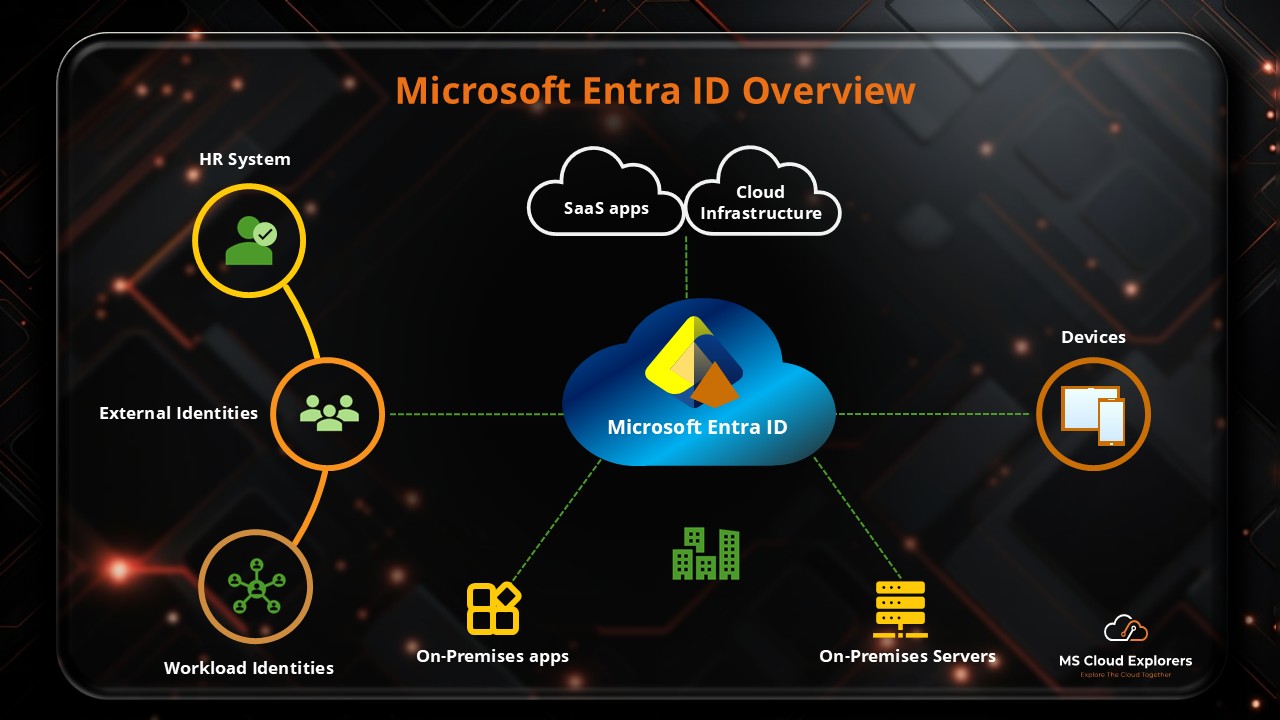
- Microsoft Entra ID: The Gateway to Microsoft’s Identity and Access Management
- Microsoft Defender for Identity: Modern Threat Detection and Identity Protection
- How to Send Encrypted Email in Outlook: A Step-by-Step Guide
- Microsoft Intune Setup Step by Step: A Complete Guide for Admins
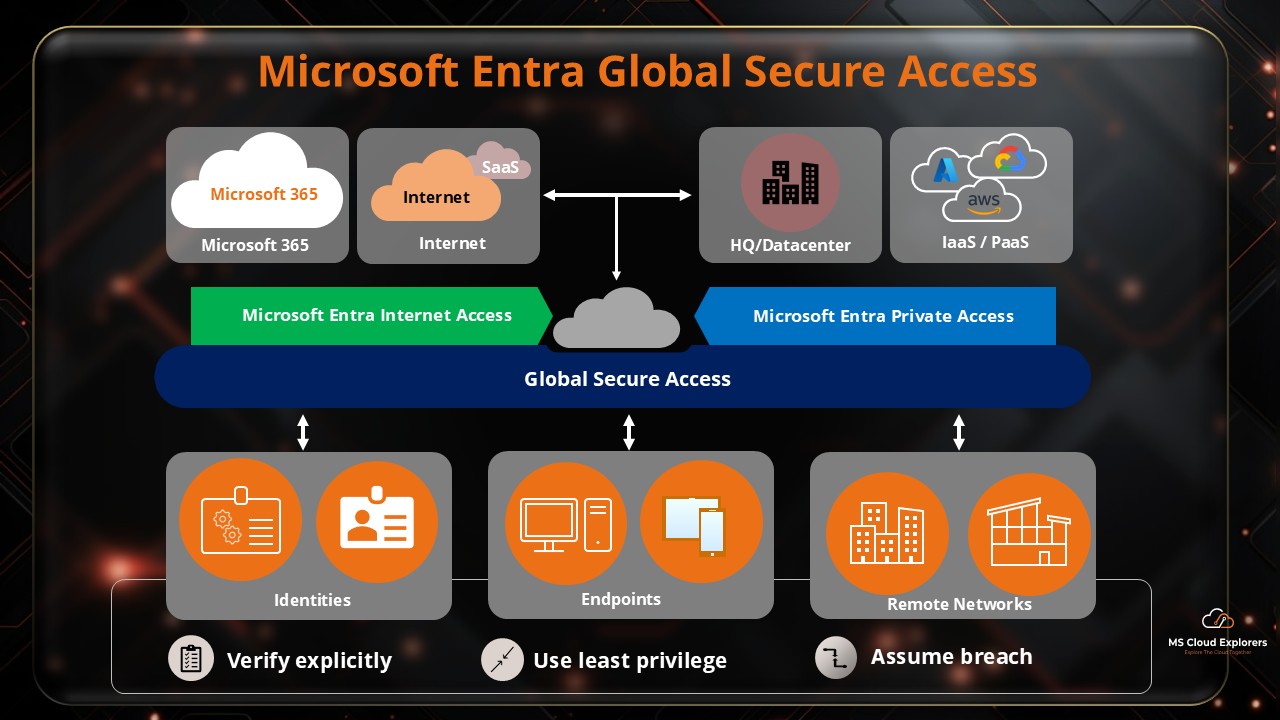
- Microsoft Global Secure Access Explained
Microsoft References and Further Reading
- Microsoft Entra Privileged Identity Management Documentation
- Microsoft Entra ID Governance Licensing Guide
- Microsoft Access Reviews Documentation
- Microsoft Entra Roles and Permissions
- Microsoft Security Best Practices for Administrator Accounts
Enjoyed the article?
We’d love to hear your thoughts—share your comments below!
For more insights, guides, and updates from the Microsoft ecosystem, be sure to subscribe to our newsletter and follow us on LinkedIn. Stay connected and never miss out on the latest tips and news!
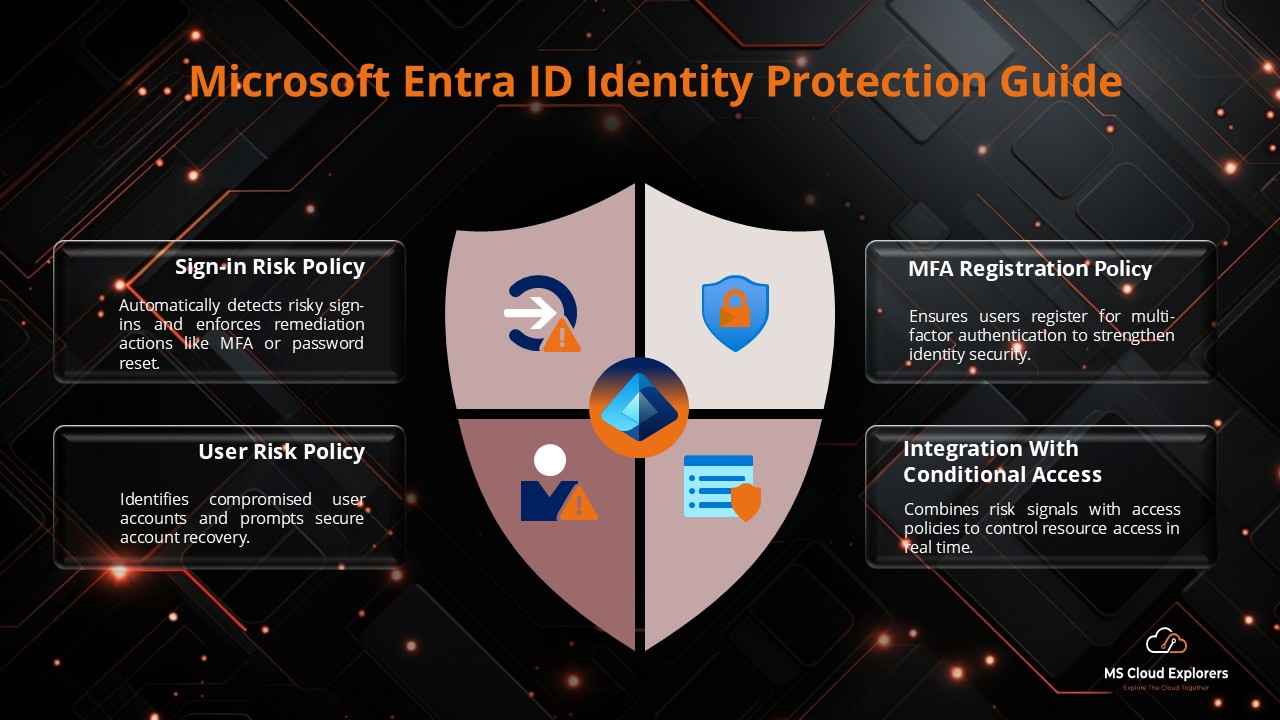
I’m not that much of a online reader to be honest but your sites really nice, keep
it up! I’ll go ahead and bookmark your site to come
back down the road. All the best
Thank you so much for the kind words—it really means a lot! 😊
We know there’s a lot out there online, so we truly appreciate you taking the time to check out our site and even bookmarking it. We’ll keep working hard to bring helpful, easy-to-digest content your way. See you again soon, and all the best to you too!
This guide is gold! I’ve been looking for a simplified explanation of PIM for ages. The just-in-time access concept makes so much sense now. Quick question—can we set up approval workflows for certain roles in PIM?
Yes, absolutely—you can configure approval workflows for eligible role assignments in PIM. This adds an extra layer of security by requiring designated approvers before access is granted.