
Windows Devices Enrollment in Microsoft Intune simplifies device management by enabling organizations to securely configure, manage, and protect Windows devices across their workforce. With options for automatic, manual, or bulk enrollment, Intune ensures compliance with organizational policies while providing a seamless experience for users. Whether managing corporate-owned or bring-your-own devices, Intune helps maintain productivity and security in one unified platform.
Prerequisites for Intune Enrollment
- Licensing Requirements: Ensure users have appropriate Microsoft 365 or Enterprise Mobility + Security (EMS) licenses.
- License Examples with Intune Included: Microsoft 365 Business Premium, Microsoft 365 E3, Microsoft 365 E5,
- Device Compatibility: Verify that devices meet the requirements for Windows 10 or later.
Device Requirements
- Supported Operating Systems:
-
- Windows 10:
- Version 1607 or later for most management scenarios.
- Pro, Enterprise, or Education editions.
- Windows 11:
- All editions are supported, but Pro, Enterprise, and Education editions offer more comprehensive management features.
- Windows 10:
- Hardware Requirements:
-
- Devices must meet the minimum hardware requirements for the supported Windows versions.
- A TPM (Trusted Platform Module) 2.0 chip is recommended for advanced security features like BitLocker management.
- Administrative Privileges:
- A local administrator account may be required to initiate enrollment on the device.
Configuring the Intune Environment
- Set Up Tenant Settings: Log in to the Microsoft Endpoint Manager admin center and configure your tenant.
- Enable MDM Authority: Grant Intune authority to manage mobile devices.
Enrollment Methods
Automatic Enrollment for Windows Devices
Automatic enrollment simplifies the process for Azure AD-joined or hybrid devices.
- Configuring Azure AD Join: Link devices to Azure Active Directory.
- Enabling Auto-enrollment: Set up policies in the Intune admin center to enable automatic enrollment for users.
Manual Enrollment Using the Windows Settings option
Manual enrollment is suitable for scenarios where automatic options aren’t feasible.
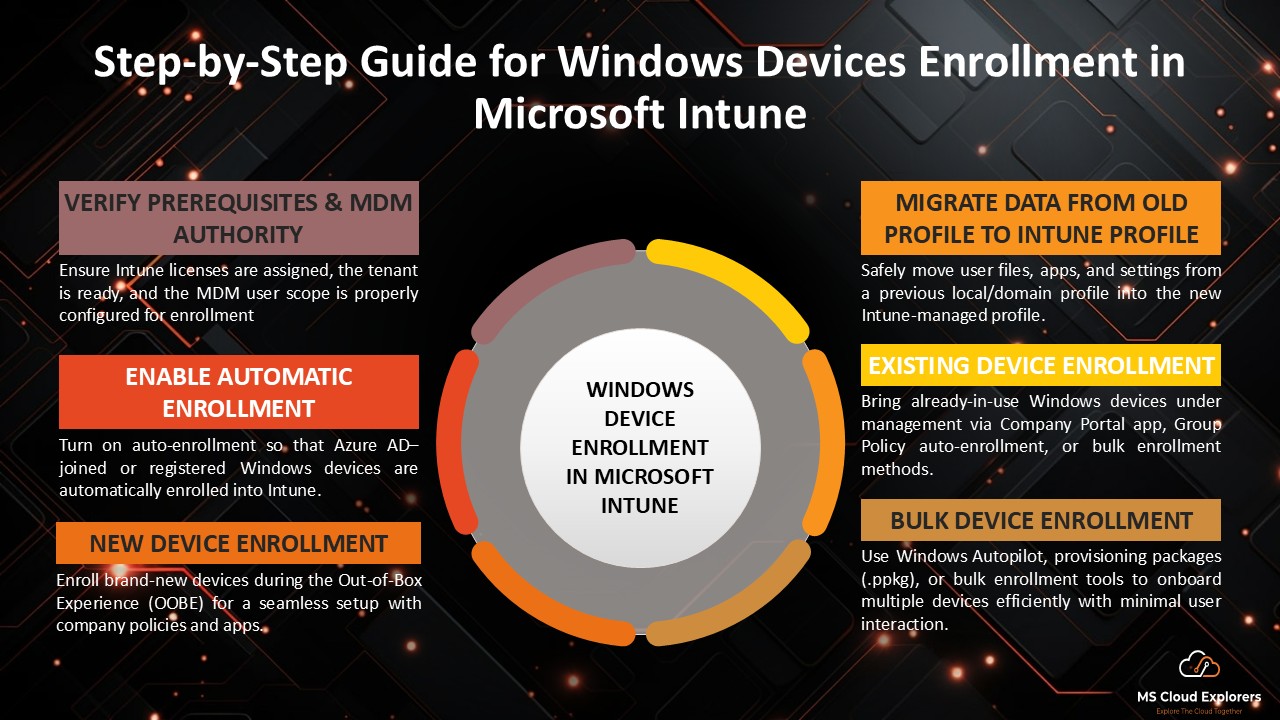
- Check the User account that you have currently logged in. Open the Windows Settings > Accounts > Your Info.
Manually enroll device in Intune to ensure the user has administrative rights and the username is not the same as the target username that will be used to enroll the device later in this guide. If it has the same username and is an Online account, it must be converted to a Local Account first and then proceed with the enrollment.
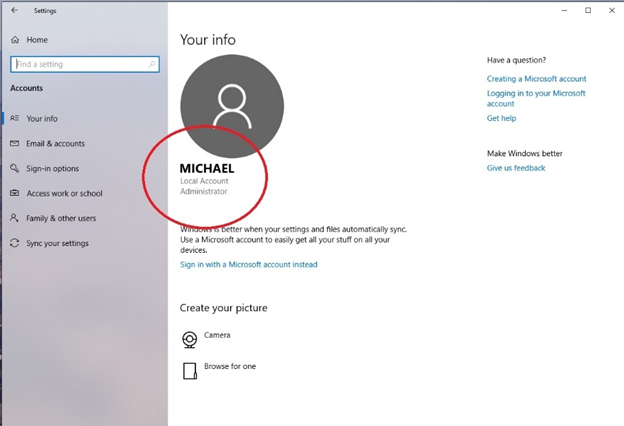
- Check if the Device has Windows 10/11 Pro Edition. Settings > System > About.
To enroll your device in Intune, please ensure it runs Windows Pro or Enterprise Edition.
Disclaimer:- If you have any crucial files on your computer, you can manually backup those files to your work OneDrive. However, we will migrate your entire data from your current profile to the new work profile using the steps shown later in this guide. The data will be migrated from the Desktop, Downloads, Documents, folders, etc.
Steps for Windows devices enrollment in Intune: –
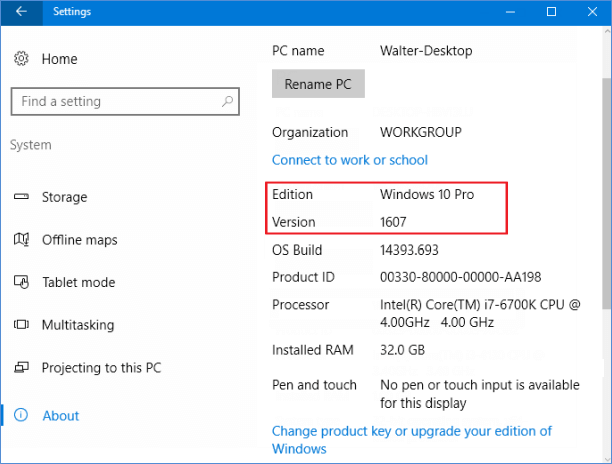
- Open the Settings on your Windows 10/11 device and click ‘Accounts‘.
- On the left side, click ‘Access work or school’ and click on Connect.
N.B – If the device already has the target user account connected, you must click on it and ‘Disconnect’ before proceeding to the next step
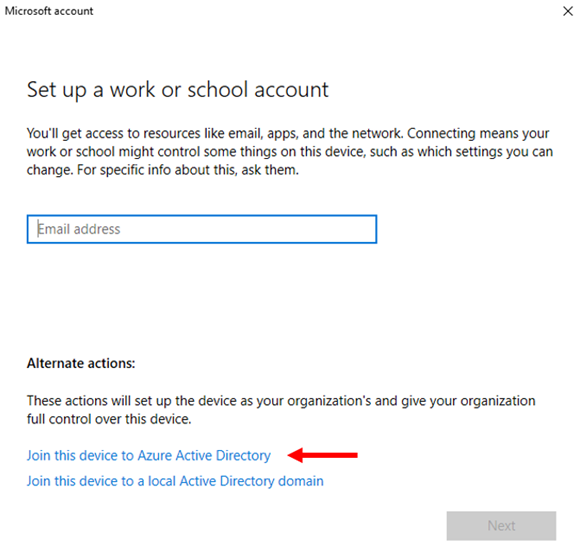
- After Clicking on the Connect You should see below windows. Select the below option Join this device to Azure Active Directory
Sign in with your work account in the following sign-in window.
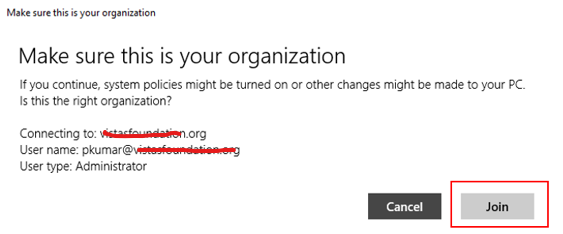
- It will give you a prompt to ensure that you are joining the right Organizational tenant. Click on the Join button after verifying.
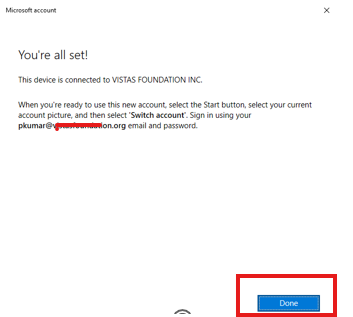
- After registration, you will get the window below. Click on Done.
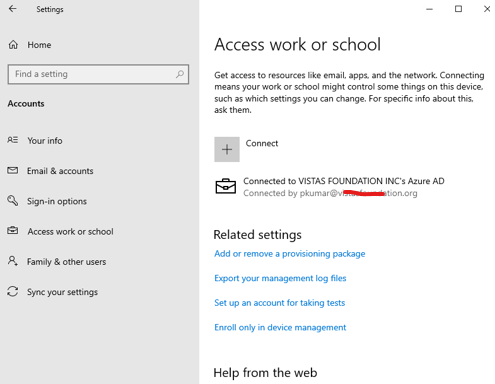
- After the successful joining, you can see your profile under the Access work or school.

It’s time to sign out from your current profile and log in with the new work account we just created.
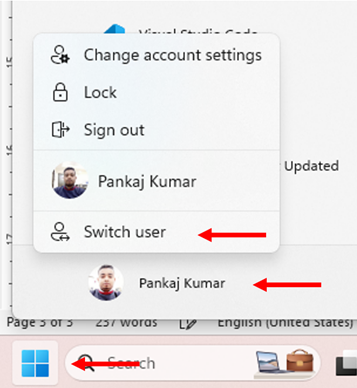
- Click on the Start Menu (Windows Key) on your Desktop, click on the Profile options, and click ‘Switch User’.
- You will be redirected to the Windows lock screen. Click on the ‘Other user’ at the bottom left of the screen.
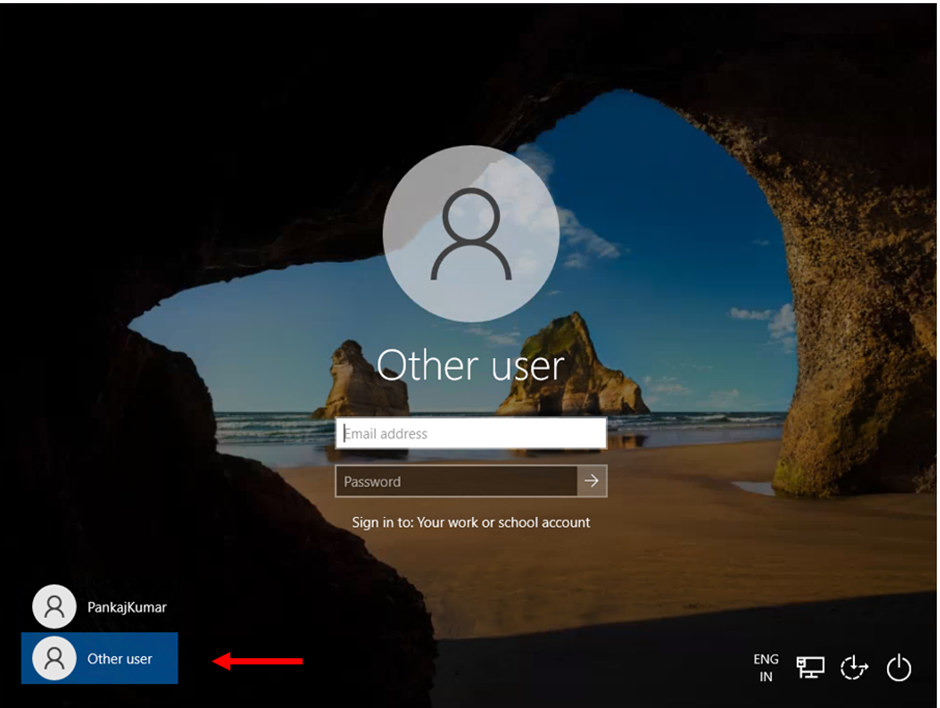
- Sign in using the Work credentials that we just used to enroll the device.
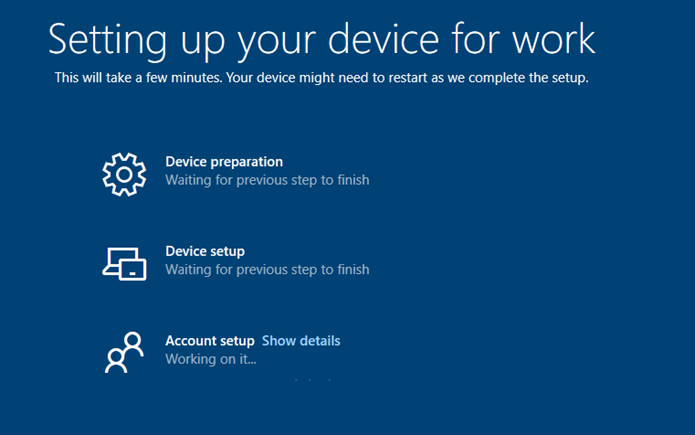
- It will then show you the enrollment status page and it will take some time to create the new profile and register the policies.
At the end of the previous step, you will be able to log in to your new work account. But the data from your old user profile has not migrated yet. To do this, follow the steps below. You can choose to skip this step if you are not interested in bringing any of the data from the old profile or if you have manually backed up everything through the One Drive.
Migrating your old user account to the new Azure work account
Note:- This action will disable your old account and prevent you from logging in to it. Additionally, you will not be able to restore it. Instead, all the data will be moved to the new one.
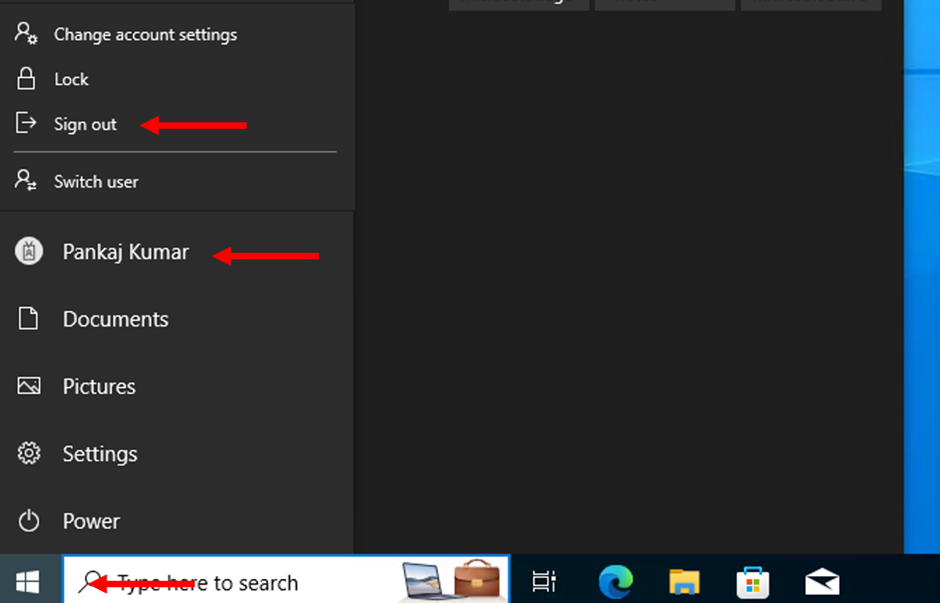
- Switch back to the old User Account from your new Work Account. Click on the Start Menu (Windows Key) on your Desktop, click on the Profile options, and click ‘Sign Out’.
You will be redirected to the Windows lock screen. Click on the ‘Other user’ at the bottom left of the screen.
Sign in using the old user credentials that you usually sign in.
After logging in to the old user account, download the software below. https://www.forensit.com/Downloads/Profwiz.msi. Open any web browser and paste the direct download link.
- Double-click on the downloaded setup file and run the setup on your computer.
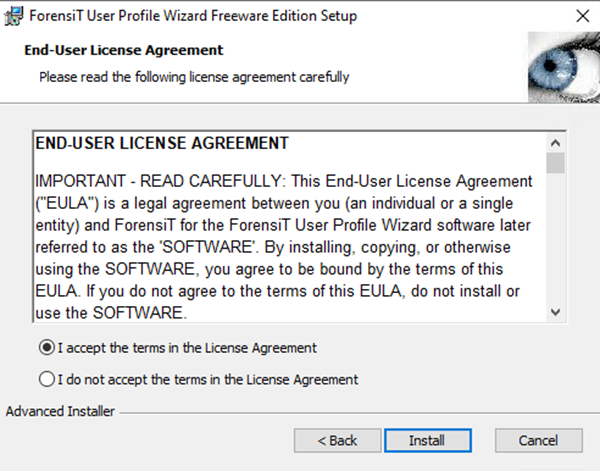
- Accept the terms and conditions and click Install.
- Check the box ‘Launch User Profile Wizard Freeware Edition’ in the final installation step. Then click on Finish.
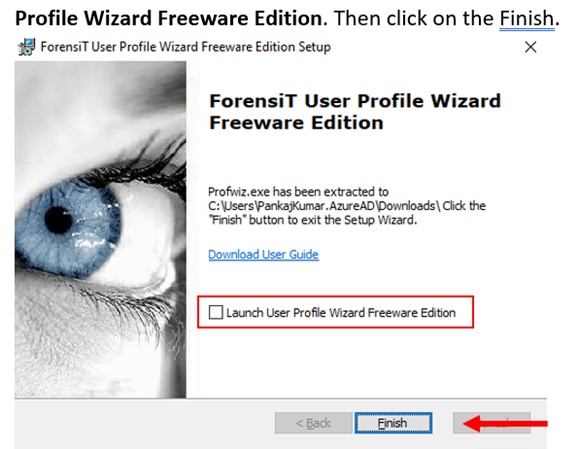
Note:- If you do not check the box, it will not run.
Launching the application may ask to grant Administrative Privileges. Please Allow it.

- Select the old account in the ‘Select a User Profile’ page.
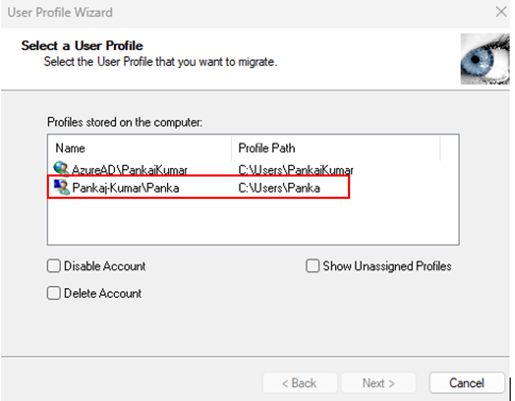
For example, refer to the screenshot above and select the required local user account. Note:- The local user account will never start with ‘AzureAD\…’ . So please choose the other one if you are confused.
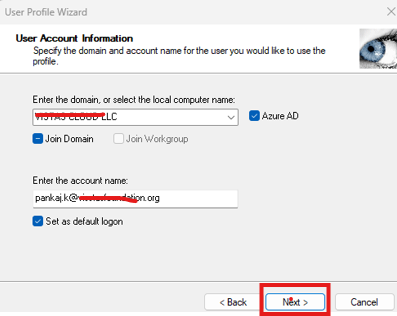
- In the next step, your work organization name will be automatically displayed under the Local computer name.
Enter your work email address that we used to enroll the device in the ‘Enter the account name’ field, and then click on Next.
- This step will migrate your data from the old profile to the new profile. It will be taking a few minutes, depending on the profile data size and installed apps.
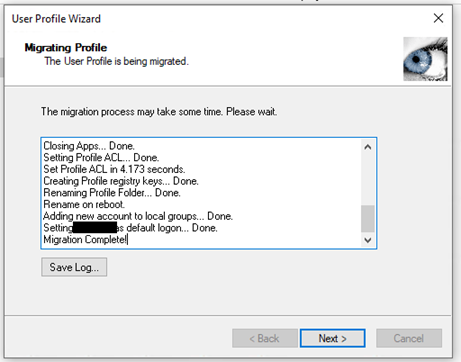
- Once the user profile migration is complete, please reboot your PC and log in with the work account using the new user credentials.
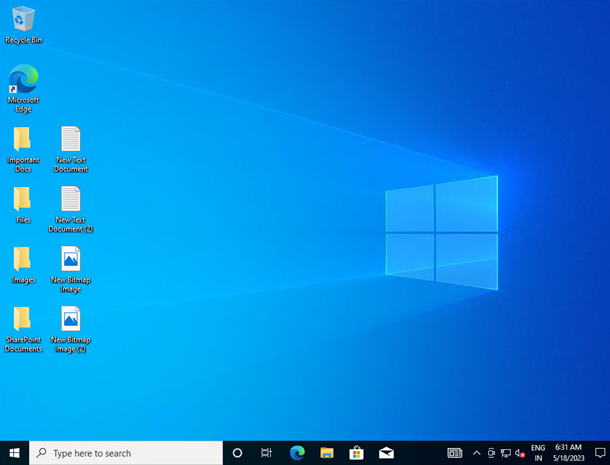
- After signing in, you can view all your old files and folders in the new Work account.
Enrollment Using Group Policy
Organizations with on-premises infrastructure can leverage Group Policy for enrollment.
- Configuring Group Policy: Use the ADMX templates for Intune enrollment.
- Best Practices: Ensure consistent policy updates to avoid conflicts.
- Check out the complete blog on office365concepts – Enroll Hybrid AzureAD devices.
Enrollment via Windows Autopilot
Windows Autopilot is perfect for new device provisioning.
- Overview: Automates out-of-the-box device setup and enrollment.
- Setting Up Profiles: Configure deployment profiles to predefine device settings.
Check out our complete step by step guide on how to enroll device by Windows Autopilot
Bulk Windows Devices Enrollment for Large Organizations
Bulk enrollment streamlines device setup for enterprises.
Create a Provisioning package
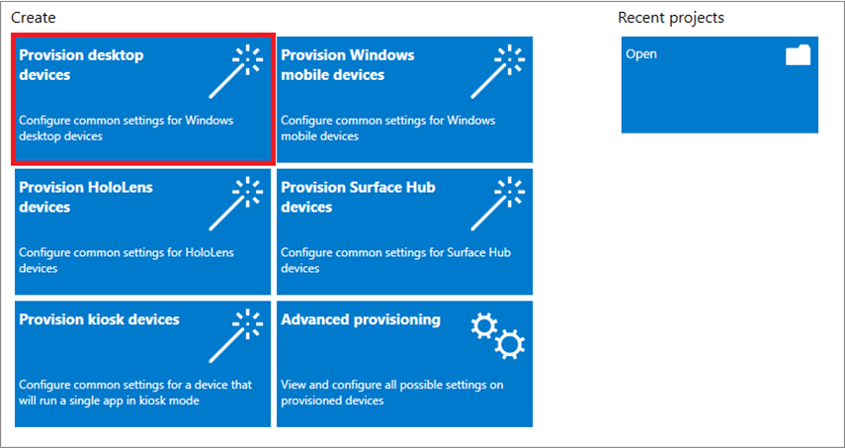
- Open the Microsoft Store and install Windows Configuration Designer (WCD).
- In the Windows Configuration Designer application, select Provision desktop devices.
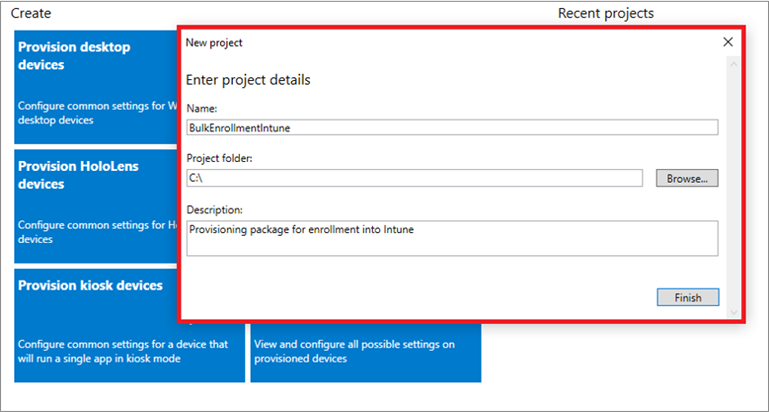
- The following details are entered in a new project window that opens:
- Name: Give your project a name;
- Project folder: Save the project’s location;
- Description: An optional project description
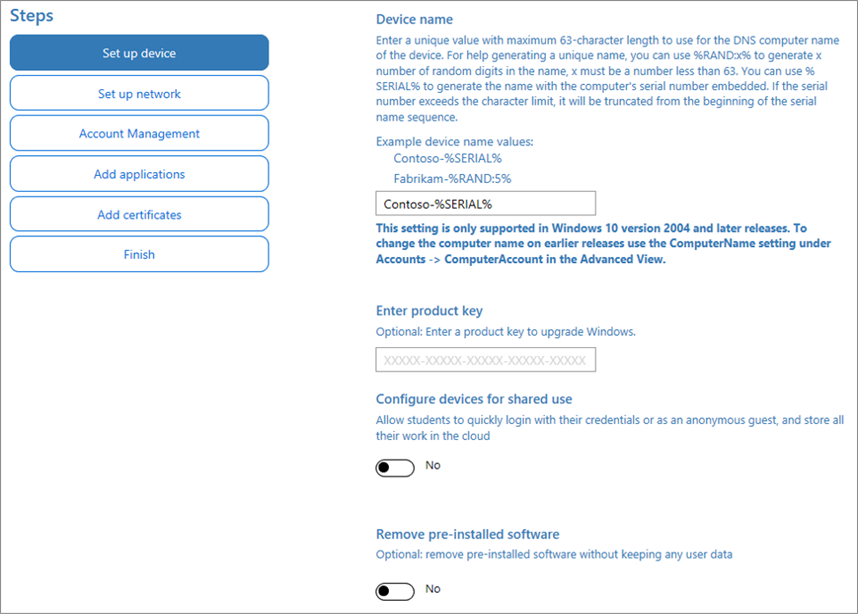
- Give each of your devices a unique name. A random string of letters or a serial number (%SERIAL%) can be included in names. You have the option to delete pre-installed software, set up the device for shared use, and enter a product key if you are updating the version of Windows.
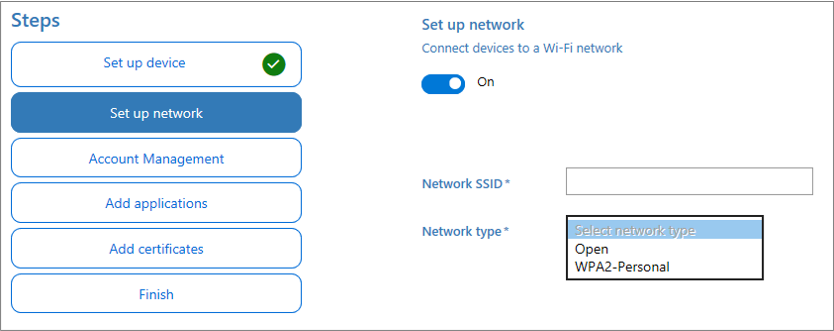
- You have the option to set up which Wi-Fi network devices connect to when they initially boot up. If the network devices aren’t setup, a wired network connection is required when the device is first launched.
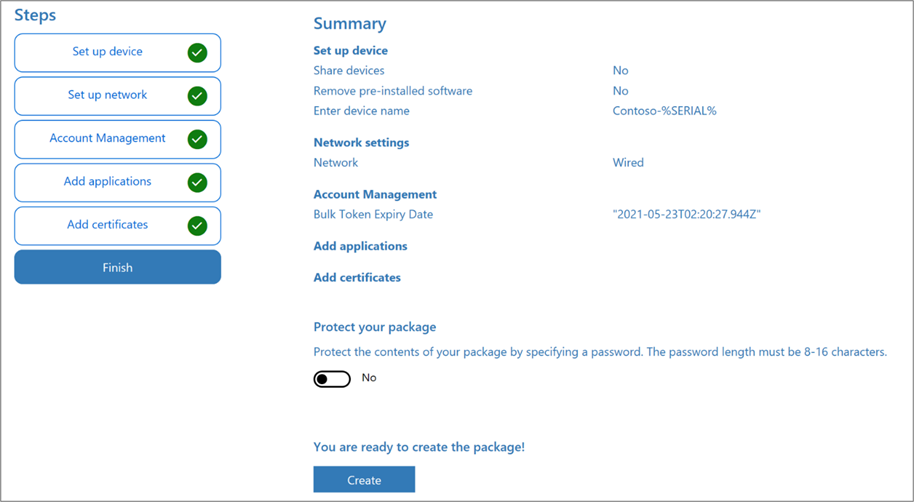
- Click Azure AD Enroll, type in the Bulk Token Expiration Date, and then choose Get Bulk Token. The token has a 180-day validity duration.
- Note: Once a provisioning package is generated, it can be withdrawn before its expiration by deleting the related package_{GUID} user account from Microsoft Entra ID.
- To obtain a bulk token, enter your Microsoft Entra login information.

Note:
- Note:
- The Microsoft Entra ID’s MDM user scope needs to include the account you use to request the bulk token. Bulk enrollment will fail if you remove this account from a group that is associated with the MDM user scope.
- Federated user accounts that are set up for staged rollouts are not able to retrieve bulk tokens.
- In the Stay logged in to all your apps screen, click No, sign in to this app only. Your organization will take control of the device you are using if you leave the check box checked and click OK. Make sure to choose “No” and log in to this app exclusively if you do not want your device to be managed.
- After the Bulk Token has been successfully fetched, click Next.
- You can include apps and certificates. The device has these apps and certificates installed.
- Optional, You have the option to password-protect your provisioning package. Click Create.
Provision devices
Provision devices
- Open the provisioning package at the address given in the app’s Project folder.
- Decide how the provisioning package will be applied to the device. One of the following methods can be used to apply a provisioning package to a device:
- To apply it during initial setup, put the provisioning package on a USB drive, then insert the USB drive into the device you wish to bulk enroll.
- Place the provisioning package on a network folder, then apply it after initial setup
- See Apply a provisioning package for detailed instructions on how to apply a provisioning package.
- Within a few minute of applying the package, the device will restart itself.
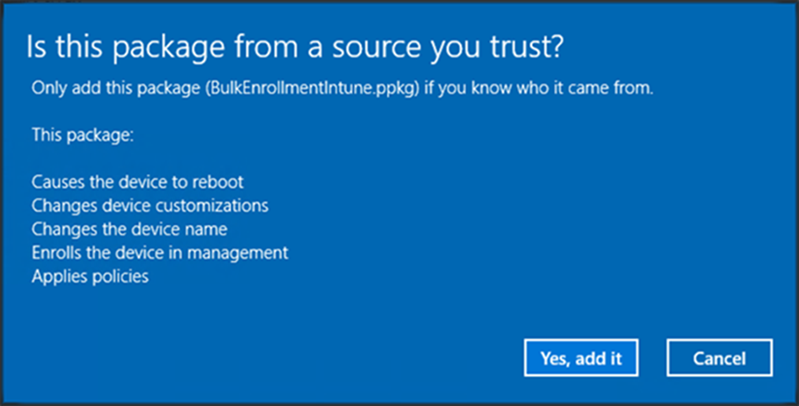
- Restart the device and it should connected to the Microsoft Entra ID and enroll in Microsoft Intune.
Check out the status in Entra ID and Intune admin Portal.

Advanced Tips and Best Practices
- Using Conditional Access for Security
Leverage conditional access to enhance security.
- Policy Configuration: Restrict access to resources based on compliance.
- Granular Controls: Block or allow access depending on device health.
- Regular Audits and Updates
Keep policies and devices up to date to avoid vulnerabilities.
Conclusion and Recommendations
Proactively enrolling and managing devices in Intune ensures a secure and efficient IT environment. By following best practices and leveraging Intune’s features, organizations can maintain compliance and productivity.
FAQs
What is the easiest way to enroll devices in Intune?
Automatic enrollment through Azure AD is the simplest method.
How do I ensure my devices remain compliant?
Use Intune’s compliance policies and regular audits.
Can I use Intune for non-Windows devices?
Yes, Intune supports macOS, iOS, Android, and more.
What are the limitations of Intune enrollment?
Intune relies on internet connectivity and licensing requirements.
Is there a cost associated with Intune enrollment?
Intune requires a subscription, either standalone or as part of Microsoft 365 or EMS
Related URL:-
- Deploy Effortlessly Microsoft Store App with Microsoft Intune
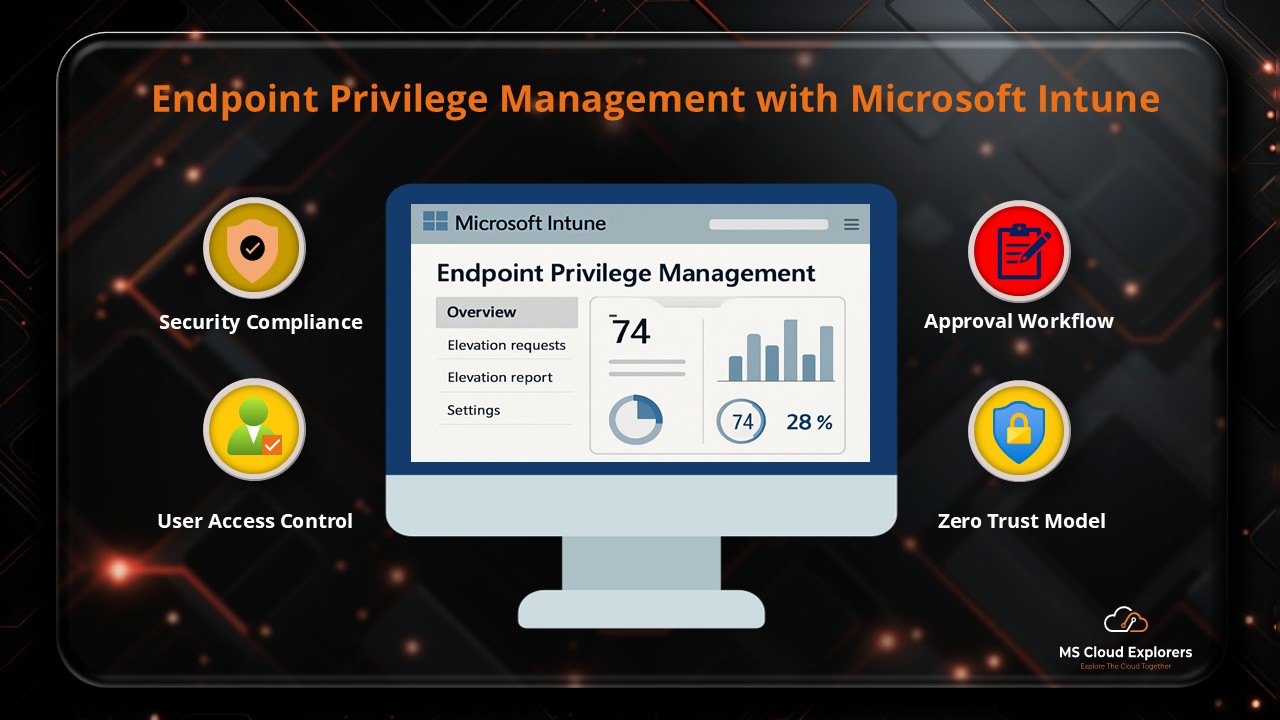
- Mastering Endpoint Privilege Management (EPM) in Microsoft Intune
- Deploy Microsoft Intune Policies from Pre-Build Templates
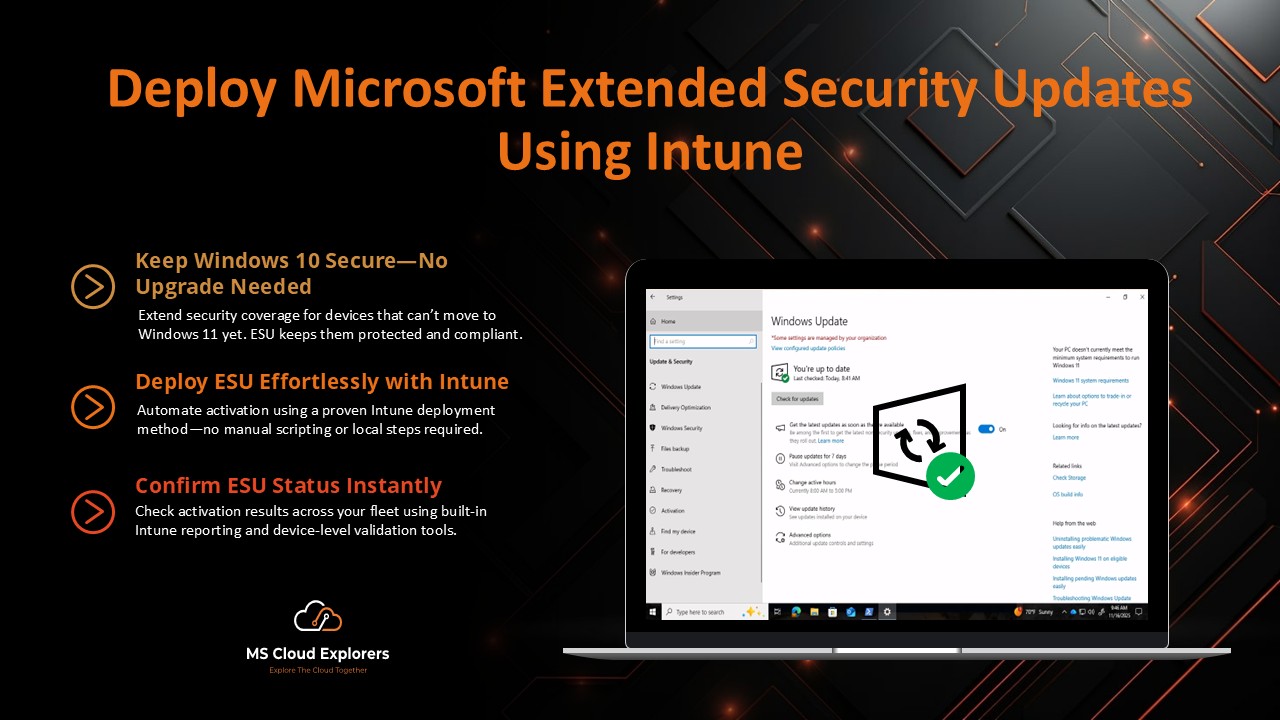
- Manage Your Windows 10 Updates with Extended Security Updates ESU using Intune
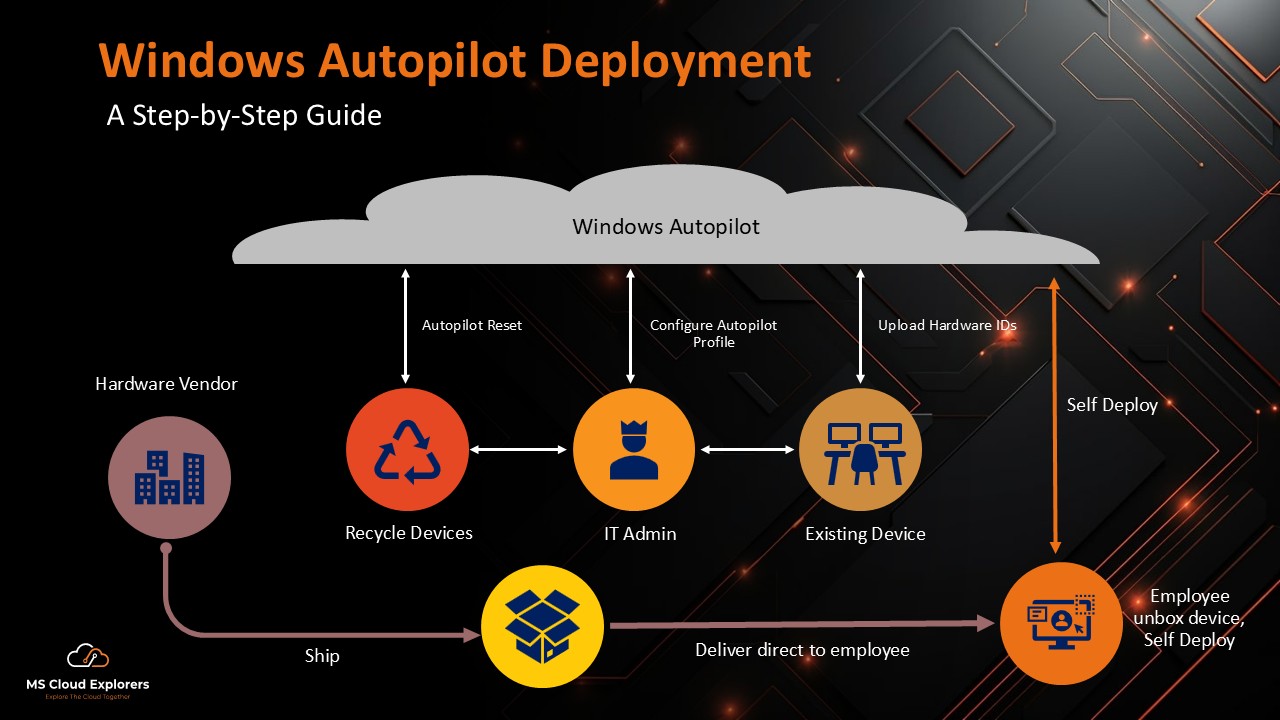
- Windows Autopilot Deployment: A Step-by-Step Guide

this is really great blog on Intune enrollment, and good part is moving one profile to another.
Thanks
Thanks for the positive feedback. there are more blogs that you may like them and don’t forget to follow us on LinkedIn for regular update.
Great walkthrough! I’m just starting with Intune and was a bit confused about the difference between Autopilot and manual enrollment. This article cleared things up. Do you recommend Autopilot for small businesses too?
Yes, we absolutely recommend using Windows Autopilot even for small businesses—it streamlines deployment, ensures standardization, and saves time when onboarding new devices. It might take a little setup at first, but the long-term benefits are worth it. Check out my another blog on Windows Autopilot – https://mscloudexplorers.com/windows-autopilot-deployment-guide/
Keep on writing, great job!